![]() Accounts Payable: Invoices
Accounts Payable: Invoices
Trade, Subcontractor, and Retention Payment Invoices are entered and edited through this menu option.
Trade Invoice amounts may be divided and charged to as many cost codes or other accounts desired. If payments have been made manually before the invoice was entered, they are entered through this program and specified as having been prepaid Paid.
Subcontract Invoices are entered and edited through this option. Billing and Payment history are displayed at the time of entry. Discounts, Retainage, Backcharges, and amounts due can all be entered on each invoice.
Retention Payment Invoices allows the user to create a live payable invoice from retainage amounts withheld on prior subcontractor invoices.
Credit Entries are entered and edited through this option. For more information, see Credit Entries.
This screen is accessed through Invoices on the Accounts Payable Menu.
Batch Information
Each person who is entering data is assigned their own file or Batch. The Invoices included in each Batch are listed to the right. All Batches are listed. See Batch Management
Change Dates in Tagged Batches (button)
see Change Dates in Tagged Batches
Proof List Tagged Batches (button)
Press the Proof List Tagged Batches button and the Invoice Proof Listing screen comes into view.
Post Tagged Batches (button)
Invoices included in Batch
see Invoices included in Batch
Import (button)
When the Export button is pressed, the following screen comes into view.

This option allows the user to save the invoices in any Batch as a text file. Enter the desired filename in the space or press the lookup button and browse for the desired file. If the Preview the text file before closing check box is selected, the text file will be opened when the Proceed button is pressed. Press the Proceed button when the file name is entered or selected and the accounting system will save the Invoices in .txt format.
# (button)
Click the # button to edit invoices in the Batch by invoice number.
Add or Change (button)
See Add or Change an Invoice.
Press the Delete button and the following screen comes into view. Press the Yes button and the highlighted record will be deleted and the previous screen will come into view. If the No button is pressed, the program returns to the previous screen.

This button closes the program and returns to the main screen.
"This Batch is in Use by another user" message
This message will come into view anytime there is someone in the Batch or the accounting system is shut down improperly.

If this message occurs and there is someone in the Batch, press the Cancel button.
If this message occurs and there is no one in the Batch, press the Proceed button and it will override this message and allow access to the Batch.
Change Dates in Tagged Batches (button)
At times, it becomes necessary to change the dates of unposted invoices within a Batch. This is usually the case when it is a repeating Batch and the invoices contained in the Batch need to be posted to a new month. The Change Dates in Tagged Batches button effects a global date change on all invoices or selected invoices within the tagged Batch(es). Press the Change Dates in Tagged Batches button and the following screen comes into view.

This selection field may be used to change invoices for a single vendor or for a range of vendors. Leave the box unchecked to change all vendors. Otherwise, check the Select Vendor box and the From and To fields will be activated. The number of the first and last vendor desired should be entered. If information is desired for only one vendor, that vendor number should be entered in both the From and the To fields.
Select Vendors (check box)
Activates the ranges defined on the next lines. This option may be used to change a range of vendors or change only one vendor.
From
Enter the vendor number or press the lookup button and the Vendors screen comes into view. Highlight the desired vendor and press the Select button. The previous screen will come into view.
To
Enter the vendor number or press the lookup button and the Vendors screen comes into view. Highlight the desired vendor and press the Select button. The previous screen will come into view.
Select Dates (check box)
This selection field may be used to change dates for all invoices or for a range of invoices limited by their invoice date. Leave this box unchecked to include all invoices. Otherwise, check the Select Dates box and the From and To fields will be activated. The first and last invoice dates should be entered in the From and To fields. If information is desired for only one invoice date, that date should be entered in both the From and To fields.
From
Enter the first invoice date or press the lookup button and a Calendar will come into view. Highlight the desired date and press the OK button. The previous screen will come into view.
To
Enter the last invoice date or press the lookup button and a Calendar will come into view. Highlight the desired date and press the OK button. The previous screen will come into view.
The following two options are available.
Add a number of days to each invoice date (radio button)
This field will affect all the invoices in the selected Batch or Batches. Specify the Number of Days to Add. This will add the specified number of days to both the Invoice Date and the Due Date.
Change to a specific date
This field will affect all the invoices in the selected Batch or Batches. This will change all Invoice Dates to the specified date and recalculate the Due Date. Enter the date or press the lookup button and a Calendar will come into view. Highlight the desired date and press the OK button.
Add a number of months to each invoice date (radio button)
This field will affect all the invoices in the selected Batch or Batches. Specify the Number of Months to Add. This will add the specified number of months to both the Invoice Date and the Due Date.
Press the Post Tagged Batches button and the following screen comes into view.
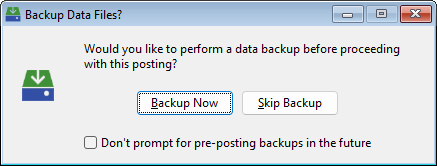
Backup Now
Click Backup Now button and the Utilities Backup/Restore screen will come into view.
Skip Backup
Click the Skip Backup button to skip the backup and continue to the next screen.
Don't prompt for pre-posting backups in the future
Check this box to turn this prompt off for future postings. To turn the prompt on again, see Setup: Preferences.

Invoices will be posted to the chosen fiscal period. The fiscal period is listed after the lookup button. The Default fiscal period will be the last period used by the posting program. To change the Fiscal Period, enter the correct fiscal period or press the lookup button and the Fiscal Period Maintenance screen comes into view. Highlight the desired fiscal period and press the Select button. When the displayed fiscal period is correct, press the Post button.
Press the Preview button to view a preview of the posting.
The system will then post the invoices in the tagged Batches. Two Reports will print:
1. The Payables Posted Invoice Journal.
2. The General Ledger Summaries of Payable Posting Report.
After the posting process is finished and all reports have been printed, the following screen will come into view.

Finish (button)
Press the Finish button to make the posting permanent.
Undo (button)
Press the Undo button to return all accounting data to the conditions prior to posting.
Invoices Included in Highlighted Batch
This list box includes all invoices in the highlighted Batch.
Entering Invoices
The Add, Change, and Delete buttons under the Invoices Included in Batch heading are used for entering, changing and deleting invoices.
Add (button)
Press the Add button and the following screen comes into view with three choices.

Choose the desired invoice button. The Subcontract Invoice and Retention Payment Invoice screens will be the same screen that is accessed when the Change button is pressed. If Trade Invoice is selected, the following screen will come into view.

If the No button is pressed, the Trade Invoice Entry entry screen will come into view. This will be the same screen that is accessed when the Change button is pressed. If there is a Purchase Order associated with this Invoice, press the Yes button. See Trade Invoices for more information.
To Change an Invoice, highlight the desired entry and press the Change button. The highlighted Invoice will come into view.
Press the Delete button and the following screen comes into view. Press the Yes button and the highlighted record will be deleted. If the No button is pressed, the program returns to the previous screen.
Trade Invoices are entered and edited through this screen. Invoice amounts may be divided and charged to as many cost codes or other accounts desired. If payments have been made manually before the invoice was entered, they are entered through this program and specified as having been prepaid.
Press the Trade Invoice button on the Add menu or highlight the desired record and press the Change button.

Purchase Order Reconciliation (tab)
The Purchase Order Reconciliation Tab will replace the Line item Detail Tab, if, in the previous screen, it was declared that this invoice was associated with a purchase order.
Vendor ( # or name)
Specify the vendor. This may be done by entering the name or number of the vendor or by pressing the lookup button and the Vendors screen will come into view. Highlight the desired vendor and press the Select button. After the vendor is specified, the vendor name, phone and fax number and contact person will appear in the next fields.
Press the More button and the following screen comes into view. The More screen lists the vendor's address and phone number.

Click this button to immediately print an envelope or a mailing label for this address. See the Printing Envelopes and Labels help topic for more information.


Proof Reference #
A Record Number is automatically assigned in consecutive order to each invoice entered through this program. This number will automatically increase by one with each invoice entry.
Enter up to ten characters for the purchase order number. This is the number on the purchase order. If in the previous screen it was declared that there was a purchase order associated with this invoice, this will be first field available. An lookup button will be at the end of the this field. Enter the PO number or press the lookup button and the Enter Purchase Order screen will come into view. Highlight the desired PO number and press the Select button.
Note: If the Purchase Order selected is currently being reconciled by anther invoice, this warning message will come into view.

Inv. Number
Enter up to twenty characters for the Invoice Number. This is the number on the Vendor’s Invoice.
Default Job (optional)
Specify the job to which all line items will be charged. Enter the Job number or press the lookup button and the Job Setup screen will come into view. Highlight the desired job and press the Select button. This option is only available on Trade Invoices.
AP Account
If multiple Accounts Payable accounts are being utilized, specify the correct Accounts Payable account here. This field will automatically be filled with the defalt AP Account for the selected vendor.
Open (radio button)
Select this option of the Invoice is not pre-paid. This option is available on Trade Invoices and Subcontract Invoices.
Hold Payment (check box)
If the Invoice is marked as Open, the Hold Payment checkbox is available. Checking this box allows the user to enter a reason for why Payment is on Hold.
Paid by Handcheck / Debit Card (radio button)
Select this option if the Invoice is paid by a hand written check or a debit card that draws on a checking account. The system will ask for the date the Invoice was paid, the check number, and checking account from which the funds will be drawn. If this was paid using a debit card, the Check No. field can be filled with the word "Card" or some other string of characters instead of an actual check number. A Discount Date is not asked for when the invoice is already paid. See Entering Handchecks and Credit Card Purchases for more information. A Print Check button will also be available when this option is selected.
Print Check (button)
Press the Print Check button to print an Instant Check for this Invoice. When this button is pressed, the following screen will come into view.

Press Yes to print the check or No to cancel. Press the Yes button to generate the check. The following screen will come into view.

Select the number of copies to print or whether the system should generate an Alignment check.
If this is a Subcontract Invoice, the system will ask:

Indicate whether or not to include a Subcontract Summary on the check stub.
If the check is printed, the system will check the Vendor file associated with this Invoice and will notify the user if the Vendor requires a Co-Payee. If the Vendor does require a Co-Payee, the following screen will come into view.

Press No to print the check without selecting a Co-Payee. If the Yes button is pressed, the following screen comes into view.

Select a Co-Payee and press the OK to continue printing. For more information about printing, see Accounts Payable: Printing/Posting Checks.
Paid by Credit Card (radio button)
Select this option if the Invoice was pre-paid with a credit card. The system will ask for the date the Invoice was paid, the Pay Type, and the Credit Card Account number. If a Default Credit Card account has been set up in Vendor Entry, that account will be diplayed. If there is no Default Credit Card account in the Vendor file, the Default Credit Card account indicated in Batch Setup for this invoice batch will serve as the default credit card. If neither of these default credit card account settings have been set, the credit card account on the invoice will default to the first credit card account found in the list of GL Accounts. This option is available on Trade Invoices and Subcontract Invoices.
Description
Enter up to 30 characters for a description of this invoice.
Invoice Date
Enter six digits for the date of the invoice. Press the lookup button and a Calendar will come into view. Highlight the correct date and press the OK button.
Due Date
Enter six digits for the date the invoice is due or press the lookup button and a Calendar will come into view. Highlight the correct date and press the OK button.
When the Trade Invoice is opened, the Line Item Detail tab is selected by default.

This is the account number or Job Cost Code to which the line item has been charged. This list box shows all charges for the invoice to specific jobs or accounts. It is possible to assign a charge to multiple jobs and multiple accounts. To edit the line item detail, use the Add, Change and Delete buttons provided.
This is the amount to be charged to the cost code or account.
This is the amount of tax for the line item.
The total amount (with tax) of the line item is displayed in this field.
Add or Change an Invoice Detail
Press the Add or Change button on the Line Item Detail tab and the following screen comes into view.

Press the down arrow, and select the type. There are four types: General Ledger Account, Job, Equipment, and Inventory. The type selected will determine the next fields.
G/L Account
G/L Account
Enter the account number or press the lookup button, and the General Ledger Accounts screen comes into view. Highlight the correct account, and press the Select button. The previous screen comes into view.
Job
Job ID
Enter the job number or press the lookup button, and the Job Setup screen comes into view. Highlight the desired job number, and press the Select button.
Cost Code
Enter the cost code or press the lookup button, and the Budget Cost Code Lookup screen comes into view. The Cost Codes will be limited to the Job selected. Highlight the desired cost code, and press the Select button. By using the 10-key shortcuts ( 1=L, 2=M, 3=S, 4=A, 5=J, 6=G, 7=C, 8=D, 9=B, .=E), the user may type in 035003 and press Enter for the cost code 03500S. The system will translate the 3 as an S.
Change Order
If this line item is to be charged to a change order, enter the Change Order Number or click the lookup button, which will open a lookup window showing all change orders on the current job.
Equipment
Equipment ID
Press the lookup button, and the Equipment File Maintenance screen comes into view. Highlight the desired Equipment ID, and press the Select button.
Cost Category
Press the lookup button, and the Budgeted Cost Code Lookup screen comes into view. The cost categories will be limited to the Equipment entered. Highlight the desired Equipment ID, and press the Select button.
Inventory

Item ID
Press the lookup button, and the Item Price File screen comes into view. Highlight the desired item, and press the Select button.
Location ID
Press the lookup button, and the Locations screen comes into view. Highlight the desired location, and press the Select button.
Bin ID
Press the lookup button, and the Area Lookup Screen comes into view. Highlight the desired Area, and press the Select button.
Enter the quantity.
Enter the cost of each unit.
The amount of the total invoice to be charged to the cost code or account. When the Quantity and Unit Cost fields are entered the Amount field is automatically calculated. To manually enter the Amount, set the Quantity and Unit Cost fields to 0.
Subject to Sales Tax (check box)
Check this box if the amount in this line item is Taxable. Leave the box unchecked if the line item is not taxable. The amount of tax for each taxable line item will be calculated and displayed after the total tax is calculated.
Subject to Shipping (check box)
Check this box if the amount in this line item is subject to a Shipping charge. Leave the box unchecked if the line item is not. The amount of shipping for each subject line item will be calculated and displayed after the total shipping is calculated.
Sales Tax
Enter the total amount of tax on this invoice. The system will take the tax amount and apportion it to all the taxable line items.
![]() Calculate Sales Tax at ____%
Calculate Sales Tax at ____%
This icon will appear if the selected vendor has a sales tax percentage set up in their vendor record. Click the icon and sales tax will be calculated at the indicated rate and applied to the invoice. It will also be apportioned to the taxable line items.
Shipping
Enter the total amount of shipping on this invoice. The system will take the shipping amount and apportion it to all the line items that are subject to shipping charges.
Total Amount
The cost (with tax) of this line item will be displayed in this field.
Use Tax Code
Use the Lookup button to select a tax code from the list of Tax Codes. The system will use the Total Tax Rate from the selected tax code to accrue an amount into the "Use Tax Payable" GL Account defined in Accounts Payable Setup.
Description
This is the description of the line item. This is user defined.
Using this information, the invoice being entered can be tied to an existing purchase order. This serves two important purposes.
1. The Purchase Order is reconciled at the same time the invoice is being entered.
2. Prices charged on the invoice can be double checked against prices on the purchase order for discrepancies.
Press the Purchase Order tab and the following screen comes into view.

Description
This is a 30 character field used to describe or explain the line item.
Quantity Not Received
The number of units ordered but not received is listed here.
Received This Invoice
This is the number of units ordered and received on this invoice.
Unit Cost
This is the invoiced price per unit.
Ext. cost
The system displays the price of the total line item.
Reconciling Purchase Order Detail
To change the amount received on this invoice for any given purchase order line item, highlight the appropriate line item and press the Change button. The following screen will come into view.

Most of the fields are for information only and cannot be changed from this screen. To change the fields, see Enter Purchase Orders. The only fields that can be changed from this screen are Quantity, Unit Cost, and Total in the This Invoice column.
Note: If the purchase order is for an item distributed to Inventory, the following additional fields will appear:
Location: Select the Location where the items will be stored.
Area: Select the Area within the Location where the items will be physically stored.
This information is important for the Inventory Module to correctly display Inventory Status.
This Invoice
The only fields that can be changed are Quantity, Unit Cost, and Total Amount.
Quantity
Enter the number of units received.
Unit Cost
The Original Order unit price amount will be automatically inserted in this field. Enter the invoiced unit price.
Taxable (check box)
Indicate whether this line item is taxable.
Total
The total amount will be automatically calculated by multiplying the Quantity by the Unit Cost. This field enables the user to enter the total amount of the invoice without entering a unit cost and/ or quantity.
If the Unit Price Mismatch message comes into view, press the Yes button to accept the invoiced price. To reject the invoiced price and reenter a different price, press the No button. This message will come into view if one of the following two conditions occur:
1. If the Total Dollar Amount entered is less than the Order Price, the following warning will come into view:

2. If the Total Dollar Amount entered is more than the Order Price, the following warning will come into view:

3. If the Total Quantity entered is more than the Ordered Amount, the following warning will come into view:

Tax and Total Amount
These fields are automatically calculated when the Quantity and Unit Cost Fields are entered. This field cannot be changed manually.
Press the Discount tab and the following screen comes into view.

Not Discountable
This field is for any amounts contained on the invoice which are not discountable. The tax amount will be automatically included here.
Rate
This field will display the discount rate found in the vendor record. To change this percentage rate, enter the percentage in this field. Enter the discount rate and press the enter key. The system will automatically calculate the discount amount.
Amount
This field will display the discount amount. This amount is the total invoice amount multiplied by the percentage found in the Rate field. As a new amount is entered, it will be divided into the total invoice amount and the new discount percentage will appear in the Rate field.
Expires
This is the date the discount expires. Enter the date or press the lookup button and a Calendar will come into view. Highlight the desired date and press the Ok button.
Press the Attachments tabs and the following screen comes into view. This tab allows the user to attach outside files to the invoice. For example: a scanned copy of a letter received regarding the Invoice a can be attached.

See the Attachments topic for a full description of how attachments work.
The Notes tab allows the user to enter notes for the selected Invoice. For more information, see Adding or Changing Notes. When the Notes tab is selected, the following screen comes into view.

An unlimited number of Notes can be attached to any or all Invoices.
Add or Change (button)
See Adding or Changing a Note.
Print (button)
See Printing Notes.
Tax
Enter the total amount of tax. The system will then divide that total tax proportionately among the taxable line items and display each tax amount in the appropriate Tax field.
Distributed
The cost (with tax) of all line items will be combined and the total will be displayed in this field.
Disputed
If the total amount of the invoice received from the vendor is greater than the total displayed in the Total field, check the invoice for non-approved (disputed) amounts. For example: if five units were received but six units were invoiced, enter the cost of the one unit that was not received in this field as a non-approved amount.
Dispute Reason
Optionally, provide the reason for the dispute.
Total
The cost (with tax) of all line items will be combined and added to the totals for Distributed and Disputed. The total will be displayed in this field.
During Check Printing, Print a Separate Check for This Invoice (check box)
This option allows the user to set printing options for this Invoice before it is posted. By checking this box, this Invoice will print separate from other Invoices.
Print Line Item Detail on Check Stub (check box)
Check this box to include the Invoice's Line Item Details on the printed Check Stub.
Alternate Totals
If a GST (Goods & Service Tax) percentage was entered during Accounts Receivable Setup, the Invoice Totals section will be modified to look like the following:

Notice the addition of a user-definable GST amount and PST Province and amount. These taxes do not apply to United States companies; however, they are indispensable to Canadian companies. Enter the GST total and PST total from the invoice. Also, for accurate PST remittance, select the correct province from the pull-down list.
During Check Printing, Print a Separate Check for This Invoice (check box)
This option allows the user to set printing options for this Invoice before it is posted. By checking this box, this Invoice will print separate from other Invoices.
Print Line Item Detail on Check Stub (check box)
Check this box to include the Invoice's Line Item Details on the printed Check Stub.
Add or Change a Subcontract Invoice
Subcontract Invoices deal with specific billing information, discounts, insurance and backcharges. They are usually based on the completed percentage of a subcontract.
Press the Subcontract Invoice button on the Add menu or highlight the desired record and press the Change button and the following screen comes into view.

Vendor Information
For more information, see Vendor Information.
Invoice Header Information
For more information, see Invoice Header Information.
AP Account
The only difference on a Subcontract Invoice is the substitution of the SP Account field for the AP Account field. If multiple Subcontracts Payable accounts are being utilized, specify the correct Subcontracts Payable account here. This field will automatically be filled with the defalt SP Account for the selected subcontractor.
Billing Information (tab)
For more information, see Billing Information Tab.
Backcharges (tab)
For more information, see Backcharges Tab.
Discount (tab)
For more information, see Discount Tab.
Insurance (tab)
For more information, see the Insurance Tab.
Attachments (tab)
For more information, see Attachments Tab.
Notes (tab)
For more information, see Notes Tab.
Invoice Totals
For more information, see Invoice Totals.
Job ID
Enter the job number to which costs associated with this billing should be applied. When the job number has been entered, the job title will come into view. Press the lookup button and the Job Setup screen will come into view. Highlight the desired job and press the Select button. The accounting system will automatically return to the previous screen. When the job number has been entered, the job description will appear after the lookup button.
Cost Code
Enter the cost code to which costs associated with this billing should be applied or press the lookup button and the Budgeted Cost Code Lookup screen will come into view. Highlight the desired cost code and press the Select button. The accounting system will return to the previous screen. When the code number has been entered, the cost code description will appear after the lookup button.
Subcontractor
Enter the number of the subcontractor. Press the lookup button and the Accounts Payable Vendors screen will come into view. Highlight the desired vendor and press the Select button. The accounting system will return to the previous screen. The name of the vendor will appear in the next field.
The name and address of the subcontractor assigned to this subcontract are available through the More button. Press the More Button and the following screen comes into view. The More field lists the subcontractor's address and phone number.
.
When the Subcontract Invoice screen comes into view, the Billing Information tab is selected by default. There are only three fields that can be changed in this screen: Billed to Date, This Invoice, and (less) Retention.

Enter a value in either the Amount or the Percent column. The system will calculate the necessary value for the other field. Once the billed-to-date values are in place, the system will subtract the amount of any prior billings of this subcontract. The resulting values will be displayed in the This Invoice Amount field.
Billed-to-Date Amount
Enter the amount billed-to-date. This may be found on the invoice received from the subcontractor. When this amount is entered, the value will be divided into the Current Contract total and the resulting value will be displayed in the Percent field.
Enter the percent billed-to-date. This can be found on the invoice received from the subcontractor. When this percentage is entered, the value will be multiplied by the Current Contract total and the resulting value will be displayed in the Amount field.
Billed-to-Date Quantity (optional)
Enter the quantity billed. This may be found on the invoice received from the subcontractor.
Enter the amount billed on this invoice. When this amount is entered, the value will be divided into the Current Subcontract total and the resulting value will be displayed in the Percent field.
This Invoice Percent
Enter the percent billed on this invoice. When this percentage is entered, the value will be multiplied by the Current Subcontract total and the resulting value will be displayed in the Amount field.
This Invoice Quantity (optional)
Enter the quantity billed on this invoice.
Enter the amount of retention to be withheld from this billing. When this amount is entered, the value will be divided into the invoice total and the resulting value will be displayed in the Percent field.
(less) Retention Percent
Enter the percent to be withheld from this billing. When this percentage is entered, the value will be multiplied by the invoice total and the resulting value will be displayed in the Amount field.
This is the amount of retention withheld from this Job.
Press the Backcharges tab and the following screen comes into view.

Enter the Type of backcharge to be applied to this account.
When a subcontractor is working on a job, he is required to carry insurance. Sometimes, however, a subcontractor will not have insurance or his insurance will have expired. In these cases, the general contractor is required to pay the insurance. When this happens, the general contractor usually charges the insurance back to the subcontractor via a backcharge. Enter the Rate and the Amount to be charged and applied to this account. If Insurance is expired, this field will automatically be filled in.
Press the Discount tab and the following screen comes into view.

Discount Information
The subcontractor may offer a discount off the invoice total if the invoice is paid by a certain date. Enter any applicable discount and the date it expires in this field.
Press the Insurance tab and the following screen comes into view.

Insurance Information
This is a description of this subcontractor’s Insurance status. If the indicated expiration date has passed, the system may deduct a certain percentage of the billing as an Insurance Surcharge. To change the information listed here, see the Accounts Payable Vendors screen.
Press the Attachments tabs and the following screen comes into view. This tab allows the user to attach outside files to the invoice. For example: a scanned copy of a letter received regarding the Invoice a can be attached.

Description
The Caption that is specified when the Attachment is added will be displayed here.
Type
The file type will be displayed in this column.
Preview
Depending on the Attachment type, a preview image may be displayed to the right of the Attachment table.
Add or Change (button)
Press the Add or Change button and the following screen will come into view.

Caption
Enter a descriptive Caption that will be used to identify the Attachment.
Retrieve an Image (button)
Press the Retrieve an Image button to browse for the desired file. Many file types are supported by this function including Document, Image, Spreadsheet, and PDF file formats.
The Notes tab allows the user to enter notes for the selected Invoice. For more information, see Adding or Changing Notes. When the Notes tab is selected, the following screen comes into view.

An unlimited number of Notes can be attached to any or all Invoices.
Gross
The total amount before Retention or Backcharges are withheld from this billing. This total is derived through the This Invoice field in the Billing Information tab.
(less) Retention
This is the total amount of Retention to be withheld from this billing. This total is derived from the data entered in Billing Information.
(less) Backcharges
This is the total amount of Backcharges to be withheld from this billing. This total is derived from the data entered in Backcharges tab.
Net Charges
This field contains the total amount of the subcontractor voucher.
Add or Change a Retention Payment Invoice
This screen is very similar to the Subcontract Invoice screen. The only fields that are different are the Retention Payment field and the Reconciliation field. Press the Retention Payment Invoice button and the following screen comes into view

Vendor Information
This process is handled the same way as the Subcontract Vendor Information.
Invoice Header Information
The information here is the same as the Subcontract Invoice Header Information.
Invoice Totals
This process is handled the same way as the Subcontract Invoice Totals.
When the Subcontract Invoice screen comes into view, the Retention Payment tab is selected by default. Retention to be Paid is the only field that can be changed in this screen.

Retention to be Paid
Enter the amount of Retention to be Paid in this billing. If an amount is entered in this field, the amount must be reconciled with existing invoices before the invoice can be saved.
Press the Reconciliation tab and the following screen comes into view.
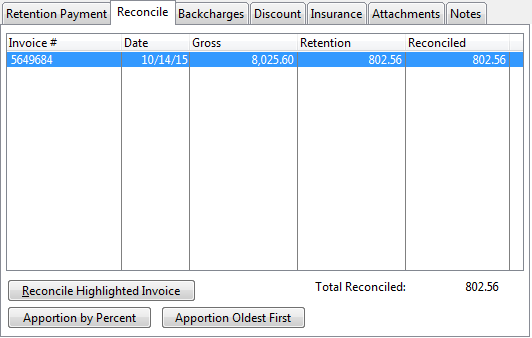
There are three methods of reconciling the Retention to be Paid amount to the highlighted invoices.
Manually reconcile the Retention To be Paid amount to one or more invoices by highlighting the desired Invoice and press the Reconcile Highlighted Invoice button. It is now possible to edit the Reconciled column. Enter in the desired information and press the Enter key.
Click the Apportion by Percent button to have the system automatically apportion the Retention to be Paid amount to the displayed invoices by percentage.
Click the Apportion Oldest First button to have the system automatically fully reconcile the oldest invoice, then the next oldest, and so on until the entire Retention to be Paid amount has been reconciled.
Press the Backcharges tab and the following screen comes into view.

Standard Backcharges
Enter the Type of backcharge and Amount to be applied to this account.
Insurance Surcharge
When a subcontractor is working on a job, he is required to carry insurance. Sometimes, however, a subcontractor will not have insurance or his insurance will have expired. In these cases, the general contractor is required to pay the insurance. When this happens, the general contractor usually charges the insurance back to the subcontractor via a backcharge. Enter the Amount to be charged and applied to this account. If Insurance is expired, this field will automatically be filled in.
Press the Discount tab and the following screen comes into view.

Discount Information
The subcontractor may offer a discount off the invoice total if the invoice is paid by a certain date. Enter any applicable discount and the date it expires in this field.
Press the Insurance tab and the following screen comes into view.
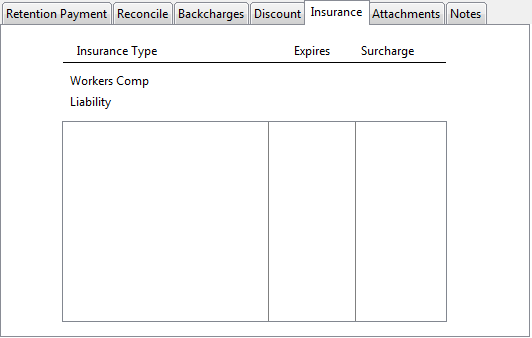
Insurance Information
This is a description of this subcontractor’s Insurance status. If the indicated expiration date has passed, the system may deduct a certain percentage of the billing as an Insurance Surcharge. To change the information listed here, see the Accounts Payable Vendors screen.
Press the Attach tab and the following screen comes into view. This tab allows the user to attach outside files to the invoice. For example: a scanned copy of a letter received regarding the Invoice a can be attached.
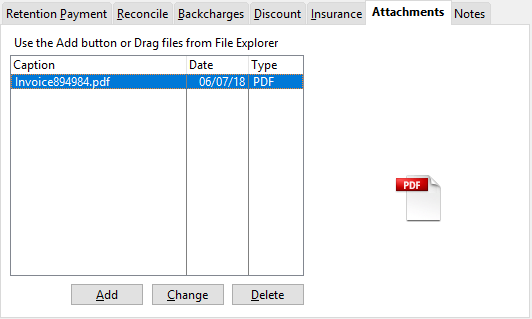
Description
The Caption that is specified when the Attachment is added will be displayed here.
Type
The file type will be displayed in this column.
Preview
Depending on the Attachment type, a preview image may be displayed to the right of the Attachment table.
Drag and Drop
To add an attachment, click the Add button or drag an item from Windows Explorer and drop it on the window.
Add or Change (button)
Press the Add or Change button and the following screen will come into view.
Caption
Enter a descriptive Caption that will be used to identify the Attachment.
Retrieve an Image (button)
Press the Retrieve an Image button to browse for the desired file. Many file types are supported by this function including Document, Image, Spreadsheet, and PDF file formats.
The Notes tab allows the user to enter notes for the selected Invoice. For more information, see Adding or Changing Notes. When the Notes tab is selected, the following screen comes into view.

An unlimited number of Notes can be attached to any or all Invoices.
Add or Change (button)
See Adding or Changing a Note.
Print (button)
See Printing Notes.
View Subcontract Information (button)
Click this button to see more information about the selected subcontract. The following information will appear:

This information is all entered on the Budget tab of the Job Setup window.
Invoice Totals
Gross
The total amount before Retention or Backcharges are withheld from this billing. This total is derived through the This Invoice field in the Billing Information tab.
(less) Retention
This is the total amount of Retention to be withheld from this billing. This total is derived from the data entered in Billing Information.
(less) Backcharges
This is the total amount of Backcharges to be withheld from this billing. This total is derived from the data entered in Backcharges tab.
Net Charges
This field contains the total amount of the subcontractor voucher.
If the Paid by Hand Check check box is selected, this button will be available. By pressing the Print Check button, the user can immediately print the check for this invoice.
If no invoice number is associated with the invoice, the following screen will come into view when the Print Check button is pressed.

If an invoice number is associated with the order, the following screen will come into view when the Print button is pressed.
Depending on the selected output type, the printed check will look something like this.

Report Description - Posted Invoice Journal
The Posted Invoice Journal is much like the Invoice Proof Listing. It is important that this report be kept and filed as part of the audit trail. The posted invoice journal contains the new reference number and is listed in the order that the invoice was posted. All transaction amounts have been distributed throughout the Job Cost, Equipment Cost and General Ledger files upon posting.
The report heading consists of the title, date, company name and page number.
Vendor Name / Number
The listing shows the vendor or subcontractor’s name and number.
Reference Number
Posted invoices are assigned a new invoice number in the ‘Posted Invoice File’. This column shows the new number.
Invoice # / Purchase Order #
This column includes the invoice or subcontractor voucher number and the purchase order number to which the invoice applies. The purchase order number will be listed below the invoice number.
Open
This indicates those subcontractor vouchers and invoices which have been posted but not yet paid.
Date
This is the date of the invoice or voucher.
Due / Paid
This column is the date the invoice is due to be paid or the date it was paid.
Status
This column contains the status of the invoice or voucher. Status might be paid, open, or historical. If the status is paid, the check number or means of payment is listed.
Not Paid
This column reflects any amount withheld from payment, such as discounts, retention, backcharges, or disputed (not approved) amounts. The discount expiration date is listed for any discounts taken. The description of the not paid item is listed under ‘REASON’.
Cost Distribution
This area shows the distribution of costs to Job Costing, Equipment Costing and/or General Ledger.
Job
This column will contain the job number or equipment ID if applicable.
Account
General Ledger account numbers are listed in this column. If the transaction is job or equipment related, the cost code or cost category will be listed in place of the general ledger account number.
Quantity
This field will display any quantities entered on the invoice.
Amount
The amount for each line item is printed in this column.
Amount Approved
The final column shows the amount approved for payment.
Vendor Totals
If more than one invoice is listed for a vendor and the listing was printed by vendor, this line will summarize all invoices for the vendor. This line also shows the total of all regular invoices, all subcontracts, the total retention held, total backcharges, and the net amount of the invoices.
Grand Totals this Report
If more than one invoice is listed for a vendor and/or subcontractor, this line will summarize all invoices. This line also shows the gross due, the discounts, the total retention held, total paid, and the net amount of the invoices.
Gross Due
This figure shows how much is to be paid from the Batch of invoices posted. It does not reflect the amount already paid to vendors subcontractors by hand-written checks, or amounts that are disputed. Discounts have not been taken yet and are not subtracted from the amount.
Discount
If discounts were taken from vendor or subcontractors, the total discounts will be shown under this heading.
Retainage
This is the total amount of retainage that will be held back from the subcontractors or vendors whose vouchers or invoices were entered in the current Batch.
Total Paid
This amount is the total already paid to vendors, but needing to be shown on the company’s General Ledger, Equipment Cost and Job Cost files
Net Due
The amount of Gross Due minus Discount, Retainage and Total Paid.
Report Description - G/L Summary of Payables Posting
The G/L Summary of Payables Posting shows the actual transactions to the General Ledger.
Account
The number of the General Ledger account is listed in this column.
Period
The fiscal period is listed in this column.
Date
The date of the invoice is listed in this column.
Journal ID, Number, & Line
The journal ID, number and line are printed in this column. This number and ID are automatically assigned by the system during posting.
Description
The description for each transaction is listed. The description includes the invoice number, if applicable, and subcontractor or vendor name and number.
Cost Disbursement
The control account and subsidiary account are listed for each transaction. In the case of job or equipment related transactions, the job number and cost code or equipment ID and cost category are listed for the subsidiary account.
Quantity
The quantity for each transaction is listed if applicable.
Amount
The transaction amount for each invoice is listed. Debits are listed as positive amounts and credits are listed as negative amounts.
Subtotal
Each transaction is added to the subtotal as it is listed. The final transaction will make the Subtotal zero.
Record #
The record number is the general ledger transaction number. As transactions are posted, they are appended to the ‘General Ledger Master Transaction File’ and assigned the next record number. This number is used by the system to refer to this transaction.
Report Sample - Posted Invoice Journal

Report Sample - G/L Summary of Payables Posting

