Notes
Notes can be attached to many different data types, including Vendors, Customers, Employees, Invoices, Timesheets, etc.
Adding or Changing a Note
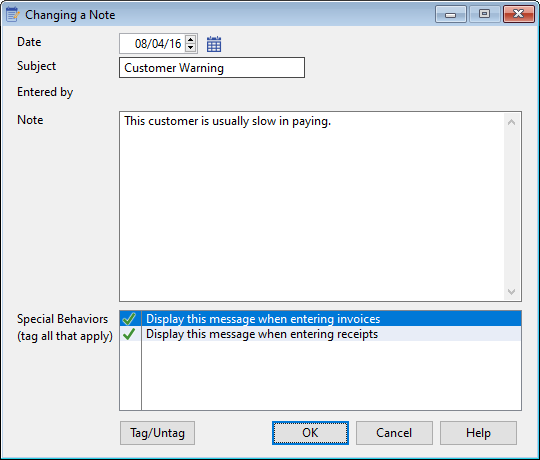
This is the screen used for entering a Note. Press the Insert or Change buttons and the following screen comes into view.
Date
This is the date the note was entered. Press the lookup button after the Date field and a Calendar will come into view. Choose the date and press the OK button.
Subject
The subject of the note is displayed. This is user defined. For example: Adding Notes
Note
Enter in the appropriate information.
Special Behaviors
If this is a note attached to a Vendor, Customer, Employee or Job record, a list of speical behaviors will appear. Tag any desired behaviors. For example, if this is a Customer note, you may select to have the system display this note every time a user attempts to enter an invoice for this customer. If a note is entered like the one above, the following window will pop up when this customer is selected during invoice entry:

Deleteable Notes
Some notes can be deleted after they are viewed. This is currently true for Employee notes that are displayed during timesheet entry. In this case, the note will look like this:
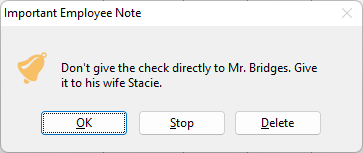
On this note display window , the user has more options. Clicking “OK” will close the note window. Clicking “Stop” will turn off the special behavior for this note, meaning it will no longer pop up during timesheet entry. Clicking “Delete” will remove the note from the employee record all together.
OK (button)
Click the OK button after all entries have been made. The note will be saved and displayed in the list box.
When the Print button is pressed below a Note listbox, the following window will be displayed:
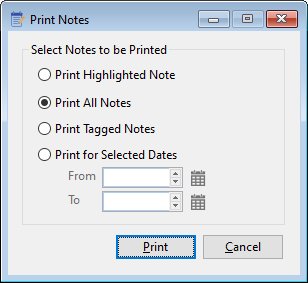
Using this window the operator can print just the note highlighted in the list box, all the notes in the list box, the notes tagged in the list box, or all notes that fall within the entered date range.