![]() Accounts Payable: Invoice Proof Listing
Accounts Payable: Invoice Proof Listing
The Invoice Proof Listing shows all invoices and subcontractor vouchers that have been entered but not posted. This list is used to check for accuracy before posting the invoices. After posting, the General Ledger and Job Costing files will be altered to reflect the new data. This listing may also be used as a reference for unposted invoices. Use this option to print an Invoice Proof Listing of the tagged Batches.
When the Proof List Tagged Batches button is pressed in the Accounts Payable Invoice Entry, the following screen will come into view.

The tabs are for sorting by Report Title, User ID, and Modify Date. These will be useful when the list of reports has grown.
Add or Change (button)
To modify the information used in generating the report, press the Add button or highlight the desired report title and press the Change button. For more information, see Add or Change a Proof Listing.
Press the Delete button and the following screen comes into view. Press the Yes button and the highlighted report will be deleted and the previous screen will come into view. If the No button is pressed, the program returns to the previous screen.

To print a report, press the Print button. For more information, see Printing Reports.
Note: If the message "Nothing to Print" comes into view when the Print button is pressed, there are two main causes:
1. There is no information within the selected limits. Remove all limits and then reinsert the limits one at a time. If the report still will not print, insert a new report title.
2. No report title is selected. The report title is used to store the selected limits. A report title must be selected in order for the report to print.
This button closes the program and returns to the main screen.
To Add or Change an Invoice Proof Listing report, press the Add button or highlight the desired report title and press the Change button. The following screen will come into view. This screen displays the possible limits that may be set. No limits should be set if a complete listing of every unposted invoice is desired. Several limits may be set to narrow the list down to a very small range of invoices.
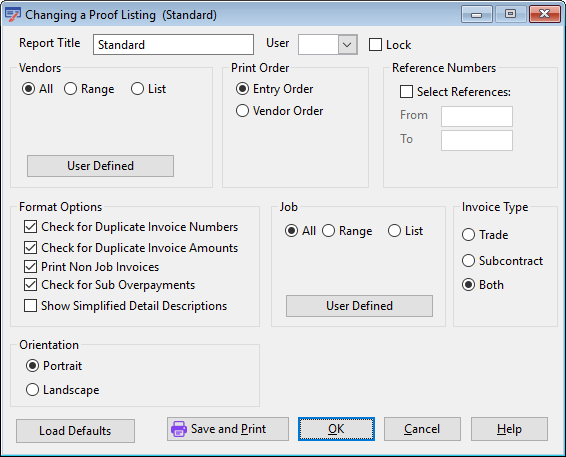
Following is a description of each of the limits. Check the appropriate boxes and enter the desired limits. When all desired limits have been set, press the OK button to save the settings. Press the Cancel button to return to the browse screen without saving the settings.
The title of the report. Warning: The title is used to store the selected limits. Without a title there are no selected limits stored. The message "Nothing to Print" will come into view when the Print button is selected from the previous screen.
User
Enter the User ID of the report creator.
Lock (check box)
If this option is selected, only the User listed in the User field can change or delete this report.
Use this section to limit the report by vendor. Use the Range setting to set a range of vendor numbers. Use the List setting to specify a list of vendors to be included.
All, Range, List (radio buttons)
Select the All radio button to ignore Vendor reporting limits. Select Range to enter a range of Vendors in the From and To fields. Select List to report on a list of selected Vendors.
These fields will be available if the Range radio button is selected.
From
Enter the vendor number. Press the lookup button and the Vendors screen comes into view. Highlight the desired vendor and press the Select button.
To
Enter the vendor number. Press the lookup button and the Vendors screen comes into view. Highlight the desired vendor and press the Select button.
Edit Vendor List
Click the Edit Employee List button to add or remove Vendors from the list of Vendors to be included in the report. The following screen will come into view.
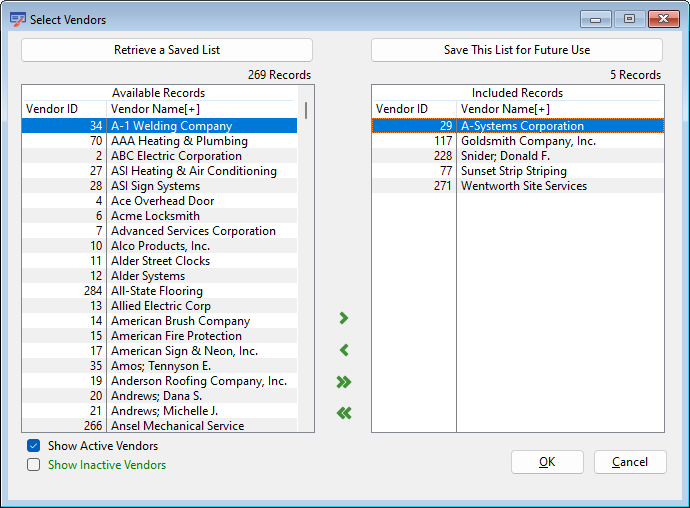
Retrieve a Saved List / Save This List for Future Use (buttons)
Use these buttons to save the current list of included records for future use, or to retrieve a previously saved list. See Saved Report Limit Lists for more details.
Available Records
All Available Vendors that are not included in the list are displayed in these columns.
Included Records
All Included Vendors are listed in these columns. Use the arrows to move selected records or all records between the Available and Included areas.
Select References (check box)
This field limits the transactions to be printed by reference number. Leave the box unchecked to include all reference numbers. Otherwise, check the Select References box. This box must be checked before the From and To fields will be available. Enter the first and last reference numbers of the transaction section to be printed. Enter <0> to clear the first reference number and 999999 to default to the last transaction number.
From
Enter the number of the first reference number in a range or a single reference number.
To
Enter the number of the last reference number in a range or a single reference number.
This selection field lists only the invoices for a particular job or a range of jobs. Leave the Select Jobs box unchecked to include all jobs. Otherwise, check the Select Jobs box. This box has to be checked before the From and To fields will be available. The job number should be entered for the first and last job for which transactions are to be listed. If information is desired for only one job, that job number should be entered in both the From and To fields.
Select Jobs (check box)
Activates the ranges which are defined on the next lines. To select only one job, enter that number in both the From and To fields.
From
Selects the first job in a range of jobs or a single job. Enter the number or press the lookup button and the Job setup screen comes into view. Highlight the desired record and press the Select button.
To
Selects the last job in a range of jobs or a single job. Enter the number or press the lookup button and the Job Setup screen will come into view. Highlight the desired record and press the Select button.
The purpose of this selection item is to differentiate between trade and subcontractor invoices. Trade and subcontractor invoices are handled differently; therefore, the system distinguishes between the two. Select the desired type of invoice by clicking on the radio button. Retention Payment Invoices are included in the Subcontract Invoice category.
Trade (radio button)
see Trade Invoices
Subcontract (radio button)
see Subcontract Invoices.
Both (radio button)
This is the default selection.
Select the desired order, either by Entry Order or by Vendor Order.
Entry Order (radio button)
This is the order in which the invoices were entered into the system.
Vendor Order (radio button)
The invoices are listed in alphabetical order of the vendor's name.
Check for Duplicate Invoice Numbers (check box)
During the listing, the program may check for duplicate invoices from the same vendor. This field allows the program to Check for Duplicate Invoice Numbers.
Check for Duplicate Invoice Amounts (check box)
During the listing, the program may check for duplicate invoice amounts from the same vendor. This field allows the program to Check for Duplicate Invoice Amounts.
Print Non Job Invoices (check box)
This field allows the printing of invoices that were not charged to any job.
Check for Sub Overpayments (check box)
This field allows vouchers or invoices to subcontracts to be checked for overpayment. If the program is set up to check for overpayment, a message will be printed on all vouchers that cause the contract to be over-paid.
Show Simplified Detail Descriptions (check box)
By default, the report will print the full job name and cost code description for each invoice or line item. If this box is checked, the report will print just the job number and cost code.
Load Defaults (button)
Press the Load Defaults button to reset the parameters for the selected Report. The original parameter selections will be loaded. Parameters that can be limited by list or range will be reset to allow All items. Other Parameters will reset to their default values.
Portrait (radio button)
Specifies how the report is positioned on the page when printed. Portrait is the standard. Portrait is printed vertically.
Landscape (radio button)
Specifies how the report is positioned on the page when printed. Landscape is printed horizontally.
Report Description - Invoice Proof Listing
The Invoice Proof Listing should be run after a Batch of invoices has been entered into the system to verify the accuracy of the entries. All transaction amounts will be distributed throughout the Job Cost and General Ledger files upon posting. The report heading consists of the title, date, time, company name, page number, and the limits that were set on the selection screen.
Vendor Name and Number
The listing shows the vendor or subcontractor name and number.
Invoice #
This column includes the invoice or subcontractor voucher number.
Status
This column contains the type and status of the invoice or voucher. Type will be Subcontractor,Trade or Retention Invoice. Status might be paid, open, or historical.
Dates
Two dates are listed in this column; the date of the invoice or voucher and the fiscal period. The Batch number is listed under the dates.
Adjustments
This column reflects any amount withheld from payment, such as Discounts, Retainage, or Not Approved (disputed) amounts.
The reference # is also listed. A reference number is assigned to each invoice as it is entered into the Invoice File. This number is used for editing the invoice prior to posting.
Detail Information
Cost Information
This area shows the PO number and the distribution of costs to Job Costing, Equipment Costing, and General Ledger.
Job/Account
This column contains the job number (or equipment ID, if applicable) and the General Ledger account numbers.
Due
The date the invoice is due is listed in this column. The period of time before the invoice is due is listed directly under the date.
Expires
The date the discount expires. The period of time before the discount expires is listed directly under the date.
Gross/Tax/Net
The amounts of the Gross, Tax, and Net are listed.
The Total Amount of this Invoice
The amount of this invoice is listed.
Vendor Totals
If more than one invoice is listed for a vendor and the listing was printed by vendor, this line will summarize all invoices for the vendor. This line also shows the Gross, Discounts, Retainage, Total Paid, and Net Due.
Grand Totals for this Report
The totals for all invoices listed are summarized as Gross Due, Discounts, Retainage, Total Paid and Net Due. These totals may be used in the same manner as ‘Hash Totals’
Report Sample- Invoice Proof Listing
