![]() Accounts Receivable: Invoices
Accounts Receivable: Invoices
Trade Invoices, Progress Billings, Final Retention Invoices, and Finance Charge Billings are entered and edited through the Account Receivable Invoice menu.
Trade Invoices are invoices for items and services sold independently of any job. They are also for work that is paid on a Time and Materials basis. If payments have been made manually before the invoice was entered, they are entered through this program and specified as having been prepaid.
Progress Billings are entered and edited through this option. Progress Billings are the invoices or periodic billings sent out to the contract holders of a job and are based on the job’s contract price. The billing amount is determined by the percentage of the job that has been completed.
Final Retention Invoices are special invoices for retention only. At the end of the contract, these invoices are used to collect the remaining retention from the customer. It takes the retention out of Retention Receivables and places it into Accounts Receivable. This feature is not available for the Small Builder edition of the accounting system.
Finance Charge Billings may be generated for any customer. The finance charge is calculated by the system and a Trade invoice is created in the Invoice File. This feature is not available at this time but will be added in the future.

Batch Information
see Batch Management
Change Dates in Tagged Batches (button)
see Change Dates in Tagged Batches
Proof List Tagged Batches (button)
Print Invoices in Tagged Batches (button)
Post Tagged Batches (button)
Invoices Included in Batch
See Invoices Included in Batch
Import Invoices (button)
When the Export button is pressed, the following screen comes into view.

This option allows the user to save the invoices in any Batch as a text file. Enter the desired filename in the space or press the lookup button and browse for the desired file. If the Preview the text file before closing check box is selected, the text file will be opened when the Proceed button is pressed. Press the Proceed button when the file name is entered or selected and the accounting system will save the Invoices in .txt format.
Click the # button to edit invoices in the Batch by invoice number.
This button allows the operator to create multiple Finance Charge invoices at the same time. The following window will appear:

Choose Yes and the system will create invoices for all customer who have a finance charge stored and one or more invoices that are past due. The invoices will be placed in the highlighted batch for editing and posting.
Add or Change (button)
See Add or Change an Invoice
This button closes the program and returns to the main screen.
"This Batch is in Use by another user" message
This message will come into view anytime there is someone in the Batch or the accounting system is shut down improperly.

If this message occurs and there is someone in the Batch, press the OK button.
If this message occurs and there is no one in the Batch, press the letter "O" key and it will override this message and allow access to the Batch.
Change Dates in Tagged Batches
At times, it becomes necessary to change the dates of unposted invoices within a Batch. This is usually the case when it is a repeating Batch and the invoices contained in it need to be posted to a new month. The Change Dates in Tagged Batches button affects a global date change on all invoices or selected invoices within the tagged Batch(es). Press the Change Dates in Tagged Batches button and the following screen comes into view.

This field allows the selection of the customer(s) whose invoice date should be changed. The number of the first and last customers desired should be entered. If information is desired for only one customer, that customer number should be entered in the From and To fields.
Select customers (check box)
Activates the ranges defined on the next lines. This option may be used to limit the customers or process just one customer.
From
Enter the customer number, or press the lookup button and the Customer Entry screen comes into view. Highlight the desired customer and press the Select button.
To
Enter the customer number, or press the lookup button and the Customer Entry screen comes into view. Highlight the desired customer and press the Select button.
Select Dates (check box)
Activates the ranges defined on the next lines. This option may be used to limit invoices to a particular date or range of dates. To limit invoices to a particular date, enter the first and last dates of the desired range. To limit invoices to a single date, enter that date in the From and To fields.
From
Selects the first date in a range of dates or a single date. Enter the date, or press the lookup button and a Calendar will come into view. Highlight the correct date and press the OK button.
To
Selects the last date in a range of dates or a single date. Enter the date, or press the lookup button and a Calendar will come into view. Highlight the correct date and press the OK button.
The following three options are available. The option chosen will affect the next field.
Add a number of days to each invoice date (radio button)
This field will affect all the invoices in the selected Batch(es). Specify the number of days to add. This number will add to both the Invoice Date and the Due Date.
Change to a specific date
This field will affect all the invoices in the selected Batch(es). Change all invoice dates to a specified date. Press the lookup button and a Calendar will come into view. This will change all Invoice Dates to the specified date and recalculate the Due Date.

Add a number of months to each invoice date (radio button)
This field will affect all the invoices in the selected Batch(es). Specify the number of months to add. This number will add to both the Invoice Date and the Due Date.
The posting process makes the invoice permanent in the Invoice File. It also makes the proper transactions in the General Ledger and updates Job Cost and General Ledger Totals. Press the Post Tagged Batches button and the following screen comes into view.
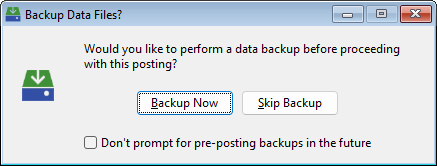
Backup Now
Click Backup Now button and the Utilities Backup/Restore screen will come into view.
Skip Backup
Click the Skip Backup button to skip the backup and continue to the next screen.
Don't prompt for pre-posting backups in the future
Check this box to turn this prompt off for future postings. To turn the prompt on again, see Setup: Preferences.

Invoices will be posted to the chosen Fiscal Period. The Fiscal Period is listed after the lookup button. The default Fiscal Period will be the last period used by the posting program. To change the Fiscal Period, enter the correct period, or press the lookup button and the Fiscal Period Maintenance screen comes into view. Highlight the desired Fiscal Period and press the Select button. Press the Post button.
Press the Preview button to see a preview of the posting that will occur.
The system will then post the invoices in the tagged Batches. Two Reports will print:
1. The Receivables Trade Invoice Posted Journal\ Progress Billing Journal.
2. The General Ledger Summaries of Receivables Posting Report.
Select the Fiscal Period to which the invoices should be posted and press the Proceed with Posting button. The system will post the receipts in the tagged Batches. As the receipts are posted, the system will generate two reports, the A/R Receipts Posting and the G/L Summary of Receivables Posting. See Printing Reports for more information. After the invoices are posted and the reports are generated, the following message will come into view.

Finish (button)
Press the Finish button to make the posting permanent.
Undo (button)
Press the Undo button to return all accounting data to the conditions prior to posting.
All invoices in the highlighted Batch are shown under this heading. The Add, Change, and Delete buttons, under the same heading, are used for entering and deleting invoices.
Customer (# or name)
The customer name and number associated with this invoice are listed.
Invoice Number
This is the number that will be printed on the invoice, unless it is changed through Invoice Printing Limits.
Type
The customer name and number associated with this invoice are listed.
Date
The Invoice date is listed in this column.
Status
This column displays the current status of the Invoice. If the status is Pre-Paid, the Pre-Paid amount will be displayed below the Invoice list when selected.
Amount
The Invoice amount is displayed here.
Press the Add button and the following screen comes into view. Choose the desired invoice button and the Invoice will come into view.

To Change an invoice, highlight the desired entry and press the Change button. The invoice will come into view.
To Delete an invoice, highlight the desired entry and press the Delete button. The following screen comes into view. Press the Yes button and the invoice will be deleted. Press the No button and the program will return to the previous screen.

Trade Invoices and T&M Billings
Accounts Receivable is designed to manage subcontracts receivable as well as Trade Invoices and Time & Material Billings. Trade Invoices are not normally related to budgeted jobs (jobs found in the Job Costing module). Items or services sold independently of any job, or work that is billed on a ‘time and materials’ basis would be entered as a trade invoice. Time & Material Billings are job billings with line items specifying exact charges for time worked and materials purchased when performing job tasks. The only real difference between a Trade Invoice and a T&M Billing is that a job number is inserted in the invoice header of a T&M Billing. As invoices are entered, they are accumulated in the Invoice File. Press the Trade Invoice button and the following screen comes into view.

Customer (# or name)
Specify the customer. This may be done by name or number. After the customer is specified, the customer name, phone and fax number and contact person will appear in the next fields.
The following screen comes into view when this button is pressed. The More screen lists the customer's address and phone number.

Terms
The billing terms may be specified and will be printed on the invoice. If terms are not specified, the terms entered through Customer Entry will be assumed.
Work Order #
A Work Order number of up to six characters may be entered if desired.
Invoice Number
Up to ten characters are available for the number of this invoice. This is the number that will be printed on the invoice, unless it is changed through Invoice Printing Limits.
Customer PO
Enter up to ten characters for the Customer's Purchase Order number if applicable.
Job ID
Specify the job to which all lines will be charged. Press the lookup button and the Job Setup screen will come into view. Note: Specifying a Job here will affect the options available in Add or Change a Line Item Detail.
Income Acct
Enter the Income Account Number or press the lookup button and select the Account from the General Ledger Account screen.
AR Account
If this invoice is to be charged to a different AR Account, enter the appropriate GL Account Number or press the lookup button and select the Account from the General Ledger Account screen.
Description
Enter a description of the invoice here.
Prepaid (check box)
Check this box if the invoice is paid. The system will ask for the following fields.
Paid Date
Enter the date the invoice was paid or select the date from the Calendar.
Check Number
Enter the number of the Check used to pay the invoice.
If the customer has already paid for this invoice with a credit card, the credit card information can be entered and processed here.
If a credit card processing account has been established, the credit card processing window will appear and allow for entry of a card number and on-line processing of the payment.
Checking Acct
Enter the number of the Account into which the money was deposited
Invoice Date
Enter six digits for the date of the invoice. Press the lookup button and a Calendar will come into view. Choose the correct date and press the OK button.
Due Date
Enter six digits for the date the invoice is due, or press the lookup button and a Calendar will come into view. Choose the correct date and press the OK button.
When the Trade Invoice is opened, the Line Item Detail tab is selected by default.

Description
Enter up to 22 characters of description for the item being billed.
Quantity
Enter the quantity of the item being billed.
Unit Price
Enter the unit price amount for the line item.
Amount
The total amount of the line item is displayed in this field.
Taxable
This column will contain the letter "T" if the line item has been marked as Taxable.
![]() These buttons are for changing the order of the line items on the invoice. There are four options: move the line item up one, move the line item to the top, move the line item down one and move the line item to the bottom.
These buttons are for changing the order of the line items on the invoice. There are four options: move the line item up one, move the line item to the top, move the line item down one and move the line item to the bottom.
![]() Paste from Spreadsheet
Paste from Spreadsheet
Click this button to paste line items that have been created in a spreadsheet and copied to the clipboard. The order of the columns in the clipboard must match the column headings displayed. The order of the columns in the spreadsheet must be as follows:
|
Column |
Contents |
|
A |
Item ID |
|
B |
Description |
|
C |
Quantity |
|
D |
Unit Price |
|
E |
Amount |
|
F |
GL Account |
|
G |
Relieve Inventory (T/F) |
|
H |
Inventory Location |
|
I |
Inventory Area |
|
J |
Date |
|
K |
Ticket Number |
|
L |
Location |
|
M |
Taxable (T/F) |
|
N |
Text Flag (T/F) |
|
O |
Text |
Mark All Taxable (button titled "T")
The user may wish to mark all the line items Taxable (or Nontaxable) at one time. Pressing this button will bring the following to the screen:

Make the desired choice by clicking one of the buttons.
Add or Change a Line Item Detail
To edit a Line Item, press the Add or Change button and the following screen comes into view. Three types of line items may be entered: 1. Text Line Item 2. Equipment Rental or 3. an item to be taken out of inventory (Relieve Inventory).

Note: If the invoice was assigned to a Job and the Charge T&M Billing Line Items to Specified Cost Codes check box was selected in the Receivables 1 tab of Setup: Accounting Options, then the screen will reflect the following changes.

Bill Cost Code (Check box)
If the Charge T&M Billing Line Items to Specified Cost Codes was selected in the Receivables 1 tab of Setup: Accounting Options, then this check box will automatically be checked. Pressing on the lookup button next to Item ID will bring up the Budgeted Cost Code Lookup screen. If the Bill Cost Code box is not checked, pressing on the lookup button next to Item ID will bring up the Item Price File browse screen.
Text Line Item (Check box)
Equipment Rental (Check box)
See Adding an Equipment Line Item
Relieve Inventory (Check box)
This option will remove this item from inventory. See Adding an Inventory Line Item.
Enter an existing Item ID, or press the lookup button and the Browse the Item File screen will come into view. Highlight the desired Item ID and press the Select button. If the "Relieve Inventory" box is checked, this is REQUIRED field, and must have a valid Item ID entered; otherwise, the Item ID is optional, and if filled it can either be an existing Item ID from or any value. If a valid Item ID is entered, the system will retrieve the Description and Unit Price if it is available in the price file.
The Item ID field will also accept a valid UPC code. If a valid UPC code is entered either by using a bar code scanner or by keying in the UPC code manually, the system will retrieve all the Item information from the Item Price File, just as though a valid Item ID had been entered.
Description
Enter up to 22 characters of description for the item being billed.
Quantity
Enter the quantity of the item being billed. Note: If a credit invoice is being entered, enter this figure as negative.
Unit Name
Enter the name of the units being billed (hours, boxes, each, etc.) if applicable.
Unit Price
Enter the price per unit of the item being billed.
Total Amount
The amount will be automatically calculated from the quantity and unit price. This figure may not be altered manually.
Taxable (check box)
Check the box to indicate that the line item is taxable. If the box is checked, the tax on this item will be calculated automatically from the amount and total tax percentage.
GL Account
Enter the account number, or press the lookup button and the General Ledger Accounts screen will come into view. Highlight the desired account and press the Select button. If a job number is selected in the previous screen, this field will not be available.
Check the Text Line Item box and the following screen will come into view. This field allows a text message to be entered. This is a user defined field.

By pressing the lookup button, the user can access previously saved text line items. Press the lookup button and the following screen will come into view.

Select (button)
Press the Select button to select the highlighted text line item.
Add or Change (button)
Press the Add or Change button to insert a new text line item or edit an existing text line item. Press the Add or Change button and the following screen will come into view. Enter the desired text line item and press the OK button to save it or press the Cancel button to exit without saving.

Delete (button)
Press the Delete button to delete the highlighted text line item. Press the Delete button and the following screen will come into view. Press the Yes button and the invoice will be deleted. Press the No button and the program will return to the previous screen.
Close (button)
Press the Close button to return to the previous screen without selecting a text line item.
Help (button)
See How to Use Help
Adding an Equipment Rental Line Item
Check the Equipment Rental box and the screen will change to the following fields.

The Description, Quantity, Unit Name, Unit Price, Total Amount, and the Taxable check box fields are the same as entering a line item. See Add or Change a Line item for more information. The following two fields change.
Check this box to indicate income to equipment for equipment rental invoices.
Equipment ID
Income to equipment (for equipment rental invoices) may be specified by entering the Equipment I.D. in place of the account number. Line item amounts will be credited to the equipment control account and equipment usage will be updated.
Check the Relieve Inventory box and the screen will change to the following fields. This option will take the items from inventory.

The Description, Quantity, Unit Name, Unit Price, Total Amount, and the Taxable check box fields are the same as entering a line item. See Add or Change a Line item for more information. The following three fields change.
Check this box to take the items out of inventory.
Enter the Location of the item or press the lookup button, and the Locations screen will come into view. Highlight the desired item, and press the Select button.
Enter the Area where the item is located or press the lookup button, and the Area Lookup screen will come into view. Highlight the desired item, and press the Select button.
Press the Discount & Retention tab and the following screen comes into view.

Discount information is displayed automatically from the customer’s record. The displayed information may be edited. Editing this displayed information will not cause the customer file to be changed. This option influences the next fields.
Discount Terms
Enter the terms in which the customer may take the discount.
Discount Rate
Enter the percentage of the invoice amount on which the discount is based or the percentage retention to be allowed.
Discount Amount
The discount amount is automatically calculated using the invoice amount and the discount rate. If a discount amount is entered, the discount rate or retention rate (above) will be recalculated and displayed.
Discount Expires
The expiration date is automatically calculated from the invoice date and the discount terms. The expiration date may be changed.
If the customer is going to withhold retention, the Discount/ Retention area of the screen can be used to enter that retention. In order to enter Retention, push the Retention radio button. The terms description will be displayed as Retention. The only two entry fields available will be Rate and Amount. Enter the retention rate or amount. The system will automatically calculate the figure not entered.

Press the Shipping tab and the following screen comes into view.

Enter the information in the appropriate fields. The Shipping information is self explanatory except for the Shipping Category.
Ship Via
Indicate the shipping method.
F.O.B.
Select whether F.O.B. is the point of origin or destination.
Ship To
There are five options to choose from: Job, Vendor, Customer, Customer Ship-To, and Other. The Name, Address, and City State Zip fields remain unaffected by the choice. However depending on the selection there may be an extra field under Ship To. If Other is chosen, the ship-to address must be entered by hand, otherwise, the system will allow selection of the desired Job, Vendor or Customer record and the address fields will be filled from the selected record.
Press the Commission tab and the following screen will come into view.

This tab allows the user to select a specific employee or employees who will receive Commission for this Invoice.
Pay Commission on This Invoice
Check this box to pay Commissions to selected Employees on this Invoice.
Commissionable Amount
Enter the amount of the Invoice that is Commissionable. This amount will default to the pre-tax invoice subtotal.
Update from Subtotal
Click the Update from Subtotal button to enter the Invoice Subtotal in the Commissionable Amount field.
Employee
The Employee(s) selected to receive Commission on this Invoice will be listed here.
Commission Amt.
The Commission Amt. that each Employee will earn on this Invoice is listed here.
Adding or Changing a Commissioned Employee
Press the Add or Change button and the following screen will come into view.

Employee
Select the Employee that will receive Commissions for this Invoice
Show All (check box)
Check this box to show all Employees including those that are not set up to receive Commissions. To set up an Employee to receive Commissions, see Payroll Employees: Rates.
Commissionable Amount
The Commissionable Amount will be displayed here. The amount listed here can be modified for each employee.
Commission Percent
Once an employee is selected, the Commission Rate specified in the Employee File will be automatically entered here. This value can be overridden at this screen.
Commission Amount
The Commission Amount that will be paid to the selected employee will be listed here. This value can be overridden by manually entering the Commission Amount to be paid out or by manually entering the Commission Percent to be paid to this employee.
Press the Attach tabs and the following screen comes into view. This tab allows the user to attach outside files to the invoice. For example: a scanned copy of a letter received regarding the Invoice a can be attached.

See the Attachments topic for a full description of how attachments work.
The Notes tab allows the user to enter memos or notes for the selected Invoice. For more information, see Adding or Changing Notes. When the Notes tab is selected, the following screen comes into view.

Memo Field
Type the desired Memo in the box provided or press the lookup button to select or create a saved Memo.
Additional Notes
An unlimited number of Notes can be attached to any or all Invoices.
Add or Change (button)
See Adding or Changing a Note.
Print (button)
See Printing Notes.
Subtotal
This amount is automatically calculated by totaling the line item amounts. This field may not be changed manually, but is updated as the information in each line item is entered or edited.
Tax Code
Enter the Tax Code associated with this Invoice. Press the lookup button to select from the Tax Codes entered in Setup Accounting Options.
Tax
There are two field under this option. The first field is the Tax percentage field. The user may enter either a Tax Code in the previous field or enter a Tax Percentage manually in this field. The following field will be field automatically. It displays the Tax Amount.
Freight Charge
Enter any freight charges that apply.
Misc. Charges
Enter any miscellaneous charges that apply.
Profit
There are two field here, one for a profit percentage and one for a profit amount. Enter a figure into either field and the system will calculate the other.
Total
This field is the sum of the Subtotal, Tax 1 & 2:, Freight Charges, and Misc. Charges fields. This figure is recalculated and redisplayed as soon as any of the above fields are altered and may not be altered manually.
Click this button and the system will generate a print preview of the highlighted invoice. Many different Invoice Printing formats are available. Visit the Accounts Receivable Setup help topic to learn how to select an invoice format. If the selected invoice has been designed to print on blank paper, the preview will show up immediately. If the selected invoice has been designed to print on a pre-printed invoice form, the following option will be displayed:

If Form is selected, the invoice will print just the information to fill in the pre-printed form. If Preview is selected, the invoice will be previewed with boxes and customer return address included, so the invoice preview will look like a finished invoice suitable for PDF generation and emailing.
Accounts Receivable handles two types of invoices. The second of these is the Progress Billing. These are the periodic billings sent out to the job owners. Progress billings are made against a budgeted contract price and are based on a percentage complete figure of the job. Jobs without contract prices, or Time and Materials type jobs should be billed through Trade Invoice Entry.
When the Progress Billing Entry button is selected for the invoice type, the following screen will come into view.

Customer (# or name)
Specify the customer. This may be done by name or number. After the customer is specified, the customer name, phone and fax number, and contact person will appear in the next fields.
Press the More button and the following screen comes into view. The More screen lists the customer's address and phone number.
Terms
The billing terms may be specified and will be printed on the invoice. If terms are not specified, the terms entered through System Setup will be assumed.
Invoice Number
Up to ten characters are available for the number of this invoice. This is the number that will be printed on the invoice unless it is changed through Invoice Printing Limits.
Invoice Date
Enter six digits for the date of the invoice. Press the lookup button and a Calendar will come into view. Choose the correct date and press the OK button.
Customer PO
Enter up to ten characters for the Customer's Purchase Order number if applicable
Due Date
Enter six digits for the date the invoice is due, or press the lookup button and a Calendar will come into view. Choose the correct date and press the OK button.
Job ID
Specify the job for which this billing is intended. Press the lookup button and the Job Setup screen will come into view. Highlight the desired Job ID and press the Select button.
Prepaid (check box)
Check this box if the invoice is paid. The system will ask for the Paid Date and Check Number. Enter the information in the appropriate fields.

For a description of the Credit Card procedure, see the definition of the Card button under Trade Invoice Entry.
Description
Enter a brief description of the invoice that will be included on the printed invoice.
Contract & Billing Information
The billing information to date will be listed in this field. This field is for informational purposes only.
Billings are produced according to one of two methods.
1. Billings may be based on the percent complete of the job. Enter the percentage of completion of the job. The system will assume that a billing for that same percentage of the contract price is desired. For instance, if a $100,000 job is indicated as being 30% complete, the system will bill for $30,000. If other billings totaling $20,000 have been made to the job, this billing will be produced for the remaining $10,000.
2. The second method is the reverse of the first. Enter the dollar amount to be billed, and the system will calculate the percentage of the contract price.
Current Percent Complete
Enter the percent complete of the job. The billing amount will be calculated using this figure and the contract price. If the second method is being used, the Current Percent Complete will be calculated and displayed when the figure for This Invoice is entered.
Retention Rate
Enter the percentage of the billing that will be retained. If the second method is being used, enter a dollar figure under Retention. This figure will be calculated automatically.
Total Billing
This figure is automatically calculated by multiplying the contract price by the figure in the Current Percent Complete field.
(less) Prior Billings
This figure is the amount already billed on the job, derived from the job information displayed above it on the screen.
This Invoice
This figure will be automatically calculated by subtracting the Prior Billing from the Total Billing. If Current Percent Complete has not been entered, enter the dollar amount of this billing in this field. The Current Percent Complete will then be calculated and inserted automatically.
Retention
This figure is calculated by multiplying the This Invoice figure by the Retention Rate. If Retention Rate was not entered, enter a dollar figure here. The Retention Rate will be automatically calculated and displayed.
Tax Code
Enter the Tax Code associated with this billing. Press the lookup button to select from the Tax Codes entered in Setup Accounting Options.
Sales Tax
If sales tax is to be manually entered on this billing, enter the amount here. When the invoice is posted, this amount will not be included in the job Billed to-Date amount, but will instead be posted to a Sales Tax Payable account.
Net Invoice Amount
This figure is the actual billing amount. It is calculated by subtracting Retention from the This Invoice figure. Note: The Net Invoice Amount will be negative if no dollar amount was entered in the This Invoice field but a Retention amount was entered. If entering only a retention invoice, enter the same dollar amount in both the Retention and the This Invoice fields.
Final Retention Billings are special invoices for Retention only. At the end of the contract, these invoices are used to collect the remaining retention from the customer. It takes retention out of Retention Receivables and places it into Accounts Receivable. This feature is not available for the Small Builder Edition of the accounting system. When Final Retention Billing entry is selected, the following screen will come into view.

Specify the customer. This may be done by name or number. After the customer is specified, the customer name, phone and fax number and contact person will appear in the next fields.
Press the More button and the following screen comes into view. The More screen lists the customer's address and phone number.
The billing terms may be specified and will be printed on the invoice. If terms are not specified, the terms entered through System Setup will be assumed.
Up to ten characters are available for the number of this invoice. This is the number that will be printed on the invoice, unless it is changed through Invoice Printing Limits.
Specify the job for this billing. Press the lookup button and the Job Setup screen will come into view. Highlight the desired Job ID and press the Select button.
Enter six digits for the date of the invoice. Press the lookup button and a Calendar will come into view. Choose the correct date and press the OK button.
Enter six digits for the date the invoice is due, or press the lookup button and a Calendar will come into view. Choose the correct date and press the OK button.
Check this box if the invoice is paid. The system will ask for the Paid Date and Check Number. Enter the information in the appropriate fields.
For a description of the Credit Card procedure, see the definition of the Card button under Trade Invoice Entry.
The billing information to date will be listed in this field. This field is for informational purposes only.
Original Contract
This is the original contract amount as entered through the General Ledger Tab in Job Setup.
Change Orders
This is the total amount of approved change orders for this job. For more information, see the Change Order Tab in Job Setup.
Current Contract
This is the most recent contract amount. Changes to the Original Contract amount can be entered through the General Ledger Tab in Job Setup.
Billed to Date
This is the amount billed to date on this job. This figure comes from Accounts Receivable.
Received
The amount received to date on this job. This figure comes from Accounts Receivable. The Current Percent Complete will then be calculated and inserted automatically.
Retained
This is the amount retained to date on this job. This figure comes from Accounts Receivable.
Retention to be billed
Enter the amount of the outstanding retention that is to be reconciled using this retention billing. This can be entered either as a percent of the total original retention, a percent of the remaining retention, or a dollar amount. If an amount less than 100% of the remaining retention is entered, the system will ask the following question:

If Yes is selected, all the invoices listed below will have their remaining retention reconciled using the listed percentage.
Manually reconcile the retention to be billed amount to one or more invoices by highlighting the desired Invoice and press the Change the Retention to be billed button.
Change the Retention to be billed (button)
When this button is pressed, the Retention to be Billed column will be available for editing. Enter the desired information and press the Enter key.
This is the total amount of retention that will be billed.
Report Description - A/R Posted Invoice Journal
This listing contains a summary of each invoice. A summary is printed for trade invoices and a summary is printed for progress billings. The summary for each trade invoice contains all of the information found on the invoice. The progress billing summary lists the customer, billed amount, retained amount and due dates but does not show any job information except the job number and title.
Receivables Trade Invoice Posted Journal
Reference Number
The first column contains the reference number for the billing. This number represents the position of this invoice in the A/R History file. Note: the reference numbers are listed in order, but they are not consecutive. Because of the way progress invoice information is stored, each invoice will take up multiple reference numbers.
Customer Information
The Customer Name is listed along with the Customer Number, Address, Phone Number and Customer Type (Balance Forward or Open Item).
General Invoice Information
The Invoice Number, Issue Date, Due Date, Work Order number and Purchase Order number are listed here.
Line Item Disbursement Detail
The remaining columns deal with the individual line items found on the invoice. These include Item #, Item ID, Description, Quantity, Unit Name, Unit Price, Extended Amount and General Ledger Income Account.
Invoice Totals
Below the line item detail, the system prints other pertinent information about the invoice, including Payment Terms, Discounts, Taxes, Shipping Charges, Other Charges and the Invoice Total.
Progress Billing Summary
Reference Number
The first column contains the reference number for the billing. This number represents the position of this invoice in the A/R History file. Note: the reference numbers are listed in order, but they are not consecutive. Because of the way progress invoice information is stored, each invoice will take up multiple reference numbers.
Customer Information
The Customer Name and number are listed first.
General Invoice Information
The Invoice Number, Issue Date and Due Date are listed here.
Job Information
The Job Number, Description, and Current Contract amount are listed here.
Billing and Retention Information
The remaining columns deal with the actual billing amounts. These columns include the amount billed, the amount retained, and net amount due.
Report Description - G/L Summary of Receivables Posting
This report is a summary of the posting procedure. Invoices are posted in summary to the general ledger and maintained in the ‘History File’ in condensed form. The summarized information is printed for each invoice. All transactions associated with an invoice will print in sequence. The first transaction listing for an invoice will be the customer name and account. The last line shows the total invoice transaction amount.
The reference number is the general ledger transaction number. The description for the first transaction line of an invoice will be the invoice number, customer name and customer number. The period number and date of posting will be displayed. The journal ID and number will be displayed. All transactions from the Accounts Receivable module are given the journal ID of ‘S/J,’ standing for ‘Sales Journal.’ The control account and subsidiary account for each transaction is listed. In the case of ‘Progress Billings’ the job number is listed for the subsidiary account. The transaction amount and running balance for each invoice is listed.
Report Sample- Receivables Trade Invoice Posted Journal

Report Sample- Progress Billing Posted Journal

Report Sample - G/L Summary of Receivables Posting
