![]() Print Paychecks
Print Paychecks
After timesheets have been posted, Paychecks may be printed. All unpaid amounts from previous postings will be combined on the paycheck. The operator may post on a weekly or more frequent basis if desired, but still generate checks on some other pay cycle.
When all checks have been printed, the Check Register may be produced. Any hand-written paychecks or voided paychecks that have been posted since the last printing of the check register will be shown along with all checks for the current check run.
When Paycheck Printing is selected from the Payroll Payments menu, the following screen will come into view.

Post Paychecks to the following Fiscal Period
Select the fiscal period to which accounting transactions made by the check run will be assigned. The default fiscal period will be the last fiscal period used by a posting program
Select the last day to be included in this pay period. Enter the correct date or press the lookup button and a Calendar will come into view. Select the correct date and press the OK button.
The default payroll checking account set up in Payroll Setup will be automatically entered. Enter an alternate checking account number or press the lookup button and the General Ledger Accounts screen will come into view.
Current Balance
The Current Checking Account balance is displayed here. To deactivate this option, deselect View Checking Account Balance in the Menu Access Levels setup.
Today's date will automatically be entered as the date of all checks printed in this run. To enter an alternate check date, press the lookup button and a Calendar will come into view. Choose the correct date and press the OK button.
Enter the number of the first payroll check in the printer.
Press the down arrow key to select between Normal, Higher, and Lower. These options allow for the height of the text to be altered to fit the paycheck. If unsure as to which to choose, begin with Normal and then press Print Alignment Check. Check to see if the information appears correctly on the "test paycheck". If it does not appear correctly, select either Higher or Lower and repeat the process.
Paycheck Messages
The system can print messages on paychecks. There are three categories of messages, which are defined below.
Message for All Checks
This message will print on all paychecks and direct deposit vouchers.
Message for Tagged Checks
Using the Tag, Tag All and Untag All buttons, the operator can tag certain employees to receive a message on their paycheck or voucher. Enter the text of that message here.
Message for "Employee Name"
As different employees in the list are hightlighted, the prompt will change to include the employee name. For example, "Message for J.R. Bridges." Enter a message that will print only on the check for this employee.
Print For Selected Employees (check box)
If this option is not checked, all employees with unpaid earnings will have paychecks printed for them. This option allows for a limited number of paychecks to be printed. This is useful when it is necessary to print only one paycheck or paychecks for a select group of employees. When the check box is selected, the screen will look like this.

This is a list of all employees who have unpaid earnings. The employee names will be listed and it is specified which employees will receive checks and which employees will receive direct deposit vouchers.
This is a list of employees selected for check printing.
This button selects one employee from the Unpaid Employees category and places the employee in the Paychecks to Print category.
![]()
This button selects one employee from the Paychecks to Print category and places the employee in the Unpaid Employees category.
![]()
This button selects all employees from the Unpaid Employees category and places the employees in the Paychecks to Print category.
![]()
This button selects all employees from the Paychecks to Print category and places them in the Unpaid Employees category.
Print Alignment Check (button)
This button is used to test whether the data fields in the accounting system will line up with the data fields (spaces) on the paycheck. When the button is pressed, the check will appear on the screen. The "test paycheck" may be printed at that point. If all information is lined up properly, press the Print Checks button to print all checks.
Press the Print Checks button and the following screen comes into view.

Note: Checks are usually printed on the same printer as other reports; therefore, a change of forms is usually necessary at this point. If there is a separate printer that is always loaded with payroll checks, click on the Printer button and select this printer. Press the Continue button and the checks will be printed.
If the Check run includes postings that will be paid via Direct Deposit, the following screen will come into view after all regular paychecks have printed.
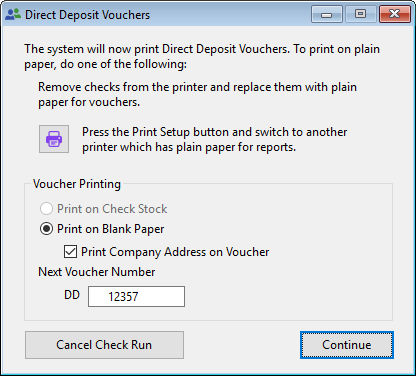

Select the type of paper on which to print the voucher(s). If Blank Paper is selected, the user is prompted to enter the Next Voucher Number. Also, the user can indicate whether the Company Address should be printed on each voucher. Press Continue and the voucher(s) will be printed.
After all paychecks and/or vouchers have printed, the following screen will come into view.

No (button)
If all the checks did not print properly, press the No button. The user then has the opportunity to reprint the checks or continue with the check run. See Reprint Checks for more information.
Yes (button)
If all the checks printed properly, select the Yes Button. The following screen will come into view.

Press the Continue button. Two Reports will be printed; 1. GL Summary of Payroll Posting and 2. Check Register Listing.
After the posting process is finished and all reports have been printed, the following screen comes into view.

Finish (button)
Press the Finish button to make the posting permanent.
Undo (button)
Press the Undo button to return all accounting data to the conditions prior to posting.
If any of the checks did not print properly, press the No button and the following screen will come into view.

If checks did not print properly, some or all of the checks may be reprinted. This can be accomplished either by starting over at a certain check number or by specifying which employee paychecks are to be reprinted.
To start over at a certain check number, follow these steps.
1. Click on the Range of Check numbers option.
2. Enter the number of the last check that printed properly.
3. Enter the number of the next available blank check form.
4. Press the Reprint Now button.
When the checks have finished printing, the message "Did all the checks print properly?" will appear again. The Reprint Checks screen will keep appearing until Yes is answered to the question or the Undo the Check Run button is pressed.
If a range of checks is not specified to print, the following message will come into view.

To specify which checks should be reprinted, follow these steps.
1. Click on the Individual Checks option.
2. Use the arrows to select which checks to reprint.
3. Press the Reprint Now button.
When the checks have finished printing, the message "Did all the checks print properly?" will appear again. The Reprint Checks screen will keep appearing until Yes is answered to the question or the Undo the Check Run button is pressed.
If no checks are moved into the "Reprint the Following Checks" box and the Reprint Now button is pressed, the following message will come into view.

Continue without Printing (button)
This button is used to continue on with the check run without reprinting the checks. The system will finish with check run.
Undo the Check Run (button)
Press the Undo button to return all accounting data to the conditions prior to posting.

No (button)
If the No button is pushed the previous screen will come into view. Enter the number of the last check that printed properly and the number of the next available check in the printer.
Yes (button)
Press the Yes button to return all accounting data to the conditions prior to posting. When the Yes button is pressed, the following message will come into view.

Warning: All checks created during this check run must be destroyed. They are not accounted for in the accounting system. Press the OK button and the check run will aborted.
Emailing Direct Deposit Vouchers to Employees
If Direct Deposit Vouchers have been printed and one or more of the Direct Deposit Employee records have valid email addresses, this Email Direct Deposit Vouchers window will appear at the end of the check run.
Report Description- Check Register Listing
This report shows the activity which will reach the General Ledger Transaction File as a result of this posting. Each transaction is listed, with its unique reference number, description, check number (if any), journal line number, and amount.
Check Number/Date
The Check number will be listed and then the date of the check underneath.
Name/Id
The employee name as it appears in the employee record will be listed with the employee number underneath.
Regular and Overtime hours
The total regular and overtime hours paid by this check are listed.
Tax/Non-tax
Standard Deductions
All the standard deductions for this employee are listed.
Net Pay/Direct Deposit
The Net Pay and the Direct Deposit amount for this employee are listed under the Net Pay.
Totals
The totals for each category are listed.
Sample - Paycheck (with optional Timesheet Details on Check Stub)

Sample - Direct Deposit Voucher (with traditional two identical check stubs)

Report Description- General Ledger Summary of Check Register Posting
This report shows the activity which will reach the General Ledger Transaction File as a result of this posting. Each credit and debit transaction is listed, with its unique reference number, description, check number (if any), journal line number, and amount. This information is permanently stored in the transaction file and may be retrieved at a later date using General Ledger reporting. File all printouts produced by the posting as soon as possible. They are EXTREMELY important for auditing purposes and should NEVER be thrown away.
Report Sample- Check Register Listing

Report Sample- General Ledger Summary of Payroll Posting
