![]() Setup: Payroll
Setup: Payroll
This screen can be accessed by selecting Setup > Accounting Options > Payroll. It can also be accessed by right-clicking the PR menu icon.

State for Entry of New Employees
The is the state that will be entered automatically for New Employees if no state has been entered for this employee. This option is useful if the state for Withholding, Worker's Comp, Liability, and Unemployment for an employee is the same as the default state.
Warn of Duplicat SSN During Employee Entry (button)
If this box is checked, the system will warn the user if they enter a Social Security Number in the employee entry window that already belongs to another entered employee.
Source for Prevailing Wage Rates
This is the source that will be used automatically for employee wage rates for timesheet entry. Use the arrow button to select the desired source. The Prevailing Wage Rate is the rate the system will use for timesheet entry. This rate(s) will override the pay rates found in the employee file.
Job Wage Rate Table
If this option is selected, the program will use the Prevailing Wage Rate Table for each job . The Wage Rate Tables for each job are setup in Job Setup on the Certification Tab.
Certified Craft Dictionary
If this option is selected, the program will use the Certified Craft Dictionary. The wage rates for each craft code are setup in the Certified Payroll Codes entry program.
Ignore Default Certified Craft Unless Entering Certified Job Timesheets (checkbox)
This option affects how Default Certified Craft codes stored in the Employee Record are used during timesheet entry. If the box is unchecked, the timesheet entry programs will ALWAYS use the default certified craft code from the employee record (unless a certified code attached to the entered cost code overrides the certified code). If the box is checked, the timesheet entry programs will use the default certified craft code from the employee record ONLY IF A CERTIFIED JOB IS ENTERED.
Track Premium hours (check box)
Whenever an employee works at overtime rates, the premium hours may be tracked separately from regular and overtime hours. This is especially useful when the contractor is trying to accurately determine work rates and unit costs for future estimating that doesn't include overtime distortions. If the Track Premium Hours box is selected, the premium hours are separated from regular and overtime hours. Premium hours are user defined. Examples: double or triple time.
Setup Shift Differentials (button)
Press the Setup Shift Differentials button to define different wage adjustments that can be applied to different work shifts. When this button is press, the following screen will come into view.

Select (button)
Press the Select button to choose the highlighted Shift Differential.
Add or Change (button)
Press the Add or Change button to Add or Modify a Shift Differential. See Adding or Changing a Shift Differential.
Delete (button)
Press the Delete button to delete the
Adding or Changing a Shift Differential
Pressing the Add or Change button will bring the following screen into view. This screen allows the user to define or modify a Shift Differential.


Shift Id
Enter the Shift Id for this Shift Differential.
Description
Enter a Description for this Shift Differential.
Wage Adjustment Type
Select the Wage Adjustment Type and different options will appear based on the selection.
Additional Amount Per Hour
This selection will add specified amounts to Regular, Overtime, and Premium Hours.
Additional Percent
This selection will add a specified percentage to Regular, Overtime, and Premium Hours.
Flat Hourly Rate
This selection will replace Regular, Overtime, and Premium Hours with specified amounts.
When Changes are made to Employee record
Whenever information is changed in a employee record, the program can automatically attach a history entry to the employee file documenting the change that was made. Select one of the options regarding the creation of this history entry.
The system can track three types of accruals for each employee. The default description for these types are Vacation, Sick Pay, and Pension; however, the user may specify any label to be used for these three types throughout the system. Examples of different labels might be Paid Time Off, Holiday Pay, etc. Enter the desired labels here.
Accounts & Accrual Distribution (tab)

General
Payroll Checking
This is the General Ledger checking account number that will be used for payroll checks. Enter the number of the General Ledger Account or click on the lookup button and the General Ledger Accounts screen will come into view. Highlight the correct account and press the Select button. The account will be selected and the previous screen will come into view.
Wages Payable
This is a suspense account in the liability section of the General Ledger. This account will hold money due employees after payroll has been posted. Unit checks are issued by the system.
Whenever an employee works at overtime rates, the employee's earnings can be separated into to portions. The base portion of the employee's pay is the number of overtime hours worked times the employee's regular pay rate. The premium portion is the number of overtime hours worked times the difference between the employee's regular pay rate and the overtime pay rate. For example, let's say John's regular pay rate is $20 per hour and his overtime pay rate is $30 per hour. If John works 10 hours of overtime, his wage is 10 times $30, or $300. The base portion of his pay is 10 times $20, or $200. The premium portion of his pay is 10 times $10, or $100.
This premium portion of the wage may be charged separately from regular earnings. This is especially useful when the contractor is trying to accurately determine work rates and unit costs for future estimating that excludes overtime distortions. The three methods of specifying them are the same as the specification for Field Payroll Accruals. (Review Field Payroll Accruals above for details) Enter a General Ledger account, a Job Cost account, or 'D' or Distribute. Most companies enter Distribute (if premium wages will not be separated) or a Job Cost account (if premium wages will be separated). If a Job Cost account is entered, remember to include a Premium Wages cost code when setting up each job (during job entry).
All non-job labor such as executive and clerical wages generate employer paid accruals. These accruals include state & federal unemployment, worker's compensation insurance, employer's FICA, General Liability, Union and other items. To charge any of these expenses to a single expense account in the General Ledger, enter the account number here. To let the program charge the expenses to the same account entered on the employee's timesheet, type 'D' for Distribute. For more information, see Accrual Distribution Setup.
Field Payroll Accruals include FICA, Unemployment, Worker's Comp, Liability and Unions. For all job related labor, all employer paid accruals may be applied to the company's books in one of the following three ways:
1. The expenses may be applied (debited ) to a single specified General Ledger expense account. To charge any of these accruals to a single expense account in the General Ledger, enter the account number here.
2. Any accrued expenses may be applied (debited) to a separate Job Cost account (one per job). The Job Cost account (cost code) must be the same on each job. Remember when setting up each job (during job entry ) this labor overhead cost code must be put into each job. To select this option, type a cost code including a code type (M, L, S, B , E, or G) in response to this question.
3. Any accrued expenses may be applied (debited) to the same Job Cost account (cost code) to which the direct labor expense was charged. For example: one hour of concrete labor worked at $10.00 would cause $2.21 (example only) in employer accruals. Instead of $10.00 charged to the job and $2.21 charged elsewhere, a total of $12.21 would be charged to the concrete labor cost code on this particular job. In order to achieve this desired result type 'D' for Distribute or type "Distribute" in response to this question.
The following screen comes into view when any of the Accrual Distribution lookup buttons is pressed. There are three options available: 1. Distribute 2. Assign to a specific General Ledger account or 3. Job and Cost Code. Note: If this screen is accessed from Office Payroll Accruals option, 3 will not be available.
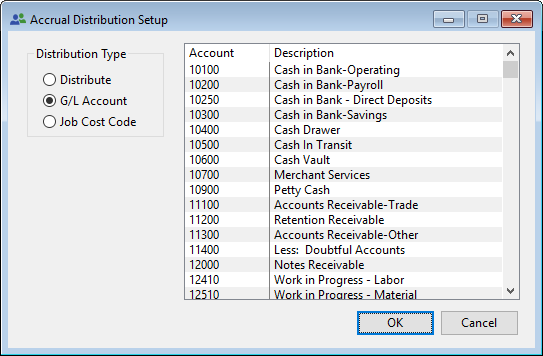

Distribution Type
Distribute (radio button)
To let the program charge the expenses to the same account entered on the employee's timesheet, choose the Distribute radio button.
G/L Account (radio button)
To charge any of these expenses to a single expense account in the General Ledger, press the G/L Account radio button and highlight the account number off to the right.
Job Cost Code (radio button)
To charge any of these expenses to a separate cost code budget on the same job, press the Job Cost Code radio button. Select the cost code from the list box on the right and the cost type from the list of cost types below.
Office Special Pay
When money is accrued into a General Ledger account for Vacation, Sick, or Pension Pay, money and/or hours are added to the Employee Record through the Vacation/Sick Pay/Pension Setup screen. When an employee takes vacation hours on a time sheet, money and/or hours are subtracted from the Vacation/Sick Pay/Pension amounts previously setup. There are two accounts for each special pay type. This can accommodate, for example, Vacation pay being charged to different accounts for executives as opposed to regular employees.
Field Special Pay
When money is accrued into a Cost Code and Cost Type for Vacation, Sick, or Pension Pay, money and/or hours are added to the Employee Record through the Vacation/Sick Pay/Pension Setup screen. When an employee takes vacation hours on a time sheet, money and/or hours are subtracted from the Vacation/Sick Pay/Pension amounts previously setup.

Posting Options
Print Posting in Summary (check box)
Payroll postings will be printed in summary instead of in detail. This only affects the report; postings will continue to be in detail.
Separate Burden from Wages in Detail (check box)
If this box is checked, any burden cost code will be separated from the wages in the Payroll Posting Detail Report. If this box is not checked and the method for allocating payroll is set to 'distribute', the burden will be included in the wages on the Payroll Posting Detail Report."
For example: if burden was $35.00 and the wages were $100.00 , the following G/L transactions would be generated.
|
Job |
Cost code |
Account |
Distribute |
Wages |
|
|
|
|
|
|
|
(Box Unchecked) |
||||
|
200 |
30000L |
45010 |
D |
$135 (Burden included in wage) |
|
|
|
|
|
|
|
(Box Checked) |
||||
|
200 |
30000L |
45010 |
D |
$100 (Burden separated) |
|
200 |
30000L |
45010 |
D |
$ 35 |
Overtime Hours Spread (Blended Rates) (check box)
Use this check box to instruct the timesheet posting program to take any entered overtime hours and spread them to all the codes worked on at a Blended Overtime Rate .
When an employees is paid overtime, they are actually paid their regular rate plus an overtime premium portion.
If the Overtime Hours Spread box is not selected, the regular and the premium overtime portion of the pay will be applied to whatever cost code is entered. If any of the work is on jobs funded with federal funds, federal law may dictate leaving this box unchecked. Overtime pay for eight hour law jobs is tallied daily and proportionally distributed to all eight-hour law jobs worked during the week.
If the Overtime Hours Spread box is selected, the overtime premium portion of the employee's pay is tallied for the week and is proportionately distributed to all non eight-hour law jobs worked during the week.
Print Job Cost Summaries (check box)
Job Cost Summaries are optional reports that may be printed during payroll posting. A separate report is printed for each job which has had labor costs incurred during the current posting. The report summarizes the hours and costs by cost code. NOTE: If time sheets have been posted to several different jobs, these reports may be lengthy. The common response is not to check this option, since not printing the Job Cost Summaries reduces the overall posting time. The same information is available through Detailed Job Costing reports.
During time sheet entry, any number of regular hours or overtime hours may be entered for an employee during the work week. In order to give the system the authority to change some regular hours to overtime hours during the posting, enter the maximum number of regular hours (i.e. 40) that any employee will be allowed before the system changes the hours to overtime hours. To keep the system from changing regular hours to overtime hours, enter all '9's (99999999).
Create AP Invoice(s) for Payroll Accounts(check box)
This option allows the user to automatically create an AP invoice for any amounts withheld or deducted from an employee's pay. The created AP Invoice can then be Proof Listed and Posted accordingly. Press the Settings button and the following screen will come into view.

For each withholding or accrual type there will be an associated Vendor ID and Batch ID. If no Vendor ID or an invalid Vendor ID is selected, no Invoice will be created. If an invoice for the selected vendor(s) already exists, the system will follow the instructions on this window to either add a line item for the withholding or accrual to that existing invoice, or create a new invoice.
Federal Tax Withheld
Enter the Vendor ID to whom Federal Tax withholdings should be paid. Enter the Batch ID where the AP Invoice should be created.
Social Security Withheld/Accrued
Enter the Vendor ID to whom Social Security withholdings and accruals should be paid. Enter the Batch ID where the AP Invoice should be created.
Medicare Withheld/Accrued
Enter the Vendor ID to whom Medicare withholdings and accruals should be paid. Enter the Batch ID where the AP Invoice should be created.
Federal Unemployment Accrued
Enter the Vendor ID to whom Federal Unemployment accruals should be paid. Enter the Batch ID where the AP Invoice should be created.
If this box is checked, then when timesheets are about to be posted the system will quickly look for any unpaid commissions for any of the employees in the tagged timesheet batch(es). If any are found, a warning window will be displayed informing the user of the unpaid commission. The employee's timesheet can then be edited and the commission added before the timesheets are posted.
Setup Account Reconciliation File Export (button)
See Account Reconciliation Setup.
Transfer Funds During Check Posting (check box)
Select this box to automatically transfer the amount of net pay from the desired source account to the payroll checking account during check posting.
Source Account for Funds
Enter the GL account number from which Payroll funds should be transferred.
Paycheck Options
Order Checks & Forms Online (button)
Press the Order Checks & Forms Online button to be directed to the check and form ordering website.
Click this button to select which check format will be used for printing Payroll checks. The following window will appear:

Highlight any check format to see a representive sample of the printed check in the pane on the right. Once the desired check format is highlighted, click the Select button. See Setup Check Formats for more information.
Color (radio buttons)
When a laser format with shaded boxes is selected, the user will be allowed to select a color scheme for the check stub. For example, if the user selects "Blue", the check stub will print the boxes with blue outlines and pale blue shading.
To print out multiple copies, press the Copies/Collation button.
 OR
OR 
Number of Check Copies to Print
Enter the number of copies of the paycheck that will be printed by the system.
Number of Voucher Copies to Print
Enter the number of copies of the direct deposit voucher that will be printed by the system.
Collate (check box)
If the Collate box is not checked, payroll check copies will be printed 1-1-1, 2-2-2, 3-3-3. If the Collate box is checked, payroll check copies will be printed 1-2-3, 1-2-3, 1-2-3.
FormMaker Check Filename
If FormMaker is selected as the Payroll Check Format, use this entry field and/or lookup button to specify the report file (*.rpt) which contains the report format created in FormMaker for printing payroll checks.
Modify FormMaker Checks (button)
Press the Modify FormMaker Checks button to open FormMaker and modify or create a Payroll check format. For more information, see FormMaker.
Alignment Check (button)
Press the Alignment Check button to print an Alignment Check on check stock. For more information see Print Alignment Checks.
Press the Direct Deposit button and the following screen comes into view.
Cash Account for Direct Deposits
Enter the payroll cash account to be used for making direct deposits.
Direct Deposit Employees:
This is a list of all employees for whom Direct Deposit setup has been completed. Use the Add and Change buttons to modify settings for an individual employee. See the Direct Deposit Setup instructions in the Employee topic for more information.
Checking Account Direct Deposit Settings
This is a list of all GL Accounts that have been designated as Checking Accounts. Use the Change Attributes button to modify the Direct Deposit settings for the highlighted account. Refer to the Bank Information Setup in the General Ledger Accounts topic for more information about changing bank settings.
Specify a Printer for Paychecks (check box)
Normally, paychecks will be formatted for and printed to the Windows system default printer. If a tick is placed in this box, the operator can use the lookup button to pick from a list of system printers. The printer specified here will be used for printing paychecks.
Vacation Accrual Information on Check Stubs
Use these controls to indicate how much Vacation information should be printed on the Paycheck Stub.
Sick Accrual Information on Check Stubs
Use these controls to indicate how much Sick Pay information should be printed on the Paycheck Stub.
Employee SSN on Check Stub (radio buttons)
Select this desired option for including the employee's Social Security Number on Payroll checks. This can be overridden for individual employees in the Employee Record Entry program.
Company Name on Check Stub (radio buttons)
Use these radio buttons to indicate whether the accounting sofware should print the Company Name and/or Company Address at the top of each check stub. One of the options is to Print Address Only. This would be used if the preprinted check forms already have the Company Name printed at the top of each check stub.
Pay Period Display (radio buttons)
Use these radio buttons to indicate whether the accounting sofware should print the Pay Period End Date or the Date Range of the pay period. The two different choices printed on the check stub will be as follows:
|
Selected Method |
Check Stub Representation |
|
Print Period End Date |
PERIOD END DATE: 04/24/2023 |
|
Print Pay Period Range |
PAY PERIOD: 04/18/2023 - 04/24/2023 |
Print Check Number on Check Face (check box)
Check this box to include the check number on the body of the check. Most checks already have the check number pre-printed on the check body. If this box is checked, the check printing program will also print the check number on the check body. This will result in the check number being printed on the check twice. For some people this is desirable, indicating that the system printed the right check on the right pre-printed check form. For others it may be distracting.
Print Prevailing Wages on Multi-Rate Stub (check box)
If this box is checked, the rate breakdown section of the Mutli-Rate check stub will contain not only the number of hours per rate, but also the certified craft code.
Timesheet Details on Check Stub (check box) and Settings (button)
Most of the payroll check formats include a check body and two identical, detachable check stubs. The system can provide more information about the employee time distribution. If this box is checked, the system will replace the information on the second check stub with a list of the dates, number of hours, and distribution of the employee's time. Also, the "Settings" button will be enabled. If this button is pressed, the following window will appear:

Select the desired level of detail for job information printed on the second check stub. Here is an example of how the second check stub will appear:

Standard Deductions are repeating deductions that should automatically be deducted from the employee's wages each week. Examples might be Health Insurance, Charitable Contributions, wage garnishments, or Credit Union. The name, method of calculation (hourly, Percent, or Flat Amount), the General Ledger Liability Account into which deducted amounts are accrued, and the limit basis for all deductions are specified in the Add or Change a Standard Deduction screens. They are the same for all employees. The rate, the limit amount, the week to date and year to date values of each deduction may vary from employee to employee and are specified by employee through Employees in the Payroll Main Menu.

Add or Change (button)
See Add or Change a Standard Deduction.
Press the Delete button and the following screen comes into view. Press the Yes button and the highlighted record will be deleted and the previous screen comes into view. If the No button is pressed, the program returns to the previous screen.

This button closes the program and returns to the Main screen.
Help (button)
see How to use Help
Add or Change A Standard Deduction
Press the Add or Change button and the following screen will come into view.

Enter the number of the deduction.
Enter a description for the deduction.
Enter up to 6 characters for a shorthand description of the deduction. This is the description which will be printed on the check stub.
Enter the General Ledger account to which this deduction is to be credited.
There are five types of deductions available: Flat Amount, Percent of Gross, Percent of Main Gross, Percent of Net and Amount per Hour. Use the arrow to choose the correct type.
Flat Amount
Deduction is a flat dollar amount per pay period.
Percent of Gross
Deduction is a percentage of the employee's gross pay.
Percent of Main Gross
Deduction is a percentage of the gross pay from Hourly and Salary timesheets, omitting pay from Other Pay timesheets.
Percent of Net
Deduction is a percentage of the net pay after Federal, State and Local taxes have been deducted.
Amount per Hour
Deduction is a dollar amount per hour the employee worked.
The deduction limit may be based upon either the total amount of the deduction or the total accumulated annual Gross Pay. If Gross Pay is selected and the limit in the employee file is set to $10,000.00, this deduction will be taken until the employee's year to date gross reaches $10,000.00 at which time this deduction will no longer be taken. If Deduction is selected and the limit in the employee file is set to $250.00, this deduction will be taken until the year to date deducted amount reaches $250.00.
This is the limit that will be used as a default when this deduction is added to an employee record.
Treat deduction limit as a remaining balance (check box)
This setting will only be enabled if the limit is based on the deducted amount. If this box is checked, the limit in the employee file will be reduced by the amount of the deduction each time a deduction is taken. For example, let's say the limit is set to $250.00 in the employee record and the deduction rate per pay period is set to $50. If this box is checked, the first week payroll is processed, $50.00 will be deducted from the employee's pay and the limit will be reset to $200.00.
The box should be checked if this is a deduction for employee advances or loans.
Enter the Box type that applies to this deduction on the W2 form. Click on the down arrow to select from a list of box types. Select from the following options:
None
A
B
C
D 401(k)
E 403(b)
F 408(k)(6)
G 457(b)
H 501(c)(18)(D)
J
K
L
M
N
P
Q
R MSA
S 408(p)
T
V
W HSA
Y
Z
AA Roth 401(k)
BB Roth 403(b)
DD Heath Coverage
EE Roth 457(b)
Certified Payroll Assessment (check box)
If this box is checked, this deduction will show up on page 1 of the Certified Payroll Report Statement of Compliance under assessments.
Direct Deposit Deduction (check box)
If the employee has direct deposit, when the check is deposited, the money is taken from the employees net amount and put directly in the specified account. For example: The amount of the paycheck is $500.00. The employee wants $450.00 to go into a checking account and $50.00 to go in a savings account. This will be an employee specified account.
Section 125 Deduction (check box)
Check this box if this deduction meets the requirements of a Section 125 payroll deduction.
|
Federal Tax |
Social Security |
|
Medicare |
Federal Unemployment |
|
State Tax |
State Unemployment |
|
Workers Comp |
General Liability |
|
Local Tax |
Disability Insurance |
Each deduction may be excluded from eight possible options. Check the options that are desired for exclusion. If no options are checked, the deductions will be processed after all taxes have been subtracted from the gross.
For example: a 401K plan may be exempt from Federal and State Tax, but not exempt from FICA. By selecting Federal Tax and State Tax, such a deduction would be subtracted from the gross pay before the Federal and State Taxes are subtracted from the gross pay, but not before FICA is subtracted. Cafeteria plans can be any combination of the eight possible deductions.
IMPORTANT NOTE: Regarding Non-Taxable Deductions such as 401k and Percent of Net Deductions
Deductions which are designated as Percentage of Net deductions cannot, by nature also be flagged as Non-Taxable. The very nature of a Percentage of Net deduction is that it cannot be calculated until the computer has calculated the Net Pay amount. The nature of a Non-Taxable deduction is that its deduction value is subtracted from the Gross Pay amount in order to determine the Net Pay amount. It is for this reason that the system will not allow a deduction to be flagged as both Non-Taxable AND as a Percent of Net deduction.
Employer Match (check box)
If the employer matched this deduction, check this box.
Match Amount
Enter the percentage of the total deduction the employer will match.
Match Limit
The deduction limit may be based upon either a Percentage of Gross or a Flat dollar amount. Use the radio button to choose the correct type. For example: the employer portion of this deduction is a flat amount of $200.00.
Base Limit on YTD (check box)
Check this box if the match limit needs to be based on the amount deducted or employee gross year to date, as opposed to basing it on the deduction amount and gross for the pay period being processed.
Account
Enter the General Ledger account to which this deduction is to be credited.
Payment of Deducted Amounts
This area is used to identify the Vendor to whom Employer contributions will be paid and to select an Invoice Batch in which the payments will be posted.
Vendor ID
Select the Vendor ID to whom deductions for this Standard Deduction should be paid. Press the lookup button to Select the Vendor ID from a list of Vendors.
Batch ID
Select the Batch ID where automatically created Invoices will be placed for transactions involving this Standard Deduction.
When the system attempts to create an invoice for the selected vendor in the selected invoice batch, there may already be an invoice for this vendor in the batch. If this is the case, the system will lean on the option selected here to determin whether to create a second invoice for the vendor, or to add a line item to the existing invoice.
This area is used to identify the Vendor to whom Employee contributions will be paid and to select an Invoice Batch in which the payments will be posted.
Vendor ID
Select the Vendor ID to whom deductions for this Standard Deduction should be paid. Press the lookup button to Select the Vendor ID from a list of Vendors.
Batch ID
Select the Batch ID where automatically created Invoices will be placed for transactions involving this Standard Deduction.
When the system attempts to create an invoice for the selected vendor in the selected invoice batch, there may already be an invoice for this vendor in the batch. If this is the case, the system will lean on the option selected here to determin whether to create a second invoice for the vendor, or to add a line item to the existing invoice.
For more information see Setup: Payroll: Miscellaneous: Create AP Invoices Automatically.
Standard Timesheet Information may be entered through Timesheet entry. For the Preferred Edition only, the System now stores a database of Other Pay types, tailored by the user and accessible during timesheet entry.

Other Pay Description
Description of the Other Pay Type is given here. For example: Travel Reimbursement
Insert or Change (button)
These buttons are used to insert or modify the Other Pay Types information. Press the Insert button or highlight the desired Pay Type and press the Change button. For more information, see Inserting or Adding an Other Pay Type.
Delete (button)
Press the Delete button and the following screen comes into view. Press the Yes button and the highlighted record will be deleted and the previous screen comes into view. If the No button is pressed, the program returns to the previous screen.
Close (button)
This button closes the program and returns to the Main screen.
Inserting or Adding an Other Pay Type
Press the Insert button or highlight the desired pay type and press the Change button. The following screen comes into view.

Description
Description of the Other Pay Type. Example: Taxable Other Pay
GL Account
Enter the default GL Account number that will be used to expense this other pay.
Cost Code
If this type of other pay will usually be expensed to a job, enter the default Job Cost Code that will be used to expense this pay.
This option offers increased flexibility by allowing entry of two types of Other Pay: 1 Other Taxable Pay ( bonus, travel pay,etc.) and 2. Other Non-Taxable Pay (reimbursements, subsistence)
Taxable Other Pay (Check box)
If this pay is subject to taxation, check this box. Examples: vacation pay or bonuses.
Non -Taxable Other Pay (Check box)
If this pay is not subject to taxation, check this box. Examples: reimbursements, subsistence
Tax State
Enter the two-letter ID of the state. State tax will be calculated for this other pay type according to the Tax tables of the state specified here. Pressing the lookup button will cause a list of Available States to come into view. Highlight the correct state and press the OK button.
Unemployment State
Enter the abbreviation of the State under which unemployment is to be calculated for this other pay type. Pressing the lookup button will cause a list of Available States to come into view. Select the correct state and press the OK button.
Locality 1 & 2
Enter the three-letter ID of the locality in which the employee is working. Local tax will be calculated for this employee according to the Tax tables of the locality specified here. If an employee works in more than one locality within a single pay period, enter both localities. Pressing the lookup button will cause a list of Available localities to come into view. Highlight the correct locality and press the Select button.
Workers Comp Code
Enter the Worker's Comp craft code for the work performed for this other pay type. The system will take this code and lookup the associated Worker's Comp rate from the rate table for the assigned Worker's Comp state.
Workers Comp State
Enter the abbreviation of the State under which Worker's Compensation is to be calculated for this other pay type. Worker's Compensation rate tables are established for each state in State & Local Tax Tables. Pressing the lookup button will cause a list of available states to come into view. Select the correct state and press the OK button.
General Liability Code
Enter the Liability craft code for the work performed for this other pay type. The system will take this code and lookup the associated Liability rate from the rate table for the assigned Liability State.
General Liability State
Enter the abbreviation of the State under which Liability is to be calculated for this employee. Pressing the lookup button will cause a list of Available States to come into view. Select the correct state and press the OK button.
Certified Code
Enter the Certified Code to be used for this other pay type.
Fringe Benefit Table
Enter the Fringe Benefit Table to be used for this other pay type.
DO NOT Withhold or Accrue the following
This other pay type may include special tax and accrual requirements. Check the items in this list that are desired for exclusion.
Do not Calculate Union Fringe Benefits
If this other pay type doesn't require Union Fringe Benefits to be withheld, check this box.
Do not Calculate Standard Deductions
If this other pay type doesn't require standard deductions to be withheld, check this box.
Federal Taxes (tab)


Show Settings for Tax Year (drop-down list box)
This is a list of all the years for which A-Systems stores federal tax withholding and accrual settings. All tax tables are updated by A-Systems Corp. automatically. The only fields available for modification by the user are the Federal ID Number, GL Account, and Rounding settings.
Federal I.D.
Enter the tax identification number assigned to the company from the federal government. Enter the hyphen '-' and it will appear on the reports.
GL Withholding Account
Enter the General Ledger account number for the federal tax liability account. Pressing the lookup button with cause the General Ledger Accounts screen to come into view. Choose the correct entry and press Select. This screen will come back into view.
Personal Exemption Amount (Withholding Allowance)
Personal Exemptions are adjustments to the gross earnings used in calculating the 'taxable' gross. This figure is the personal exemption amount found in the federal publication Circular E under the heading, Percentage Method of Withholding.
Social Security Withheld
Enter the general ledger liability account number for the social security tax withheld from the employee. Press the lookup button and the General Ledger Accounts screen will come into view. Choose the correct account and press the Select button. The account will be selected and the previous screen will come into view.
Social Security Accrued
Enter the general ledger liability account number of the social security tax accrued by the employer. This may be the same or different than the Social Security Withheld account. Press the lookup button and the General Ledger Accounts screen will come into view. Choose the correct account and press the Select button. The account will be selected and the previous screen will come into view.
Withholding Rate (Employee)
This is the rate at which social security tax is paid by the employee.
Accrual Rate (Employer)
This is the rate at which social security tax is accrued by the employer.
Wage Limit
This is the maximum annual earnings to which social security applies.
Additional Medicare Rate
Once the employee's earnings reach a certain point, the government may require an additional amount of Medicare tax to be deducted from the employee. This is the rate for the additional withholding.
Wage Minimum for Additional Medicare
This is the wage minimum for the wittholding of additional Medicare tax explained above.
Medicare Deducted
Enter the general ledger liability account of the withheld Medicare tax deducted from employee wages. Press the lookup button and the General Ledger Accounts screen wil come into view. Choose the correct account and press the Select button. The account will be selected and the previous screen will come into view.
Medicare Accrued
Enter the General Ledger liability account of the accrued Medicare tax accrued by the employer. This may be the same as or different than the Medicare Deducted account. Press the lookup button and the General Ledger Accounts screen will come into view. Choose the correct account and press the Select button. The account will be selected and the previous screen will come into view.
Medicare Rate
This is the percentage rate at which Medicare tax is paid by the employee and matched by the employer.
Wage Limit
This is the maximum annual earnings (if any) to which Medicare applies.
Unemployment Account
Enter the General Ledger account of the federal unemployment tax accrued by the employer. Press the lookup button and the General Ledger Accounts screen will come into view. Choose the correct account and press the Select button. The account will be selected and the previous screen will come into view.
Unemployment Rate
Federal law mandates that employers must pay 6% of an employee's wages to provide unemployment benefits to employees who are out of work. Every state is able to subtract a certain amount from this percentage in return for providing unemployment benefits at the state level. In the past, all states deducted 5.4 from the 6%, leaving .6% that must be accrued and sent to the federal government.
In the past, many states borrowed money from the federal government to pay unemployment benefits. Most states paid back the money they borrowed. States that did not repay the money are referred to as “Credit reduction” states. Employers who pay wages that are subject to the unemployment tax laws of a credit reduction state must pay additional FUTA (federal unemployment) tax.
Because of this circumstance, the percentage entered in this Federal Tax Setup window is now the full 6% instead of the .6% figure entered in the past. In the State Setup window for each state, the user can enter the Unemployment Credit amount to be deducted from the Federal figure.
Unemployment Limit
This is the maximum annual earnings to which federal unemployment applies.
This is where tax withholding tables are viewed. The list box should include three entries, Single, Married, and Head of Household.
Insert or Change (buttons)
Highlight the desired federal tax table and press the Change button. For more information, see Insert or Change a Federal Tax Table.
Round Federal Tax to the nearest dollar (check box)
This option allows withholdings to be rounded to the nearest dollar.
This is the standard deduction amount for single persons.
Married Standard Deduction
This is the standard deduction amount for married persons.
This is the amount of the Adjustment for Nonresident Aliens.
Insert or Change a Federal Tax Table
Press the Change button and the following screen comes into view.

This window displays the rate table settings for the federal withholding table for Single persons. Tables have been entered for Single, Married and Head of Household. The window contains a Standard Withholding Rate Schedule and an Alternat Withholding Rate Schedule. This second rate schedule is only used if the employee checked the box in Step 2(c) on the Form W-4.
From the percentage tables provided by the Federal Government, this is the minimum range amount for this line number. If the employee's earnings fall between this amount and the amount entered directly below, the amount withheld will be calculated using the percentage entered at the right.
This is the percentage for this line number as found in the percentage tables provided by the Federal Government. This figure will be used to calculate the amount to be withheld.
State and Local Tax Tables can be created and maintained for multiple states.

This screen is a Menu of States. New states may be added, or data for existing states may be edited or deleted through this screen. Note: States are identified by the standard U.S. Postal Service codes
Add or Change (button)
Press the Delete button and the following screen comes into view. Press the Yes button and the highlighted record will be deleted and the previous screen comes into view. If the No button is pressed, the program returns to the previous screen.
This button closes the program and returns to the Main screen.
Help (button)
see How to use Help
Press the Add or Change button and the following screen will come into view.

State ID
States are identified by the US Postal Service codes. Select the state with the arrow and the State name is automatically filled in.
State Tax ID
Enter the tax identification number assigned to the company by the state government.
State has Withholding Tax
Check this box if the state has a withholding tax.
Withholding Account
This is the General Ledger Account into which withholding taxes for this state are accrued. To add a General Ledger account, press the lookup button and the General Ledger Accounts screen will come into view. Select the correct account and press the Select button. The program will return to this screen.
The state tax may be based on the employee's gross earnings or on the federal withholding amount. Check the correct box to indicate Gross Wage or Federal Tax.
Gross Wage (radio button)
If this button is selected, the state tax will be based on the employee's gross earnings.
Federal Tax (radio button)
If this button is selected, the state tax will be based on the Federal Withholding amount.
A standard deduction may or may not be allowed by the state. If one is allowed, it may be a Flat Dollar Amount, or it may be based on a Percentage of Gross earnings. Check the correct radio button. This selection influences the screen that will come into view when changing or adding a Tax Calculation Table. The General Information Tab is the only screen affected.
Flat Dollar Amount (radio button)
A Flat dollar Amount will be taken out if this radio button is selected.
Percentage of Gross.(radio button)
A Percentage of Gross pay will be taken out if this radio button is selected.
Personal exemptions are adjustments to the gross earnings used in calculating the ‘taxable' gross, or they may be tax credits which are subtracted from the computed tax amount. Check the radio button to indicate whether exemptions are subtracted from the Gross Amount or the Tax Amount.
Gross Amount (radio button)
The Standard Deduction will be subtracted from the amount the employee is going to be paid before taxes are subtracted.
Tax Amount (radio button)
The Standard Deduction will be subtracted from the calculated State Tax.
Deducting Federal before Computing Tax
Some states allow the federal withholding tax to be deducted from the gross earnings when computing the taxable gross. Check the Deducting Federal before Computing Tax box if Federal tax is to be deducted before computing the taxes. If this option is selected, the Annual Limit field appears which allows the user to enter the desired amount.
Deducting FICA before Computing Tax (check box)
Some states allow the the FICA amounts to be deducted from the gross earnings when computing the taxable gross. Check this box if FICA is to be deducted before computing the taxes. If this option is selected, the Annual Limit field appears which allows the user to enter the desired amount.
Tax Tables are Cumulative
This question applies specifically to states which have a non-cumulative table. Most graduated income tax schemes are cumulative in nature, meaning that the tax amount for a particular income range is arrived at by cumulatively adding the amounts for each lesser range and then adding the amount for the portion of the gross wage that falls within the highest range. A few states (New Mexico for example) have a unique situation where the state withholding is a percentage of the Federal withholding tax, but the percentage varies according to the tax amount. However, the percentage for a particular range applies to the full federal tax amount, not to just the amount that falls within the particular range. This is a ‘non-cumulative' table.
Round Withholding to Nearest Dollar (check box)
Check this box to round the withholding tax to the nearest dollar.
This is a list of the tax calculation tables used by this state.
Adding or Changing a State Tax Table
Press the Add button or highlight the desired tax table and press the Change button. A screen similar to the following screen will come into view . If the State is Oklahoma, then this screen will have the Additional Oklahoma Calculation button.

Table Name
Any table may be used for any marital status. There is no significance to the order of the table. Each table may be given a table name. The names assigned here are used as prompts by the ‘Employee Record Entry' program so there should be no confusion in selecting a marital status for any employee.
Standard Deductions
The Standard Deductions available are dependent on the option selected in Standards Deductions on the Tax Tables tab.
Standard Deductions (For Percent of Gross Deductions)
see Standard Deductions (For Percent of Gross Deductions)
Standard Deductions (For Flat Amount Deductions)
see Standard Deductions (For Flat Amount Deductions)
The amount of the First, Second and Each Dependent exemptions may be specified separately. It is common for married persons to be allowed greater amounts for the first two exemptions than for subsequent dependent exemptions.
Standard Deductions (For Flat Amount Deductions)

Annual Amount
Enter the amount to be deducted annually.
Standard Tax Credit
Some states have a tax credit in addition to or in place of the standard deduction. If there is no tax credit, enter zero.
Standard Deductions (For Percent of Gross Deductions)

Additive Adjustment
Some states adjust the gross wage by an amount before taking a percentage to compute the standard deduction. If this is the case, enter the amount (either positive or negative) in this field.
Rate
Enter the percentage value by which the gross wage is to be multiplied when calculating the standard deduction.
Minimum & Maximum Amounts
Enter the values for the minimum and the maximum allowed values for the standard deduction. If there is no maximum, enter all '9's (999999).
Standard Tax Credit
Some states have a tax credit in addition to or in place of the standard deduction. If there is no tax credit, enter zero. Enter the amount that is to be deducted from the withholding tax after it has been calculated.
Press the Tax Calculation table tab and the following screen comes into view.

This is where the main tax table is entered. There are unlimited lines for entering tax information.
Press the Add button and a new line will be Added in the table. Type in the Range Minimum and Withholding Rate.
Highlight the desired record and press the Change button. Type in the Range Minimum and Withholding Rate.
Press the Delete button and the following screen comes into view. Press the Yes button and the highlighted record will be deleted and the previous screen comes into view. If the No button is pressed, the program returns to the previous screen.
Press the Adjustment Tables tab and the following screen comes into view.

Several states require an adjustment to the gross wage based on a table of values in order to compute the taxable gross wage which is then processed according to the main tax table. This is a ‘non-cumulative' table in that the entire gross is multiplied by the percent value or adjusted by the additive value for the range into which it falls. Some states adjust the gross wage by an amount before taking a percentage to compute the standard deduction. If this is the case, enter the amount (either positive or negative) in this field.
Some states (New York in particular) have a tax surcharge. After the withholding tax is calculated according to the main tax tables, the tax amount is multiplied by a percentage (which varies according to the table range) and the result is added to the tax amount. This table is also ‘non-cumulative' in nature
Unemployment & Disability (tab)
Choose the Unemployment & Disability tab and this screen comes into view.

Federal Unemployment Credit
Federal law mandates that employers must pay 6% of an employee’s wages to provide unemployment benefits to employees who are out of work. Traditionally, every state has been able to subtract 5.4 from this percentage, leaving only .6% that must be accrued and sent to the federal government. This 5.4% “Federal Unemployment Credit” is stored in the software and can be entered here.
Recently, many states borrowed money from the federal government to pay unemployment benefits. Most states paid back the money they borrowed. States that were slow to repay the money are referred to as “Credit reduction” states. Employers who pay wages that are subject to the unemployment tax laws of a credit reduction state must pay additional FUTA (federal unemployment) tax.
In order to increase the amount accrued for FUTA, the user must decrease the 5.4% credit entered in this window.
Employer Account
Enter the General Ledger account to which the employer-paid portion of the State Unemployment tax is to be accrued. Click on the lookup button and the General Ledger Accounts screen will come into view. Highlight the desired account and press the Select button.
Employee Account
Enter the General Ledger account to which the employee-paid portion of the Unemployment tax (if any) is to be accrued. Click on the lookup button and the General Ledger Accounts will come into view. Highlight the desired account and press the OK button.
Employer Rate
Enter the Unemployment tax rate paid by the employer. This rate is obtained from the state agency which governs this tax and it may vary with each employer based on their experience rating (determined by the agency).
Employee Rate
Enter the rate of the Unemployment tax paid by the employee (if any).
Employer Wage Limit
Enter the Gross Wage Limit for the employer-paid portion of State Unemployment Insurance. When the employee's gross wage reaches this limit, the employee-paid portion will stop calculating.
Employee Wage Limit
Enter the Gross Wage Limit for the employee-paid portion of State Unemployment Insurance. When the employee's gross wage reaches this limit, the employee-paid portion will stop calculating.
State Disability Insurance (SDI)
The next portion of the screen is reserved for State Disability Insurance deductions.
Account
Enter the General Ledger Liability Account for SDI withheld. Click on the lookup button and the General Ledger Accounts screen will come into view. Highlight the desired account and press the Select button.
Wage Limit
Enter the Gross Wage Limit for SDI calculations.
Rate / Amount
Enter the percentage rate (if the deduction is based on a percent of gross) or the flat amount to be deducted from each employee per pay period.
Worker's Comp & Liability (tabs)
Note: Worker's Comp & General Liability are two separate insurances; however, the two screens are identical in the way they work. The one exceptions is that Worker's Comp has the Update Hourly Worker's Comp button and the General Liability screen does not. Add the word General Liability for Worker's Comp in the following definitions.

Worker's Compensation
Worker's Compensation varies considerably from state to state in the rate and the way it is calculated. Contact the state agency that deals with Worker's Compensation Insurance to obtain the current rates, wage limits and base.
Employer Account
Enter the General Ledger account to which the employer-paid portion of the Worker's Comp. is to be accrued. Click on the lookup button and the General Ledger Accounts screen will come into view. Highlight the desired account and press the Select button.
Employee Account
Enter the General Ledger account to which the employee-paid portion of the Worker's Comp. (if any) is to be accrued. Click on the lookup button and the General Ledger Accounts screen will come into view. Highlight the desired account and press the Select button.
Wage Limit
This limit is the gross wage at which the employer no longer accrues Worker's Compensation. If there is no limit, leave the field at zero.
Limit per Pay Period
Enter a pay period wage limit for all Workers Comp calculations
Calculation Method (check one)
The wage base deals with the wage to which Worker's Compensation applies, not necessarily the employee's gross wage.
Apply Rate to Total Gross Wage (radio button)
In states where the Worker's Comp is calculated as a percentage of the gross wage, choose this option.
Apply Rate to Total Hours X Total Rate (radio button)
In states where all hours apply at the regular rate, choose this option.
Apply Rate to Total Regular Hours X Regular Rate (radio button)
In states where only regular hours apply, choose this option.
Base Worker's Comp On a Regular Amount per hour (radio button)
In states where the rate is based on dollars per hour instead of percent of gross, choose this option.
Additional Hourly Worker's Comp (button)
In some states (Oregon in particular) there is an Additional Hourly Worker's Comp calculation. Choose the Update Additional Hourly Worker's Comp button. The following screen will come into view.

Employer Account
Enter the General Ledger Liability Account number to which the Employer-paid portion of additional hourly worker's Comp. should be posted. Click on the lookup button and the General Ledger Accounts screen will come into view. Highlight the desired account and press the Select button.
Employee Account
Enter the General Ledger Liability Account number to which the Employee-paid portion of additional hourly Worker's Comp. should be posted. Click on the lookup button and the General Ledger Accounts screen will come into view. Highlight the desired account and press the Select button.
Employer Rate
Enter the Employer-paid hourly rate for additional Worker's Comp.
Employee Rate
Enter the Employee-paid hourly rate for additional Worker's Comp.
Increase/Decrease All Rates
Use this button to increase or decrease all rates in the display box by a standard percentage. When the button is pressed, the following window comes into view:

Use this window to indicate whether rates are to be increased or decreased, and to set a percentage. When the Calculate button is pressed, all the rates will be modified and the new rates displayed. Click OK to save the changes or Cancel to close the window without saving the changes.
ID
The Worker's Comp ID Code is displayed.
Employer Rates
Enter the Employer-paid hourly rate for Worker's Comp.
Employee Rates
Enter the Employee-paid hourly rate for Worker's Comp.
Add or Change A Workers Comp or Liability Rate
Using the Worker's Compensation code and rate table or the Liability code and rate table, an employer rate and an employee rate can be assigned to each different craft code. The rates normally vary with the type of labor being performed. For companies who do not break down the time into labor categories, the maximum possible rate will apply to all time. Breaking down time into different labor classes makes it possible to save money. Rather than charging everything at the maximum rate, the time can be calculated at a lower rate for a majority of the time. Note: Worker's Comp & General Liability are two separate insurances; however, the two screens are identical in the way they work.
Press the Add or Change button and one of two the following screens comes into view depending on the button pushed.


Worker's Comp or Liability Code
A Worker's Comp. or Liability Code may be up to eight characters in length. This code is used by the Payroll module to assign the correct worker's compensation or liability craft code to the proper cost code.
Code Description
A description of this code is displayed for the Workers Comp Code or Liability Code chosen in the previous field.
State Code
The name of the state and the word 'Code' will be the title of this field. For example: Alaska Code. This is the number used by the Insurance Company for the Worker's Comp Code or Liability Codes. See W/C Rates by States in the Lookup Table, or Liability Codes for a list of rates.
Employer Rate
Enter the Employer-paid hourly rate for Worker's Comp or Liability. The rates are specified in percentages. For example: a rate of 12.5% would be entered as [12.5] not as [.125].
Employee Rate
Enter the Employee-paid hourly rate for Worker's Comp or Liability. The rates are specified in percentages. For example: a rate of 12.5% would be entered as [12.5] not as [.125]. This field is not available for Liability.
Pay Period Wage Limit (Workers Comp Only)
Enter a pay period wage limit for Workers Comp calculations on just this craft code.
Choose the Local Taxes tab and the following screen comes into view.

Locality ID
The abbreviation of the city or locality. Example: SLC
Locality Name
The name of the city or locality. Example: Salt Lake City
Press the Add or Change button and the following screen comes into view.

Locality ID
Enter the abbreviation of the city or locality. Example: SF
Locality Name
Enter the name of the city or locality. Example: San Francisco
Identification Number
Enter the tax identification number assigned to the company by the city government.
Withholding Account -
Press the lookup button and the General Ledger Accounts screen will come into view. Highlight the desired account and press the Select button.
Tax Tables is Cumulative (check box)
This question applies specifically to localities which have a non-cumulative table. Most graduated income tax schemes are cumulative in nature, meaning that the tax amount for a particular income rage is arrived at by cumulatively adding the amounts for each lesser range and then adding the amount for the portion of the gross wage that falls within the highest range. A few states (New Mexico for example) have a unique situation where the locality withholding is a percentage of the State withholding tax, but the percentage varies according to the tax amount. However, the percentage for a particular range applies to the full federal tax amount, not to just the amount that falls within the particular range. This is a ‘non-cumulative' table
The local tax may be based on the employee's gross earnings, or on a percentage of the state or federal withholding amount. Check the correct box to indicate Gross Wage, State Tax or Federal Tax.
Do not withhold State Taxes (check box)
If State Tax is not to be withheld, check this box.
On Form W-2, report this tax in Box 14 (check box)
If this box is checked, the Year to-Date figure for this tax for the employee will be reported in box 14 on the Form W-2. The description will be the Locality Name field entered above.
This is the table used to calculate the local tax withholding.
Minimum
Enter the value for the Minimum of Range as described in the local tax table documentation.
Rate
Enter the Withholding rate for this range.
Press the Add button and a new line will be added in the table. Type in the Range Minimum and Withholding Rate.
Highlight the desired record and press the Change button. Type in the Range Minimum and Withholding Rate.
Press the Delete button and the following screen comes into view. Press the Yes button and the highlighted record will be deleted and the previous screen comes into view. If the No button is pressed, the program returns to the previous screen.
Note: If any of the above instructions were unclear, please contact a Tax specialist or contact technical support.
Vendor ID
Select the Vendor ID to whom withholdings for this Local Tax should be paid. Press the lookup button to Select the Vendor ID from a list of Vendors.
Batch ID
Select the Batch ID where automatically created Invoices will be placed for transactions involving this Local Tax.
For more information see Setup: Payroll: Miscellaneous: Create AP Invoices Automatically.
Select the Payments tab and the following screen will come into view.

This option allows the user to automatically create an AP invoice for any amounts withheld or deducted from an employee's pay. The created AP Invoice can then be Proof Listed and Posted accordingly. For each withholding or accrual type there will be an associated Vendor ID and Batch ID. If no Vendor ID or an invalid Vendor ID is selected, no Invoice will be created. If an invoice for the selected vendor(s) already exists, the system will follow the instructions on this window to either add a line item for the withholding or accrual to that existing invoice, or create a new invoice.
State Tax Withheld
Enter the Vendor ID to whom State Tax withholdings should be paid. Enter the Batch ID where the AP Invoice should be created.
Workers Comp Withheld/Accrued
Enter the Vendor ID to whom Workers Comp withholdings and accruals should be paid. Enter the Batch ID where the AP Invoice should be created.
General Liability Withheld/Accrued
Enter the Vendor ID to whom General Liability withholdings and accruals should be paid. Enter the Batch ID where the AP Invoice should be created.
Unemployment Withheld/Accrued
Enter the Vendor ID to whom Unemployment withholdings and accruals should be paid. Enter the Batch ID where the AP Invoice should be created.
Disability Insurance Withheld/Accrued
Enter the Vendor ID to whom Disability Insurance withholdings and accruals should be paid. Enter the Batch ID where the AP Invoice should be created.
Union setup is done in two stages. First, the user creates a dictionary of Fringe Benefits. Next, the user creates one or more unions. Within each union, the user sets up one or more Fringe Benefit Rate Tables. These tables are made up of fringes selected from the Fringe Benefit Dictionary, with union-specific rates.
The Fringe Benefit Dictionary stores the fringe benefits that are used in the union table. The Fringe Benefit ID, Description, Account and Paid By are setup in this screen. To set a rate for the fringe benefit, the fringe must be inserted into a union table. See Add a Fringe Benefit for more information.

ID
This is the number of the Fringe Benefit.
Description
A description of the Fringe Benefit is given here. For example: Health & Welfare
Account
A General Ledger Account number should be indicated to accrue the liability for this fringe benefit.
Paid By
Either the employee or the employer may pay this fringe. The Paid By column acts as a default when the union rate table is set up. For example: It does not mean that all health and welfare fringes must be employer-paid tax, if so indicated in the table. It indicates the normal status for this particular fringe.
Add or Change (button)
These buttons are used to Add or modify the Fringe Benefit information. Press the Add button or highlight the desired fringe Benefit and press the Change button. For more information, see Adding or Adding a Fringe Benefit
Press the Delete button and the following screen comes into view. Press the Yes button and the highlighted record will be deleted and the previous screen comes into view. If the No button is pressed, the program returns to the previous screen.
This button closes the program and returns to the Main screen.
Adding or Changing a Fringe Benefit
Press the Add or Change button and the following screen will come into view.

Fringe ID
This is the ID number of the Fringe Benefit
Description
A description of the fringe benefit is given here. For example: Health & Welfare
Account
A General Ledger Account number should be indicated to accrue the liability for this fringe benefit. Press the lookup button and the General Ledger Accounts screen will come into view. Choose the correct account and press the Select button. The program will return back to this screen.
Paid By Employer (radio button)
Either the employee or the employer may pay this fringe. If the employer pays this fringe to the union, it may be taxable or non-taxable to the employee. If the employer pays the fringe directly to the employee in cash, the fringe may or may not be subject to Worker's Comp. Insurance. The paid by column acts as a default when the union rate table is set up. For example: It does not mean that all health and welfare fringes must be employer-paid tax, if so indicated in the table. It indicates the normal status for this particular fringe.
Paid By Employee (radio button)
Either the employee or the employer may pay this fringe. If the employee pays this fringe to the union, it may be taxable or non-taxable to the employee. The paid by column acts as a default when the union rate table is set up. For example: It does not mean that all health and welfare fringes must be employee-paid tax, if so indicated in the table. It indicates the normal status for this particular fringe. If the fringe is employee-paid, it is deducted from the employee's wage.
Paid to the Employee (check box)
This indicates Paid directly to the employee.
Taxable(check box)
This indicates the fringe is subject to state and federal taxes.
Subject to Worker's Comp (check box)
This indicates the fringe is subject to worker's compensation insurance.
Deduction Number
This is the number used by the system for extracting fringe benefit money from the paycheck. Any existing Deduction number may be used.
There are two occasions in which the Deduction number will be used.
1. If this Fringe Benefit is employee paid, the deduction number is used for taking the Fringe Benefit out of their pay. For example: The employee pays $50.00 a pay period for Union Dues.
2. If this is a taxable fringe, the Fringe benefit is added to the gross pay and taxed then deducted from the paycheck using this number. For example: If the employee has $0.10 an hour accrued for Vacation pay, the $0.10 would be added to the employees gross pay and taxed then deducted from the paycheck.
Print Fringe Accrual on Check Stub (check box)
Select this option to include Week to-Date and Year to-Date accruals of this fringe benefit on the employee's paycheck.
Check Stub Abbreviation
If the fringe is to appear on the check stub, enter the abbreviation for the fringe benefit that will be used on the check stub.
The purpose of this function is to enter union contract information into the system. For union contractors, this will be done as the program is setup and whenever union contracts are renegotiated. Unlimited rate tables may be setup. Each rate table may be associated with a different union, or there may be multiple rate tables for a single union. This is used where there are different levels (such as journeyman and apprentice) which are paid different fringe benefit packages. By clicking on the column headings, the unions can be sorted in ID or Description order.
Add or Change (button)
Press the Delete button and the following screen comes into view. Press the Yes button and the highlighted record will be deleted and the previous screen comes into view. If the No button is pressed, the program returns to the previous screen.
This button closes the program and returns to the Main screen.
Help (button)
see How to use help
Press the Add or Change button and the following screen will come into view. Press the OK or Cancel buttons and the Union Setup screen comes in view.

Enter the union number. This union number does not necessarily need to match the rate table number or the union local number for that union, but it is the number which is used by the system for matching purposes. When an employee is hired, an employee record would be entered into the system and assigned a rate table number; however, fringe benefits calculated during payroll would be assigned the union number associated with this rate table, not the rate table number. On the union reports all fringe benefits for the rate table would be listed under the union number found in this field. For example: Assume that a union had two different rate tables, one for apprentice and one for journeyman. Each rate table would be entered using different rate table numbers but the same union number
Type in the name or the abbreviation of the name and the union local number if desired. For example: Carpenters Local 211.
Address 1
Enter the address for the union
Address 2
Enter a second address for the union
City, St, Zip
Enter the City, State and Zip code for the union
Phone
Enter the phone number for the union
Fax
Enter the fax number for the union
Contact
Enter the Union Representative .
The program will automatically assign a Table ID when a table is inserted. This is the Fringe Table number used in Employee Entry and Timesheet Entry to specify which Union Table should be used in Payroll Calculations. The Fringe Tables are entered under the Union Table for ease in keeping track of all the Fringe Benefit tables that apply to each union. One employee may use different Fringe Benefit tables.
For example:
On Monday the employee worked as a plumber which is fringe table number 3 (journeyman plumber) under union table 2 (Plumbers Local 215). On Tuesday the employee worked as a mason which is fringe table number 4 (journeyman mason) under union 1 (Mason & Carpenters Local 312). On Wednesday the employee worked as a carpenter which is fringe table number 2 (journeyman carpenter) under union 1 (Mason & Carpenters Local 312). On Thursday and Friday the employee worked as a welder which is fringe table number 1 (journeyman welder) under union 3 (Welders Local 317).
Table ID
The number of the Table will be listed. This number is user definable.
Description
This is a description of the union table. Multiple rate tables are possible for one union.
The program will automatically assign a Table ID when a table is added. This is the Fringe Table number used in Employee Entry and Timesheet Entry to specify which Union Fringe Table should be used in Payroll Calculations. The Fringe Tables are entered under the Union Table for ease in keeping track of all the Fringe Benefit tables that apply to each union. One employee may use different Fringe Benefit tables.
To Add or Change a Union Table click on the Add button or highlight the desired table and press the Change button. The following screen will come into view.

Press the Add or Change button to create or change a fringe benefit. The following screen comes into view. Now the specific fringe benefit rates and pay types for each of the union classifications may be entered.
Table ID
This is a user defined number.
Description
This is a description of the union table. Multiple rate tables are possible for one union.
ID
This is the number of the Fringe Benefit.
Description
A description of the fringe benefit is given here. For example: Health & Welfare
Account
A General Ledger Account number should be indicated to accrue the liability for this fringe benefit.
Paid By
Either the employee or the employer may pay this fringe. The paid by column acts as a default when the union rate table is set up. For example: It does not mean that all health and welfare fringes must be employer-paid tax, if so indicated in the table. It indicates the normal status for this particular fringe.
Add or Change (button)
see Adding or Adding a Fringe Benefit
Delete (button)
see Delete
Prevailing Wage Rates
If this Union has standardized wages, enter those rates in the following fields. If wage rates are entered, they may be used to automatically override the employees normal wages during timesheet entry.
Regular and Overtime
Enter the regular and overtime rates the employee receives for working for this union.
Add or Change a Fringe Benefit
Press the Add or Change button and the following screen comes into view.

Fringe ID
This is the ID number of the Fringe Benefit
Choose the type of fringe by checking the desired category.
|
Fringe Type |
Example |
|
Hours Worked |
$0.25 per hour worked |
|
Hours Paid |
$0.25 per hour paid |
|
Flat Amount |
$10 per pay period |
|
Percent of Gross |
1.5% of the gross |
|
All Hours Times Percent of Regular Rate |
10% of regular pay rate per hour worked |
Hours Worked (radio button)
The ‘hours' used in calculating the union fringe benefit will be the actual hours worked.
Hours Paid (radio button)
Hours paid implies that the ‘hours' used in calculating the union fringe benefit will be higher than the actual hours worked for overtime earnings. For example: each overtime hour that an employee works while being paid double time will be counted as two hours for Hours Paid type fringes.
Flat Amount (radio button)
A flat amount will be used in calculating the union fringe benefit.
Percent of Gross (radio button)
A Percent of the Gross amount will be used in calculating the union fringe benefit.
All Hours Times Percent of Regular Rate (radio button)
A Percent of the employee's regular hourly pay rate will be used in calculating the union fringe benefit
Paid By Employer (radio button)
Either the employee or the employer may pay this fringe. If the employer pays this fringe to the union, it may be taxable or non-taxable to the employee. If the employer pays the fringe directly to the employee in cash, the fringe may or may not be subject to Worker's Comp. Insurance. The Paid By column acts as a default when the union rate table is set up. For example: It does not mean that all health and welfare fringes must be employer paid tax, if so indicated in the table. It indicates the normal status for this particular fringe.
Paid By Employee (radio button)
Either the employee or the employer may pay this fringe. If the employee pays this fringe to the union, it may be taxable or non-taxable to the employee. The paid by column acts as a default when the union rate table is set up. For example: It does not mean that all health and welfare fringes must be employee paid tax, if so indicated in the table. It indicates the normal status for this particular fringe.
Deduction number
This is the number of the standard deduction.
Regular Hours
Enter the dollar amount for regular hours
Overtime Hours
Enter the dollar amount for overtime hours.
Premium Hours
Enter the dollar amount for premium hours.
Paid to Employee in Cash (check box)
Indicates the fringe is paid directly to the employee
Taxable(check box)
Indicates the fringe is subject to state and federal taxes
Subject to Worker's Comp (check box)
Indicates the fringe is subject to worker's compensation insurance.
Payment of Accrued Liability
Vendor to be Paid
Select the Vendor ID to whom withholdings for the Fringe benefit should be paid. Press the lookup button to Select the Vendor ID from a list of Vendors.
Batch ID
Select the Batch ID where automatically created Invoices will be placed for transactions involving this Fringe Benefit.
For more information see Setup: Payroll: Miscellaneous: Create AP Invoices Automatically.
Global Pay Rate Increase (button)
Click this button to apply a general pay rate increase to multiple employees by fringe benefit table. The following window will appear:

Highlight the desired Union and Fringe Benefit Table in the two list boxes at the top. The names and current pay rates of employees who have the highlighted Fringe Benefit Table assigned as their Default Fringe Table in Employee Entry will be listed in the list box at the bottom. They will all be tagged with a check mark by default. Use the tagging buttons or simply click in the tag column on selected employee rows to tag just the desired employees.
Percent Increase
In this field, enter the desired pay increase percent. Each time the percent is changed, the Proposed New Rates of all the employees in the list box will show what the pay increase will do to their hourly rates.
Apply Pay Increase to Tagged Employees
Click this button to apply the percent pay increase to all the tagged employees.
