![]() General Ledger Transactions
General Ledger Transactions
This menu option allows the entering of Batches of transactions to the Transaction Batch File. Most transactions to the General Ledger will be made through other modules in the system. Occasionally, some transactions are made directly to the General Ledger without going through Payroll, Accounts Receivable or Accounts Payable. Examples of this are month-end or year-end adjustments, backing out voided checks or making other corrections. After selecting Transactions from the General Ledger Menu, the following screen will come into view.

Batch Information
This screen shows a list of all available Batches. For more information, see Batch Management.
Change Dates in Tagged Batches (button)
See Change Dates in Tagged Batches
Proof List Tagged Batches (button)
Post Tagged Batches (button)
Transactions Included in Batch
This screen shows all the unposted transactions that have been entered into the system for the highlighted Batch. Note: If this is a repeating Batch, the transactions will remain after posting. For more information, see Transactions Included in Batch.
This option allows the user create a General Ledger Transaction entry in the form of an instant check. See General Ledger Instant Checks .
This option allows the user to void any transaction that was created and posted using the GL Instant Check feature. The process of selecting and voiding an instant check is the same as the process for Creating Reversing Entries.
Insert or Change (button)
To modify the information for this transaction, press the Insert button or highlight the desired transaction and press the Change button.
This option allows the user to Import or Export outside transactions to and from the General Ledger. See General Ledger Import Transactions.
Insert or Change (button)
To modify the information for this transaction, press the Insert button or highlight the desired transaction and press the Change button. See Insert or Change a Group of Transactions.
Adjust Fiscal Period Balances (button)
This button will display a window showing all GL Accounts with their balance at the end of a user-defined fiscal period.
![]()
Edit Account Balance (button)
The user can create a group of adjusting transactions by editing the balances displayed in this window. Click the Edit Account Balance button and the following window will appear:
![]()
This window displays the ending balance for the selected fiscal period. The user can either enter the Desired Balance or the amount of Adjustment.
Proceed (button)
Once the desired adjustments have been added, clicking the Proceed button will cause the system to create a transaction group to make the desired account balance adjustments.
Press the Delete button and the following screen comes into view. Press the Yes button and the highlighted record will be deleted and the previous screen comes into view. If the No button is pressed, the program returns to the previous screen.

This button closes the program and returns to the main screen.
Help (button)
See How to use help
"This Batch is in Use by another user" message
This message will come into view anytime there is someone in the Batch or the accounting system is shut down improperly.

If this message occurs and there is someone in the Batch, then press the Cancel button.
If this message occurs and there is no one in the Batch, then press the Proceed button and it will override this message and allow access to the Batch.
Change Dates in Tagged Batches
At times it becomes necessary to change the dates of unposted transactions within a Batch. This is usually the case when it is a repeating Batch and the transactions contained in the Batch need to be posted to a new month. The Change Dates in Tagged Batches button effects a global date change on all transactions or selected transactions within the tagged Batch(es). Press the Change Dates in Tagged Batches button and the following screen comes into view.
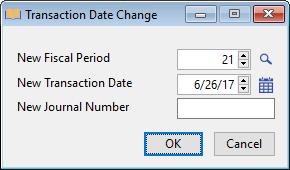
New Fiscal Period
The default fiscal period has been assigned through the Fiscal Periods option on the General Ledger menu. If a period is desired other than the Default Period, enter the fiscal period to which the transactions should be posted or press the down arrow.
New transaction Date
Enter the date or press the lookup button and a Calendar will come into view. Highlight the correct date and press the Select button.
New Journal Number
This journal number will be automatically incremented each time a new transaction is entered in the Transaction program. The journal number may be altered by entering any desired journal number. The system will take this new number as the base and automatically increment from there. The journal number consists of five digits. On the screen it will appear with a three digit extension. This extension is added automatically and cannot be altered. It represents the number of the transaction within a Batch of transactions with the same Journal number.
Press the Post Tagged Batches button and the following screen will come into view.
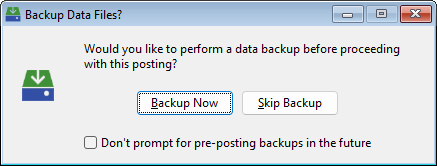
Backup Now
Click Backup Now button and the Utilities Backup/Restore screen will come into view.
Skip Backup
Click the Skip Backup button to skip the backup and continue to the next screen.
Don't prompt for pre-posting backups in the future
Check this box to turn this prompt off for future postings. To turn the prompt on again, see Setup: Preferences.
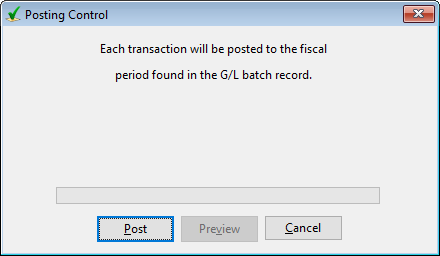
Select the Fiscal Period to which Transactions should be posted or press the lookup button and the Fiscal Period Maintenance screen comes into view. Highlight the desired fiscal period and press the Select button. The program will return to this screen. Then press the Proceed with Posting button.
The system will post the Transactions in the tagged Batches. After the posting process is finished and the General Ledger Summary of General Journal Posting Report has printed, the following screen will come into view.

Finish (button)
Press the Finish button to make the posting permanent.
Undo (button)
Press the Undo button to return all accounting data to the conditions prior to posting.
Transactions included in Batch
All transactions in the highlighted Batch are shown under the heading Transactions Included in Batch. The Insert, Change, and Delete buttons under the same heading are used for entering and deleting a group or groups of transactions.
Insert or Change a Group of Transactions
Press the Insert button or highlight the desired transaction and press the Change button. The following screen comes into view.

This screen shows general information about the group of transactions being entered or edited, as well as a list of all the individual transactions in the group.
Fiscal Period
The fiscal period may be changed for the current transaction group by entering the fiscal period. Press the lookup button and the Fiscal Period Maintenance screen comes into view. Highlight the desired fiscal period and press the Select button.
Date
Enter the date of the transaction or press the lookup button and a Calendar will come into view. Highlight the desired date and press the OK button.
Journal ID (drop-down list box)
The Journal I.D. code is a three character code which identifies the source of the transaction. The system automatically assigns codes for its internally generated transactions: ‘P/R’ for Payroll, ‘A/P’ for Accounts Payable, ‘S/J’ for Sales Journal, ‘C/R’ for Cash Receipts, I/N for Inventory Pick Tickets or Adjustments, E/C for Equipment Costing transactions, or J/C for Job Closing transactions. Transactions entered in this screen are assigned a default code of ‘G/J’ which represents General Journal. If desired, a different I.D. code may be entered. If this is the case, select "User Defined" from the drop-down list box then enter the desired Journal ID in the entry field.
Description
Enter a description of the group of transactions here.
This is an Adjusting Entry (check box)
Check this box if this is a group of Adjusting Entries. General Ledger reports can be limited to just transactions from Adjusting Entries.
Auto Assign a Journal Number during Posting (check box)
If this option is selected, Journal numbers are assigned and incremented automatically by the system. This journal number will be automatically incremented each time a new transaction is entered.
Journal Number
The journal number may be altered by entering any desired journal number. The system will take this new number as the base and automatically increment from there. The journal number consists of five digits.
Notes (button)
The Notes button allows the user to enter Notes for the Group of Transactions. For more information, see Inserting or Changing a Note.
Line
This is the line number for the transaction. The system automatically assigns a number to the Transaction.
Account
The account number for the transaction is listed here.
Subsidiary
This field will list the Job and Cost Code or Equipment ID and Cost Category. If this transaction does not affect a job and cost code or a piece of equipment and a cost category, the system will leave this field blank.
Check #
This field is the number of the check associated with this transaction
Date
This is the date of the transaction.
Description
This is the description of the transaction.
Quantity
This is the quantity of the transaction.
Amount
This is the amount of the transaction.
Press the Reverse Signs button to change all debits to credits and all credits to debits.
Totals
The total Debits and Credits will be displayed beneath the corresponding column. The totals will automatically be updated as values are entered.
Difference
This field is the difference between the total debits and total credits. It will be automatically updated as each credit transaction is entered. A positive figure indicates the sum of the debits is higher and a negative figure indicates that the sum of the credits is higher. This field cannot be directly altered.
Insert or Change a Transaction
Press the Insert or Change button and the following screen comes into view.

Line number
The system will automatically assign a number to the Transaction or enter the desired number.
Press the down arrow and select the desired type. There are four types: General Ledger Account, Job, and Equipment. The type selected will determine the next two fields.
A G/L Account
![]()
B. Job

C. Equipment 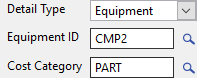
GL Account
Enter the account number or press the lookup button and the General Ledger Accounts screen comes into view. Highlight the desired account and press the Select button.
Job ID
Enter the Job ID number or press the lookup button and the Job Setup screen comes into view. Highlight the desired job and press the Select button.
Cost Code
Enter the Cost Code or press the lookup button and the Budget Cost Code Lookup screen comes into view. Highlight the desired cost code and press the Select button.
IMPORTANT NOTE: If this is a Sales Journal or Cash Receipt transaction, enter a cost code of '0000000000' (ten zeroes). This is the cost code the system will recognize as the 'Job Revenue' cost code. This ten-zero cost code does NOT need to be set up as a job budget in Job Entry.
Equipment ID
Enter the Equipment ID number or press the lookup button and the Equipment File Maintenance screen comes into view. Highlight the desired Equipment ID number and press the Select button.
Cost Category
Enter the cost category or press the lookup button and the Budgeted Cost Code Lookup screen comes into view. Highlight the desired cost category and press the Select button.
This field makes a transaction to a General Ledger account. To charge the transaction to a General Ledger account, enter the five digit account number or press the lookup button. The General Ledger Accounts screen will come into view. Highlight the desired account and press the Select button.
Enter the description of the transaction.
Notes (button)
The Notes button allows the user to enter Notes for the Transaction. For more information, see Inserting or Changing a Note.
Enter up to five digits for the Check number.
Enter the date of the transaction or press the lookup button and a Calendar comes into view. Choose the correct date and press the OK button.
Quantity
This field will be not be available if General Ledger Account was selected for Detail Type. This field shows the quantity used in the job cost code or equipment cost category.
If this transaction is being charged to a Job and Cost Code, and the Cost Type is either “L” or “B,” the screen will allow the user to indicate whether these are Regular, Overtime or Premium time hours.
Enter the amount in this field if the transaction is a Debit.
Enter the amount in this field if the transaction is a Credit.
Clicking this button will move the entered amount from the Debit field to the Credit field or vice versa.
Create Reversing Entries (button)
This button allows the user to create reversing transactions for a posted transaction. Press the Create Reversing Entries button and the following screen will come into view.

Fiscal Period
Select the Fiscal Period when the desired Transaction was posted.
Journal ID
Enter the Journal ID where the Transaction was posted.
Journal #
This is the the Journal ID# of the Transaction
Journal ID
This is the Journal Id of the Transaction.
Date
This is the Date the Transaction was posted.
Line#
This is the line item number for the selected Transaction
Description
This is the Description of the Selected Line Item.
Amount
This is the Amount of the Selected Line Item.
This button allows the user to create a group of two transactions that transfer an amount from one account to another. When the button is pressed, the following window appears:.

Enter the account the money is to be moved from (Credit), the account the money is to be moved to (Debit), and the amount. When the Proceed button is pressed, the system will create the two transactions in the current group.
View Details of Highlighted Transaction (button)
Press the View Details of Highlighted Transaction button and the following screen will come into view.

This screen will display information about the selected Transaction.
Reverse Highlighted Journal (button)
Press the Reverse Highlighted Journal button and reversing entries will be created for all line items of the selected Transaction as in the example below.
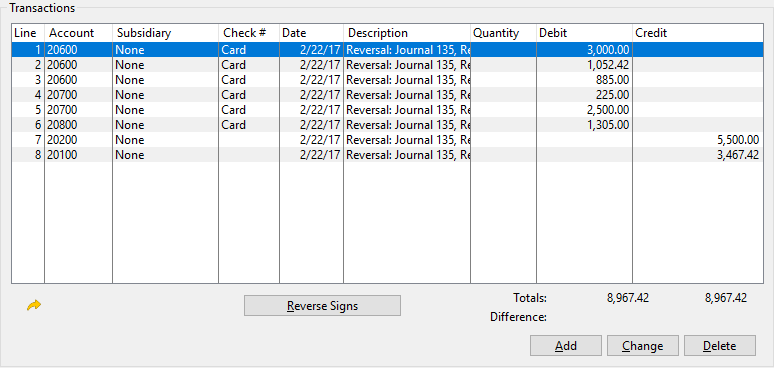
This new Reversing Transactions can be posted to reverse the original posted Transaction.
Report Description - G / L Summary of General Journal Posting Report
Account #
The account number is listed for each transaction.
Period # / Date
The fiscal period number and date of the transaction will be displayed.
Journal ID, #, and Line
Each transaction is distinguished from all others by the combination of a journal ID, a journal number and line number. These are listed here on the report.
Description
The description for each transaction is listed.
Cost Disbursement
If the transaction is posted to a subsidiary account, a job cost code or an equipment cost category, the identifying information is printed. For jobs, the job number, cost code, group and level are listed. For equipment, the equipment ID and cost category are listed. If a job number, cost code, Equipment ID or cost category is invalid, ‘CNTRL’ will be printed instead of an account number. If no assignment was made, "NONE" will be printed.
Hours
The hours applied to this Transaction.
Amount
The transaction amount for each invoice is listed. Debits are listed as positive amounts and credits are listed as negative amounts.
Subtotal
Each transaction is added to the subtotal balance as it is listed. This figure should be zero at the end of each set of balancing transactions. If the final running balance is not zero, check for out of balance transaction(s) and correct the problem by posting correcting transactions.
Record #
The record number is the general ledger transaction number. As transactions are posted, they are appended to the ‘General Ledger Master File’ and assigned the next available record number. This number is then used by the system whenever it refers to this transaction.
Report Sample - G/ L Summary of General Journal Posting Report
