![]() Job Cost Detail Listing
Job Cost Detail Listing
This program scans the Job Cost File and lists the transactions in the Transaction File made to the cost codes for each job. Although this is useful for getting a complete list of all the transactions in the system, usually only a certain portion of this list is desired.
For example: the list may be limited to transactions made to a single job or cost code. By limiting the transactions to those made to a particular cost code found on several jobs, an accurate comparison of a particular cost item between different jobs can be obtained. Transactions may be printed from a selected period or journal number. The system will examine each of the transactions in the file and print only those which fall within all of the set limits. After selecting Job Cost Detail Listing from the Job Cost Report Menu, the following screen comes into view.

Click on any column header to sort the listed items. This will be useful when the list of reports has grown.
Add or Change (button)
To modify the information used in generating the report, press the Add button or highlight the desired report title and press the Change button. For more information, see Add or Change a Job Detail Listing.
Press the Delete button and the following screen comes into view. Press the Yes button and the highlighted record will be deleted. If the No button is pressed, the program returns to the previous screen.

To print a report, press the Print button. For more information, see Printing Reports.
Note: If the message "Nothing to Print"comes into view when the Print button is pressed, there are two main causes:
A. There is no information within the selected limits. Remove all limits, then reinsert them one at a time. If the report still will not print, insert a new report title.
B. No report title is selected. The report title is used to store the selected limits. A report title must be selected in order for the report to print.
There are two possible reports:
|
1. |
|
|
|
|
|
2. |
|
|
|
This button closes the program and returns to the main screen.
Add or Change a Job Cost Detail Listing
To Add or Change a report, press the appropriate button and the following screen will come into view. This screen displays the possible limits that may be set. No limits should be set if a complete listing of every transaction in the Posted Transaction File is desired. Several limits may be set to narrow the list down to a very small range of transactions.

Following is a description of each of the limits. Check the appropriate boxes and enter the desired limits. When all desired limits have been set, press the OK button to save the settings. Press the Cancel button to return to the browse screen without saving the settings.
Report Title
The title of the report. Warning: The title is used to store the selected limits. If no title is entered for the report, the message "Nothing to Print" will come into view when trying to print the report.
User
Enter the User ID of the report creator.
Lock (check box)
If this option is selected, only the User listed in the User field can change or delete this report.
There are two tabs available on this screen.
1. Job-Format-Dates
This tab will automatically be opened. This tab contains the specifications of the report format and limits the report by Jobs and Cost Codes.
2. General Ledger
This tab allows the report to be limited by General Ledger Accounts, Transaction Dates, Fiscal Periods, and Journal Numbers.
This tab will be opened by default. This tab allows the user to specify the report format and limit the report by Job, Cost Codes, Customers, Groups, or Managers.
Use this section to limit the report by Job. Use the Range setting to set a range of Job ID numbers. Use the List setting to specify a list of Jobs to be included.
All, Range, List (radio buttons)
Select the All radio button to ignore Job reporting limits. Select Range to enter a range of Jobs in the From and To fields. Select List to report on a list of selected Jobs.
These fields will be available if the Range radio button is selected.
From
Selects the first job in a range or a single job. Enter the number or press the lookup button and the Job setup screen comes into view.
To
Selects the last job in a range or a single job. Enter the number or press the lookup button and the Job setup screen comes into view. Highlight the desired record and press the Select button.
Edit Job List (button)
If the List radio button is selected, this button will be available. The following screen will come into view when the Edit Job List button is pressed.

Use the arrows to move Jobs from the Available list to the Included list. All Jobs in the Included Records section will be included on the report. Use the tabs to sort each section by Job Number or by Job Name.
Retrieve a Saved List / Save This List for Future Use (buttons)
Use these buttons to save the current list of included records for future use, or to retrieve a previously saved list. See Saved Report Limit Lists for more details.
From and To Cost Codes
Enter the Cost Codes or press the lookup button and the Cost Codes screen comes into view. Highlight the desired Cost Code and press the Select button.
This section allows for the selection of specific Cost Codes for which the report should be printed. The six cost type categories are listed in the next section. Each checked category will be included in the report.
All, Range, List (radio buttons)
Select the All radio button to ignore Cost Code reporting limits. Select Range to enter a range of Cost Codes in the From and To fields. Select List to report on a list of selected Cost Codes.
These fields will be available if the Range radio button is selected.
From
Selects the first cost code in a range of codes or a single code. Enter the number or press the lookup button and the Cost Code screen comes into view. Highlight the desired code and press the Select button.
To
Selects the last cost code in a range of codes or a single code. Enter the number or press the lookup button and the Cost Code screen comes into view. Highlight the desired code and press the Select button.
Edit Cost Codes List (button)
Click the Edit Cost Codes List button to add or remove Customers from the list of Customers to be included in the report. The following screen will come into view.

Available Records
All Available Cost Codes that are not included in the list are displayed in these columns.
Included Records
All Included Cost Codes are listed in these columns. Use the arrows to move selected records or all records between the Available and Included areas
If this box is not checked, all code groups will be printed. This limit allows the report to be printed for a list of groups only. To include selected groups, check this box. The next field will be available. Enter the groups in this field. A list of up to 22 group codes may be entered. Enter the groups separated by commas. For example: Group1, Group2, Group3, Group4. The user can use wildcards to facilitate similar groups. For example: To list all groups that are have GroupA (GroupA1, GroupA2, etc), the user can enter GroupA* or GroupA? in the field. The resulting selection will include or exclude all groups that begin with GroupA.
Include (radio button)
Select this option to enter groups that should be included.
Exclude (radio button)
Select this option to enter groups that should be excluded.
Use these settings to limit the report to jobs with a job date that falls within a specified range of dates.
Job Date Type (pull-down list)
Select the type of date upon which the limit will be based. Select "No Job Date Limit" if no date limit is desired; otherwise, select the type of date to be used for the limit. All the dates listed are accessible through the Job Setup program.
If a date type is selected, the date ranges defined on the next lines are enabled. To limit the jobs to a range of dates, enter the first and last dates of the desired range. To limit jobs to a single date, enter that date in both the From and To fields.
From
Selects the first date in a range of dates or a single date. Enter the date or press the lookup button and a Calendar will come into view. Highlight the correct date and press the OK button.
To
Selects the last date in a range of dates or a single date. Enter the date or press the lookup button and a Calendar will come into view. Highlight the correct date and press the OK button.
This section allows the selection of Customers for which the report should be printed. The name or number of the first and last Customers desired should be entered. If information is desired for only one Customer, that Customer's Name or Number should be entered in the From and To fields.
All, Range, List (radio buttons)
Select the All radio button to ignore Customer reporting limits. Select Range to enter a range of Customers in the From and To fields. Select List to report on a list of selected Customers.
These fields will be available if the Range radio button is selected.
From
Enter the customer number, or press the lookup button and the Customer Entry screen comes into view. Highlight the desired customer and press the Select button. The program will return to the previous screen.
To
Enter the customer number or press the lookup button and the Customer Entry screen comes into view. Highlight the desired customer and press the Select button. The program will return to the previous screen.
Edit Customer List (button)
Click the Edit Customer List button to add or remove Customers from the list of Customers to be included in the report. The following screen will come into view.

Available Records
All Available Customers that are not included in the list are displayed in these columns.
Included Records
All Included Customers are listed in these columns. Use the arrows to move selected records or all records between the Available and Included areas
This section allows the selection of Employees for which the report should be printed. The number of the first and last Employees desired should be entered. If information is desired for only one Employee, that Employee's Number should be entered in the From and To fields.
All, Range, List (radio buttons)
Select the All radio button to ignore Employee reporting limits. Select Range to enter a range of Employees in the From and To fields. Select List to report on a list of selected Employees.
These fields will be available if the Range radio button is selected.
From
Enter the Employee number, or press the lookup button and the Employee Entry screen comes into view. Highlight the desired Employee and press the Select button. The program will return to the previous screen.
To
Enter the Employee number or press the lookup button and the Employee Entry screen comes into view. Highlight the desired Employee and press the Select button. The program will return to the previous screen.
Edit Employee List (button)
Click the Edit Employee List button to add or remove Employees from the list of Employees to be included in the report. The following screen will come into view.

Available Records
All Available Employees that are not included in the list are displayed in these columns.
Included Records
All Included Employees are listed in these columns. Use the arrows to move selected records or all records between the Available and Included areas
This section allows the selection of Vendors for which the report should be printed. The name or number of the first and last Vendors desired should be entered. If information is desired for only one Vendor, that Vendor's Name or Number should be entered in the From and To fields.
All, Range, List (radio buttons)
Select the All radio button to ignore Vendor reporting limits. Select Range to enter a range of Vendors in the From and To fields. Select List to report on a list of selected Vendors.
These fields will be available if the Range radio button is selected.
From
Enter the Vendor number, or press the lookup button and the Vendor Entry screen comes into view. Highlight the desired Vendor and press the Select button. The program will return to the previous screen.
To
Enter the Vendor number or press the lookup button and the Vendor Entry screen comes into view. Highlight the desired Vendor and press the Select button. The program will return to the previous screen.
Edit Vendor List (button)
Click the Edit Vendor List button to add or remove Vendors from the list of Vendors to be included in the report. The following screen will come into view.
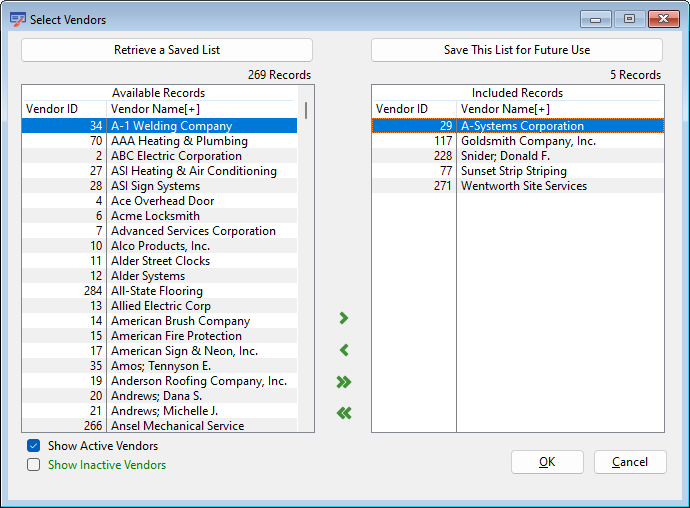
Available Records
All Available Vendors that are not included in the list are displayed in these columns.
Included Records
All Included Vendors are listed in these columns. Use the arrows to move selected records or all records between the Available and Included areas
Project Manager
This option allows the user to limit the report by Project Manager. Press the down arrow button to select from a list of Project Managers.
Superintendent
This option allows the user to limit the report by Superintendent. Press the down arrow button to select from a list of Superintendents.
Include Managers Marked Inactive (checkbox)
If this box is checked, then the pulldown lists for Project Manager and Superintendent will include Inactive employees.
Salesman
This option allows the user to limit the report by Salesman. Press the down arrow button to select from a list of Salesmen.
Foreman
This option allows the user to limit the report by Foreman. Press the down arrow button to select from a list of Foremen.
Estimator
This option allows the user to limit the report by Estimator. Press the down arrow button to select from a list of Estimators.
Category to Include
Select the Job Category of the jobs for which the Detail Report should be printed. This option allows the user to see only jobs of a certain category
Billing Type
Select the Job Billing Type of the jobs for which the Analysis Report should be printed. This option allows the user to see only jobs of a certain billing type.
A single cost code may be broken down into six cost types. These cost types are Labor, Materials, Subcontracts, Equipment, General, and Burden. Choose the desired categories by checking the box(es).
Press the Formatting tab and the following screen comes into view. From this screen additional settings can be specified to include or exclude additional information on the report.

Detail Listing (radio button)
This report will include a listing for every transaction for each cost code.
Detail Listing (Summarize Labor) (radio button)
For all cost types except Labor, this report will include a listing for every transaction for each cost code. For Labor cost types, a summary line will be printed.
Summary Listing (radio button)
This report will include each cost code listed once with a summary for all related transactions.
Detail by Employee (radio button)
This report will show the job cost detail sorted by employee. The employee name will print, followed by all the job cost detail line items that fall within the other report limits.
Summary by Employee (radio button)
This report will show the job cost detail sorted by employee. The employee name will print, followed by a summary of the detail line items that fall within the other report limits.
Daily by Cost Code (radio button)
This report will include a listing for every transaction for each cost code grouped by day.
Job Cost & Billing Detail (radio button)
This report will include a listing of cost detail, separating out costs into Cost Type columns (Labor, Materials, etc.). The report is separated into Base Contract and Change Order sections, with subtotals for each. The next level is the Cost Code level, with subtotals for each Cost Code.
Print Closed Jobs (check box)
Select this option to include closed Jobs on the report.
Print Inactive Jobs (check box)
Select this option to include inactive Jobs on the report.
Print Budget Info (check box)
Select this option to include Job Budget information on the report.
Include Receipts (check box)
This option will include all Cash Receipts on the report.
Include Open Purchase Orders (check box)
Select this box to include Committed Costs from unreconciled Purchase Orders.
Wrap Long Description Lines (check box)
If a detail has a particularly long description line, the system can either print the detail on one line and cut off a part of the description, or it can word wrap the description and show part of it on a second line.
New Page for Each Employee (check box)
Check this box and a new page will be printed for each new employee. This box will only be enabled if the Detail by Employee report format is selected.
Print Totals for Cost Code Sets (check box)
The report will print a subtotal after each cost code set (cost codes with a common cost code number, but different cost types).
Print Billing and Profit Information (check box)
The report will list all Billing and Profit Information.
Print Transaction Amounts (check box)
This option will include Transaction Amounts on the report
Mask Quantities (check box)
If this box is checked, the report will not show quantities unless there is a quantity budget on the cost code. This check box does not apply to cost codes with a Labor cost type. Labor quantities (hours) will always be printed regardless of whether this box is checked.
Print Full Name in Description (check box)
This option will cause each report to print the full name of the Vendor, Customer, or Employee if applicable.
Print Codes w/ No Transactions (check box)
If this option is not checked, all cost codes without qualifying transactions will be skipped on the report.
Readability Bars
Use this checkbox to indicate whether colored readability bars should be included on the report. Click the sample color rectangle and the following will appear:

Select the desired color and click the OK button.
Print Transaction Notes (check box)
Use this checkbox to include GL Transaction Notes on the listing.
Color Coding by Status (check box)
If this box is checked, the Job ID and Job Name of all printed jobs will be color coded according to their status. Active jobs will print in Black, inactive jobs will print in Green, and closed jobs will print in Red.
Separate Overtime and Premium Time (check box)
If this box is checked, transactions that included both regular and overtime portions will be split so that the user can see how much was regular and how much was overtime or premium time.
Hide Quantity Totals (check box)
If this box is checked, totals for hours and other quantities will be masked from the report.
Select the appropriate radio button to indicate how the detail line items are to be sorted on the report.
Portrait (radio button)
Specifies how the report is positioned on the page when printed. Portrait is the standard. Portrait is printed vertically.
Landscape (radio button)
Specifies how the report is positioned on the page when printed. Landscape is printed horizontally.
Costs from Unposted Timesheets (radio buttons)
Indicate whether costs from unposted timesheets should be included in the cost to date figures. If so, indicate whether timesheets in Repeating Batches should be excluded.
Costs from Unposted Invoices (radio buttons)
Indicate whether costs from unposted A/P Invoices should be included in the cost to date figures. If so, indicate whether invoices in Repeating Batches should be excluded.
Press the General Ledger tab and the following screen comes into view. From this screen the limits for the General Ledger may be specified.

If more than one General Ledger Control Account is used to represent Job Costs, the listing may be limited to transactions belonging to a specified General Ledger Account. Enter that account in the From and To fields. If the Select Accounts box is unchecked, all accounts will be included. To limit General Ledger Accounts to those from a particular account, enter the account number in the From and To fields.
Select Accounts (check box)
Activates the ranges which are defined on the next lines.
From
Selects the first account number in a range of accounts or a single account. Enter the account number or press the lookup button and the General Ledger Account screen comes into view. Highlight the desired record and press the Select button.
To
Selects the last account number in a range of accounts or a single account. Enter the account number or press the lookup button and the General Ledger Account screen comes into view. Highlight the desired record and press the Select button.
If the Select Dates box is unchecked, all transactions will be selected for printing. Transactions may be listed for a single date or for a range of dates. If transactions are desired for a certain date, enter that date in both the From and To fields. To limit transactions to those from a particular period, enter the first and last dates of that period.
Select Dates (check box)
If this box is selected, it activates the ranges which are defined on the next lines.
From
Selects the first date in a range of dates or a single date. Enter the date or press the lookup button and a Calendar will come into view. Highlight the desired date and press the OK button.
To
Selects the last date in a range of dates or a single date. Enter the date or press the lookup button and a Calendar will come into view. Highlight the desired date and press the OK button.
Limit by Transaction Date (radio button)
Check this box to limit transactions by transaction date.
Limit by Posting Date (radio button)
Check this box to limit transactions by posting date.
If the Select Periods box is unchecked, all Fiscal periods will be selected. Transactions from one fiscal period or a range of periods may be printed. If transactions from only one fiscal period are desired, enter the number of that period in the From and To Fields.
Select Periods (check box)
Activates the ranges which are defined on the next lines.
From
Selects the first fiscal period in a range of periods or a single fiscal period. Enter the fiscal period or press the lookup button. Highlight the desired fiscal period and press the OK button.
To
Selects the last fiscal period in a range of periods or a single fiscal period. Enter the fiscal period or press the lookup button. Highlight the desired fiscal period and press the OK button.
This allows transactions to be limited to a particular journal number or range of journal numbers. The first and last journal numbers desired should be entered in the From and To fields. To limit transactions to a single journal number, enter the that journal number in the From and To fields. To print all journal numbers, leave the Select Journal Numbers box unchecked.
Select Journal Numbers (check box)
Activates the ranges which are defined on the next lines.
From
Enter the first journal number in a range of journal numbers or a single journal number.
To
Enter the last journal number in a range of journal numbers or a single journal number.
Types (check box)
One or more three character Journal Types may be selected. These can be any of the system generated codes such as ‘P/R,’ ‘A/P,’ ‘S/J’ or codes that have been assigned to transactions entered manually. The default is to select all Journal types.
Omit Voided Transactions (check box)
If this box is checked, the listing will not print any transactions that have been voided.
Print for Department (select box)
This field is only available if Departmentalize was selected in Accounting Options Setup. Click the arrow to open the field and select the desired Department.
Click this button to save the current settings and print the report immediately, without having to return to the Report Title browse window.
Report Description - Job Cost Detail Listing
The Job Cost Detail Listing is a listing of the transactions associated with cost codes on a job. The information contained in the report depends on the limits set.
Heading
The report heading includes the title of the report, the company name, the date and the time.
Job Code and Description
The Job code number and description.
Cost Code Description /Number
The cost code description and number are listed here.
Control Account
This is the General Ledger account number for this job and/or cost code.
Reference Number
This is the journal reference number.
Date
This is the date the transaction was posted.
Fiscal Period
This shows the fiscal period to which the transaction was posted.
Journal ID
This is the journal ID number.
Transaction Description
This field is the description recorded with the transaction in the General Ledger. For subcontracts, it is the subcontractor. For payroll transactions, it is the employee or other descriptions depending on the transaction type.
Quantity
The number of units.
Units
These are the units. For example: hours
Transaction Amount
The transaction amount is listed to the right of the units.
$/units
This is the cost code total divided by the quantity of units. For example: Quantity = 439.40 and 40 hours were worked. The $/unit = $10.99/hour
Cost Code total
The transactions are subtotaled for each job cost code, type and group. The subtotal is on the right of the last transaction associated with the subtotal group.
Job Cost Total
The total of the transactions listed for each cost code is found at the bottom of the report in the far right column.
The following totals are based on all job data.
Total Billing
This is the amount of the total billings for this job.
Total Cost
This is the total amount of costs incurred for this job.
Gross Profit
This is the gross profit on the job. Gross profit is the total billings minus the total cost.
Gross Profit as a percent of Total Billing
This field shows the percentage of gross profit.
Report Description - Job Cost Summary Listing
The summary report is similar to the Detail listing. If a summary report was requested, transaction data will be replaced with the description, "***Transaction Summary." The quantity and transaction amount will be listed for each cost code. The units for the cost codes are not listed. The other aspects of the report are the same.
Report Description - Job Cost & Billing Detail
This report prints lines of detail, but on each line the cost is printed in the appropriate column (Labor, Material, Subcontract, Equipment, General, Burden, or Billings). Costs are subtotaled by cost code, then by base contract. An additional section is included if any costs have been charged to Change Orders.
Report Sample - Job Cost Detail Listing

Report Sample - Job Cost Summary Listing

Report Sample - Job Cost & Billing Detail
