![]() Accounts Receivable: Customer Listings
Accounts Receivable: Customer Listings
Five types of customer lists are available. An alphabetical listing, an address listing, a numerical customer listing, a customer detail listing and mailing labels.
The following screen comes into view when Customer Lists is chosen from the Account Receivable Report menu.

Click on any column header to sort the listed items. This will be useful when the list of reports has grown.
Add or Change (button)
To modify the information used in generating the report, press the Add button, or highlight the desired report title and press the Change button. For more information, see Add or Change a Customer Listing.
Press the Delete button and the following screen comes into view. Press the Yes button and the highlighted report will be deleted. If the No button is pressed, the program returns to the previous screen.

To print a report, press the Print button. For more information, see Printing Reports.
Note: If the message "Nothing to Print" comes into view when the Print button is pressed, there are two main causes:
A. There is no information within the selected limits. Remove all limits, then reinsert the limits one at a time. If the report still will not print, insert a new report title.
B. No report title is selected. The report title is used to store the selected limits. A report title must be selected in order for the report to print.
Five different report are possible.
|
1. |
|
|
|
|
|
2. |
|
|
|
|
|
3. |
|
|
|
|
|
4. |
|
|
|
|
|
5. |
|
|
|
This button closes the program and returns to the main screen.
Help (button)
see How to use help
Add or Change a Customer Listing
To Add or Change a report, press the appropriate button and the following screen will come into view. This screen displays the possible limits that may be set. No limits should be set if a complete listing of every customer is desired. Several limits may be set to narrow the list down to a very small range of customers.
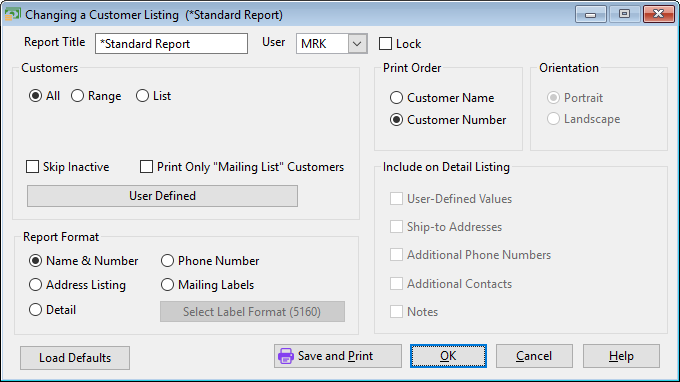
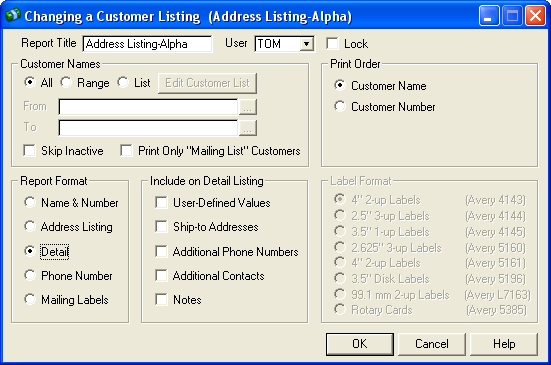

The following is a description of each of the limits. Check the appropriate boxes and enter the desired limits. When all desired limits have been set, press the OK button to save the settings. Press the Cancel button to return to the browse screen without saving the settings.
Report Title
The title of the report. Warning: The title is used to store the selected limits. If no title is entered for the report, the message "Nothing to Print" will come into view when trying to print the report.
User
Enter the User ID of the report creator.
Lock (check box)
If this option is selected, only the User listed in the User field can change or delete this report.
Use this section to limit the report by customer. Use the Range setting to set a range of customer numbers. Use the List setting to specify a list of customers to be included.
All, Range, List (radio buttons)
Select the All radio button to ignore Customer reporting limits. Select Range to enter a range of Customers in the From and To fields. Select List to report on a list of selected Customers.
These fields will be available if the Range radio button is selected.
From
Enter the customer number (or name). Press the lookup button and the Customer Entry screen comes into view. Highlight the desired customer and press the Select button.
To
Enter the customer number (or name). Press the lookup button and the Customer Entry screen comes into view. Highlight the desired customer and press the Select button.
Edit Customer List (button)
Click the Edit Customer List button to add or remove Customers from the list of Customers to be included in the report. The following screen will come into view.

Retrieve a Saved List / Save This List for Future Use (buttons)
Use these buttons to save the current list of included records for future use, or to retrieve a previously saved list. See Saved Report Limit Lists for more details.
Available Records
All Available Customers that are not included in the list are displayed in these columns.
Included Records
All Included Customers are listed in these columns. Use the arrows to move selected records or all records between the Available and Included areas
Skip Inactive Customers
Indicate whether inactive customers should be included or excluded from the listing.
Print Only "Mailing List" Customers
Check this box to include only Customers who were selected for inclusion in the "Mailing List". For more information, Adding or Changing a Customer -> Miscellaneous -> Settings.
Name & Number (radio button)
This report contains the name and number of the customer.
Address Listing (radio button)
This report contains the name, address, zip code and telephone number of each customer. The customers are listed in alphabetical order. The customer number is listed next to the customer name.
Detail (radio button)
This report is a listing of each customer and their information found in the Customer File. The listing is printed in alphabetical order. All items pertaining to this customer may be included on the listing. This information includes customer name, number, address, phone, type, payment terms, discount terms and rate, sales tax rate, last payment, current balance and notes.
Phone Number (radio button)
This report contains the phone number of the customer.
Mailing Labels (radio button)
This option will print the Customer's name and address information plus a user-defined message on paper or label stock.
Click this button to select which label format will be used for printing the customer labels. The following window will appear:

Highlight any label format to see a representive sample of the labels in the pane on the right. Once the desired label format is highlighted, click the Select button.
Choose one of the following two options.
Customer Name (radio button)
This option prints all customers listed in alphabetical order.
Customer number (radio button)
This option prints all customers by their ID number, in numerical order.
Portrait (radio button)
Specifies how the report is positioned on the page when printed. Portrait is the standard. Portrait is printed vertically.
Landscape (radio button)
Specifies how the report is positioned on the page when printed. Landscape is printed horizontally.
Include on Detail Listing
If the Detail format is selected, use these boxes to specify which details will be included on the report.
User-Defined Values (check box)
Check this box to include customer user-defined values on the report.
Ship-To Addresses (check box)
Check this box to include customer ship-to addresses on the report.
Additional Phone Numbers (check box)
TCheck this box to include additional customer phone numbers on the report.
Additional Contacts (check box)
Check this box to include additional customer contacts on the report.
Notes (check box)
Check this box to include customer notes on the report.
Click this button to save the current settings and print the report immediately, without having to return to the Report Title browse window.
Report Description - Numeric Customer List
The Numeric Customer List shows all customers, listed in numerical order. The number assigned to the customer is called the customer number, and is used when entering information concerning that customer into the system. On this list, there are four columns of information for each customer.
Customer Number
As described above, the number shown to the left of the customer name is that customer’s number.
Name
The name of the customer will appear here.
Contact
The name of the contact person will appear in this column.
Phone
The phone number(s) of the customer will be listed.
Fax
The fax number will be listed.
Report Description - Alphabetic Customer List
This list is identical to the Numeric Vendor List except that the listing is in alphabetical order.
Report Description - Customer Address Listing
This report contains the name, address, zip code and telephone number of each customer. They are listed in alphabetical order. The customer number is listed next to the customer name.
Report Description - Detailed Customer List
This report is a listing of each customer and information found in the Customer File. The listing is printed in alphabetical order.
All items pertaining to this customer are included on the listing, including customer number, name and address, payment terms,discount terms and rates, sales tax rate, last payment, current balances and notes.
Report Description - Customer Labels
The customer name and address information will be printed on plain paper or label stock. The labels will be printed in alphabetical order if the By Customer Name radio button is selected under Print Order. The labels will be printed in numerical order by customer number if the customer number radio button is selected under Print Order.
Report Sample - Numeric Customer List

Report Sample - Alphabetic Customer List

Report Sample - Customer Address Listing

Report Sample- Detailed Customer List

Report Sample- Customer Labels
