![]() General Ledger Loans
General Ledger Loans
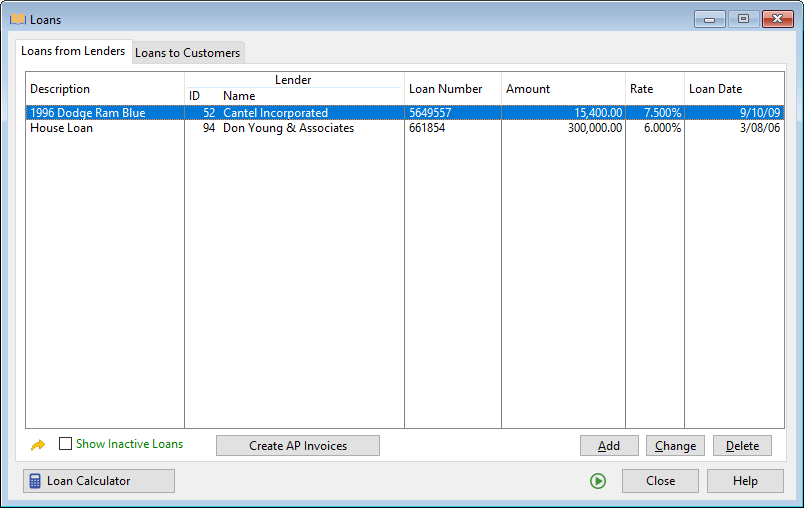
This module allows the user to create and track loans from lenders (banks, lending institutions, vendors, etc.) or loans to borrowers (customers, etc.). Loan payment schedules can be created and accompanying Account Payable or Accounts Receivable Invoices can be created for monthly payments. Select Loans from the General Ledger menu and the following screen comes into view.

The two tabs separate the types of loans tracked by this module: Loans from Lenders and Loans to Customers.
Loans from Lenders (tab)
Select this tab to view all Loans from Lenders. This displays the Loan Description, Lender Number and Name, Loan Number, Loan Amount, Interest Rate, and Loan Start Date.
Sorting
Click on the header of any of the columns to sort the list.
Create AP Invoices (button)
Add (button)
See Adding or Changing a Loan.
Change (button)
See Adding or Changing a Loan.
Delete (button)
Press the Delete button to delete the highlighted record. The following screen will come into view.
.png)
Loan Calculator (button)
Press this button to bring up a stand-alone Loan Calculator. The functions of the loan calculator are defined below.
Close (button)
Press the Close button to return to the main screen.
Help (button)
See How to Use Help.
Adding or Changing a Loan from a Lender
Clicking Add to add a Loan or clicking Change to modify an existing Loan will bring the following screen into view.

This tab allows the user to enter information about the loan.
Loan Description
Enter a brief description to help identify this loan.
The Loan Calculator allows the user to enter loan values that will be used to calculate the Loan Amount or the Monthly Payment.
Loan Amount
Enter the Loan Amount in this field or use the Calc button to calculate the Loan Amount from the supplied values.
Interest Rate
Enter the Interest Rate percentage in this field.
Term In Months
Enter the duration of the loan in months.
Monthly Payment
Enter the Monthly Payment amount or use the Calc button to calculate the Monthly Payment amount from the supplied values.
Loan Origination Date
Enter the date that the loan was originated.
First Payment Due Date
Enter the date when the first loan payment is due. This will be used when calculating a repayment schedule.
Loan Account
Enter the Account number from which Loan Payments will be made. Press the lookup button to select the desired account from the General Ledger Accounts screen.
Interest Expense
Enter the Account number from which Interest Expenses will be paid. Press the lookup button to select the desired account from the General Ledger Accounts screen.
Lender
Enter the number of the Vendor who is supplying this loan. Press the lookup button to select the Lender from the Accounts Payable Vendor screen.
Loan Number
Enter a Number to identify this Loan.
AP Batch
Enter the number of an Accounts Payable invoice batch. Loan payments created automatically by this program will be placed in the specified batch.
Active (check box)
Check this box if the loan is active. If this box is unchecked, the system will not automatically create Accounts Payable Invoices for loan payments.
This tab allows the user to create and update Payment Schedules for the loan. Press the Payment Schedule tab and the following screen will come into view.

Actual Payments (radio button)
Select this option to view Actual Payments made towards the loan
Original Payment Schedule (radio button)
Select this option to view the Original Payment amounts .
#
This column displays the payment number.
Date
This column displays the payment date.
Principal
This column displays the amount of principal paid with the payment.
Interest
This column displays the amount of interest paid with the payment.
Payment
This column displays the total payment amount.
Balance
This column displays the remaining Loan Balance.
Actual Totals
The total Principal, Interest, and Payments for Actual Payments will be displayed here.
Original Totals
The total Principal, Interest, and Payments for Original Payments will be displayed here.
Create Payment Schedule (button)
Press the Create Payment Schedule button to create payment entries for each month of the loan. The Monthly Payment amount from the Loan Information tab will be used for each entry and the Principal and Interest amounts will be calculated.
Print Payment Schedule (button)
Press the Print Payment Schedule button to print the Payment Schedule

Change (button)
Select a Payment and press the Change button. The following message will come into view.

Highlighted (button)
Press the Highlighted button to make changes only to the selected payment.
All (button)
Press the All button to apply changes to all payments.
Cancel (button)
Press the Cancel button to return to the Payment Schedule screen without making any changes.

Paid (check box)
Check this box to mark the payment(s) as paid.
Additional Principal
Enter the amount of Additional Principal to be added to the payment(s).
Total Payment
Enter the amount of Total Payment and the Additional Principal amount will automatically be adjusted to match the new total.
Press the Attachments tabs and the following screen comes into view. This tab allows the user to attach outside files to the invoice. For example: a scanned copy of a letter received regarding the Invoice a can be attached.

Description
The Caption that is specified when the Attachment is added will be displayed here.
Type
The file type will be displayed in this column.
Preview
Depending on the Attachment type, a preview image may be displayed to the right of the Attachment table.
Add or Change (button)
Press the Add or Change button and the following screen will come into view.

Caption
Enter a descriptive Caption that will be used to identify the Attachment.
Retrieve an Image (button)
Press the Retrieve an Image button to browse for the desired file. Many file types are supported by this function including Document, Image, Spreadsheet, and PDF file formats.
Set Defaults (button)
Press the Set Defaults button and the following screen will come into view. This screen allows the user to define default settings when attaching files to an item in JobView.
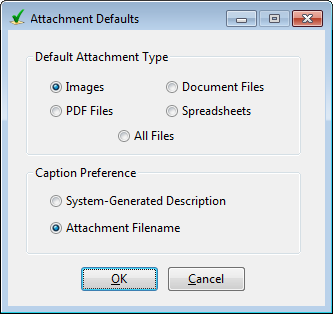
Default Attachment Type
Select the file type to display by default when selecting an attachment. Select All Files to remove any file type filter.
Option 2
Select the description to be displayed for selected attachments.
Delete (button)
Press the Delete button to remove the highlighted attachment from the Invoice. The following screen will come into view.

Press the Yes button to delete the Attachment.
The Notes tab allows the user to enter notes for the selected Fixed Asset. For more information, see Adding or Changing Notes. When the Notes tab is selected, the following screen comes into view.

Select this tab to view all Loans to Customers.
Sorting
Click on the header of any of the columns to sort the list.
Create AR Billings (button)
Add (button)
See Adding or Changing a Loan.
Change (button)
See Adding or Changing a Loan.
Delete (button)
Press the Delete button to delete the highlighted record. The following screen will come into view.
Close (button)
Press the Close button to return to the main screen.
Help (button)
See How to Use Help.
Adding or Changing a Loan to a Customer
Clicking Add to add a Loan or clicking Change to modify an existing Loan will bring the following screen into view. This screen allows the user to enter loan information and create payment schedules.

This tab allows the user to enter information about the loan.
Loan Description
Enter a brief description to help identify this loan.
Loan Calculator
The Loan Calculator allows the user to enter loan values that will be used to calculate the Loan Amount or the Monthly Payment.
Loan Amount
Enter the Loan Amount in this field or use the Calc button to calculate the Loan Amount from the supplied values.
Interest Rate
Enter the Interest Rate percentage in this field.
Term In Months
Enter the duration of the loan in months.
Monthly Payment
Enter the Monthly Payment amount or use the Calc button to calculate the Monthly Payment amount from the supplied values.
Loan Origination Date
Enter the date that the loan was originated.
First Payment Due Date
Enter the date when the first loan payment is due. This will be used when calculating a repayment schedule.
Loan Account
Enter the Account number from which Loan Payments will be made. Press the lookup button to select the desired account from the General Ledger Accounts screen.
Interest Expense
Enter the Account number from which Interest Expenses will be paid. Press the lookup button to select the desired account from the General Ledger Accounts screen.
Lender
Enter the number of the Vendor who is supplying this loan. Press the lookup button to select the Lender from the Accounts Payable Vendor screen.
Loan Number
Enter a Number to identify this Loan.
This tab allows the user to create and update Payment Schedules for the loan. Press the Payment Schedule tab and the following screen will come into view.

Actual Payments (radio button)
Select this option to view Actual Payments made towards the loan
Original Payment Schedule (radio button)
Select this option to view the Original Payment amounts .
#
This column displays the payment number.
Date
This column displays the payment date.
Principal
This column displays the amount of principal paid with the payment.
Interest
This column displays the amount of interest paid with the payment.
Payment
This column displays the total payment amount.
Balance
This column displays the remaining Loan Balance.
Actual Totals
The total Principal, Interest, and Payments for Actual Payments will be displayed here.
Original Totals
The total Principal, Interest, and Payments for Original Payments will be displayed here.
Create Payment Schedule (button)
Press the Create Payment Schedule button to create payment entries for each month of the loan. The Monthly Payment amount from the Loan Information tab will be used for each entry and the Principal and Interest amounts will be calculated.
Print Payment Schedule (button)
Press the Print Payment Schedule button to print the Payment Schedule
Change (button)
Select a Payment and press the Change button. The following message will come into view.
Highlighted (button)
Press the Highlighted button to make changes only to the selected payment.
All (button)
Press the All button to apply changes to all payments.
Cancel (button)
Press the Cancel button to return to the Payment Schedule screen without making any changes.
Paid (check box)
Check this box to mark the payment(s) as paid.
Additional Principal
Enter the amount of Additional Principal to be added to the payment(s).
Total Payment
Enter the amount of Total Payment and the Additional Principal amount will automatically be adjusted to match the new total.
Press the Create AP Invoices or Create AR Billings button and the following screen will come into view. This option is used to add invoices to a repeating batch for posting.
View AP Invoices screen View AR Billings screen


Change Principal Amount (button) AP Invoice screen only
Press the Change Principal Amount button and the following screen will come into view.

Additional Principal
Enter the amount of Additional Principal to be added to the payment(s).
Total Payment
Enter the amount of Total Payment and the Additional Principal amount will automatically be adjusted to match the new total.
Fiscal Period
Select the Fiscal Period to be used for creating the Invoices or press the lookup button and select the desired Fiscal Period from the Fiscal Period screen.
AP/AR Invoice Batch
Enter the Batch Number to which the Invoices/Billings will be added or press the lookup button and select the Batch Number from the list of available batches.
Date
Enter the date which will be used in the Invoices or press the lookup button to choose the date from the Calendar.
Automatically Number Invoices (check box) AR Invoice screen only
Check this box so that invoices created by the program will be auto-numbered using the next available AR Invoice number.
Proceed (button)
Clicking this button will start the process of creating payment invoices for the displayed loans. The following will be displayed:

If the first option is selected, invoices will be created for all loans that have a payment within the selected month. If the second option is selected, the user can specify a payment date. Only loans with a payment date of this day of the month will be processed and have an invoice created.
Once invoices have been created, go to the Invoices menu item from either the Accounts Receivable or Accounts Payable menu to view and process the new invoices.