![]() Item Master Listing
Item Master Listing
This report is used to list information on each of the items in Inventory. It is accessed through Inventory Reports

Click on any column header to sort the listed items. This will be useful when the list of reports has grown.
Insert or Change (button)
To modify the information used in generating the report, press the Change button. To add new information, press the Insert button. For more information, see Insert or Change an Item Master Listing.
Press the Delete button and the following screen comes into view. Press the Yes button, and the highlighted record will be deleted and the previous screen comes into view. If the No button is pressed, the program returns to the previous screen.

To print a report, press the Print button. For more information, see Printing Reports
Note: If the message "Nothing to Print" comes into view when the Print button is pressed, there are two main causes:
1. There is no information within the selected limits. Remove all limits. Then, one at a time, reinsert the limits. If the report still will not print, insert a new report title.
2. No report title is selected. The report title is used to store the selected limits. A report title must be selected in order for the report to print.
Insert or Change an Item Master Listing Report
To Insert or Change an Item Master Listing Report, press the appropriate button and the following screen will come into view. This screen displays the possible limits that may be set. No limits should be set if a complete listing is desired.

Report Title
The title of the report. Warning: The title is used to store the selected limits. If no title is entered for the report, the message "Nothing to Print" will come into view when trying to print the report.
User
Enter the User ID of the report creator.
Lock (check box)
If this option is selected, only the User listed in the User field can change or delete this report.
To print all Items, do not check the Select Items box.
Select Items (check box)
Activates the ranges defined on the next lines. This option may be used to limit the items to specific items or a single item. To limit the report to a single item, enter that item in both the From and To fields.
From
Selects the first item in a range of items or a single item. Enter the item. If the lookup button is pressed, the Browse the Item File screen comes into view. Highlight the desired item and press the Select button.
To
Selects the last item in a range of items or a single item. Enter the item. If the lookup button is pressed, the Browse the Item File screen comes into view. Highlight the desired item and press the Select button.
To print all Items, do not check the Select Categories box.
Select Categories (check box)
Activates the ranges defined on the next lines. This option may be used to limit the report to specific Categories or a single Category. To limit the report to a single Category, enter that Category in both the From and To fields.
From
Selects the first Category in a range of Categories or a single Category. Enter the Category or select it from the drop-down list.
To
Selects the last Category in a range of Categories or a single Category. Enter the Category or select it from the drop-down list.
Portrait (radio button)
Specifies how the report is positioned on the page when printed. Portrait is the standard. Portrait is printed vertically.
Landscape (radio button)
Specifies how the report is positioned on the page when printed. Landscape is printed horizontally
Detail Listing (radio button)
This option will produce a report with many columns of information about each included item.
ID & Description (radio button)
This option will produce a report with just the Item ID and Description of each included item.
Supplier Pricing (radio button)
This option will produce a report with just the Item ID and Description and top priority Vendor Pricing for each included item.
Item Image (check box)
Check this box to have the item photograph print on the report.
Height in Inches
Use this entry box to indicate the desired size of the printed item photograph.
Supplier Information (check box)
Check this box to have the report include information about which vendors this item can be purchased from.
Show Only Top Priority Vendor (check box)
If vendor information is being included on the report, there may be more than one supplier listed for a given item. Check this box and just the highest priority supplier will be listed.
Omit Items with No Quantity on Hand (check box)
Check this box and the report will leave out any items for which there is currently no quantity on hand.
This section allows the selection of Vendors for which the report should be printed. The number of the first and last Vendors desired should be entered. If information is desired for only one Vendor, that Vendor's Number should be entered in the From and To fields.
All, Range, List (radio buttons)
Select the All radio button to ignore Vendor reporting limits. Select Range to enter a range of Vendors in the From and To fields. Select List to report on a list of selected Vendors.
These fields will be available if the Range radio button is selected.
From
Enter the vendor number. Press the lookup button and the Vendors screen comes into view. Highlight the desired vendor and press the Select button.
To
Enter the vendor number. Press the lookup button and the Vendors screen comes into view. Highlight the desired vendor and press the Select button.
Edit Vendor List
Click the Edit Employee List button to add or remove Vendors from the list of Vendors to be included in the report. The following screen will come into view.
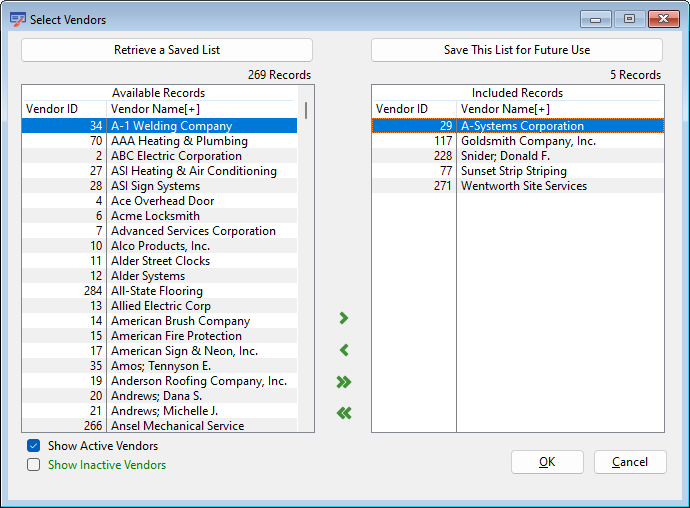
Available Records
All Available Vendors that are not included in the list are displayed in these columns.
Included Records
All Included Vendors are listed in these columns. Use the arrows to move selected records or all records between the Available and Included areas.
Click this button to save the current settings and print the report immediately, without having to return to the Report Title browse window.
Report Description - Inventory Item Master Listing
This report provides a brief summary of the quantities and costs of the selected items.
Item ID
This is the unique item identification number.
Description
This is the user-supplied description of the item.
Units of Measure
This is the label for the unit of measure for this item. This is the unit which is used for selling or picking the item from inventory.
GL Account
This is the number of the GL Account that stores the value of this inventory item.
Quantity On Hand
This is the number of units currently contained in inventory.
Quantity On Order
This is the number of units currently on order according to unreconciled Purchase Orders.
Minimum Reorder Point
When the quantity on hand reaches this value, the system will remind the operator to reorder the item.
Latest Cost
This is the cost per unit of the most recent item purchase.
Average Cost
This is the average cost per unit of all the item quantities currently in stock.
Report Sample - Inventory Item Master Listing
