![]() Payroll Handchecks
Payroll Handchecks
The Handchecks option allows the following functions to be performed:
(1) Enter hand-written payroll check information
(2) Edit entered checks
(3) Print a listing of entered checks
There are a few main differences between entering payroll data as timesheets and entering data as hand-written checks. For handchecks, deduction amounts are not calculated, but are manually entered. The cash account will be credited when payroll is posted. Only the quarter-to-date and year-to-date fields in the employee’s record are updated with the handcheck amounts. No paycheck will be generated for amounts posted from handchecks. All accrual and union amounts will still be calculated and recorded in the same way that they would be handled for timesheets.
Handchecks may be entered and posted separately from timesheet information or they may be posted along with a Batch of timesheets. As with any posting, it is a good practice to run a Proof Listing of handchecks. Examine all entries for correctness before actually posting the data. Any errors may easily be corrected by editing the handcheck in question through this program.
Select the Handchecks option from the Payroll Main Menu and the following screen comes into view.
Entries Included in Highlighted Batch
The radio buttons are for sorting the information by Emp. Number, Emp. Name, or Check Number. The name and number of the Employee, the Check no. and the check type are listed in the following columns. If the type of the highlighted item is a Timesheet, the entry will be grayed out.
Press the Add button and the Changing a Handcheck screen will come into view.
Highlight the desired record and press the Change button. Handchecks may be changed through highlighting the desired check and pressing the Change button. The Changing a Handcheck screen will come into view.
Press the Delete button and the following screen comes into view. Press the Yes button and the highlighted record will be deleted and the previous screen comes into view. If the No button is pressed, the program returns to the previous screen.

This button closes the program and returns to the main screen.
Press the Change button or the Handwritten Check button and the following screen comes into view.
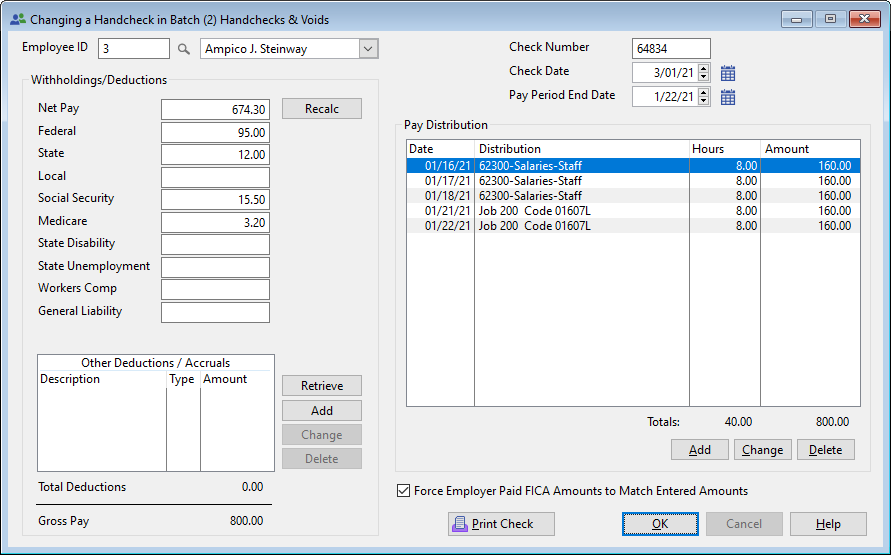
Employee ID
Enter the number of the employee to whom the check was issued or press the lookup button and the Employees screen comes into view. Highlight the desired employee and press the Select button.
Check Number
Enter the number of the hand-written check.
Check Date
Enter the date of the check or press the lookup button and a Calendar will come into view. Highlight the desired date and press the OK button.
Pay Period Ending Date
Enter the Pay Period Ending Date or press the lookup button and a Calendar will come into view. Highlight the desired date and press the OK button.
Net Pay
Enter the net amount of the check.
Press this button to have the system calculate the Nte Pay based on the Distribution Total at the bottom right and all the deductions on the left.
Federal Tax, State Tax, Local Tax
Enter the amounts of the federal, state, and local withholding taxes of the paycheck.
Social Security and Medicare
Enter the amount of the Social Security and Medicare deductions for the paycheck.
Deductions 1-12
The actual names of each deduction are specified through Payroll Setup, consequently, the company's screen will undoubtedly appear somewhat different from the examples shown in this document.
Retrieve (button)
Click the Retrieve button to pull all of the Selected Employee's Standard Deductions and enter them in the list. Press the Retrieve button and the following message will come into view.

Press the Yes button to continue and the No button to cancel the action.
Press the Add or Change button and the following screen comes into view.

Deduction
Enter the deduction type or use the down arrow to select from the list.
Amount
Enter an amount to be deducted from this paycheck for this deduction.
Total
The sum of all deductions.
The sum of the net amount of the check plus all deductions will be displayed in the Gross Pay Field. Verify that this is the correct gross amount of the check
Pay Distribution
After the basic check information has been entered, the cursor moves to the Pay Distributions portion of the screen to allow the accounting distribution of the check to be specified. It is unlikely that this information will be available on the check. The check will most likely be coded based on timesheet information. The amount paid to this employee and the Job Codes to which it is charged will be listed in these columns. For more information, see Pay Distribution.
Force Employer Paid FICA amounts Match Entered Amounts
The sum of the net amount of the check plus all deductions will be displayed in the Gross Pay Field. Verify that this is the correct gross amount of the check.
By pressing this button, the user can immediately print the check for this handcheck entry. The following screen will come into view.

Press the Yes button to generate the check. The following screen will come into view.

Select the number of copies to print or whether the system should generate an Alignment check. The system will immediately show the paper swap reminder, allowing the user to place blank check stock in the printer. The check will then be printed and once again the paper swap reminder will display, allowing the user to remove the check stock and replace it with blank paper.
After the basic check information has been entered, the cursor moves to the Pay Distributions portion of the screen to allow the accounting distribution of the check to be specified. It is unlikely that this information will be available on the check. The check will most likely be coded based on timesheet information. The amount paid to this employee and the Job Codes to which it is charged will be listed in these columns.
Press the Add button or highlight the desired timesheet and press the Change button. The screen that comes into view is similar to the Changing a Daily Timesheet , except there is a Non-Taxable Pay check box. If this entry is non taxable, check this box.

